

Adding a Tag to an MRS Cluster/Node
As the number of MRS clusters and nodes grows, administrators need an effective way to classify, identify, and manage them. For example, you can group clusters by department, project, or usage, or identify nodes by role to quickly search for resources and track costs. Adding tags to clusters and nodes helps meet this requirement. As resource identifiers, tags make it easy to classify, manage, search, and locate clusters and nodes.
A tag consists of a tag key and a tag value. Table 1 provides tag key and value requirements.
| Parameter | Requirement | Example |
|---|---|---|
| Key | Specifies the tag key, which uniquely identifies the tag. A tag key cannot be left blank. A tag key must be unique in a cluster. A tag key can contain a maximum of 128 characters. A tag value cannot contain special characters (=*<>\,|/) or start or end with spaces. | Organization |
| Value | Specifies the tag value. Together with the tag key, it uniquely identifies a resource. A tag value can contain a maximum of 255 characters. A tag value cannot contain special characters (=*<>\,|/) or start or end with spaces. This parameter can be left blank. | Apache |
Tags are used to identify clusters/nodes. Adding tags to clusters/nodes can help you identify and manage your resources.
- Cluster tag: Identifies an entire MRS cluster. You can add tags when creating a cluster or on the cluster details page after creation. You can add up to 20 tags to a cluster. Updating a cluster tag synchronizes it to all nodes in the cluster.
- Node tag: Identifies a node within a cluster. You can use default tags to add tags to MRS cluster nodes when configuring auto-scaling policies. Node tags count toward your total tag quota. You can view node tags on the Nodes tab of the MRS console.
- Default tags: When the default tag feature is enabled, the system automatically generates default cluster and node tags. These tags are synchronized to the corresponding ECSs or EVS disks.
To view node tags, access the Nodes tab on the MRS console, and hover over the tag icon of a node in the node list.
Notes and Constraints
- A cluster supports up to 20 tags. When a node in the cluster reaches the maximum number of tags, no additional tags can be added to the cluster.
- When the default tag is enabled, a default tag is added to the cluster and each node, consuming two quotas. By default, a maximum of 20 tags can be added. In this case, up to 18 additional tags can still be added.
- Tag updates in MRS are automatically synchronized to ECSs or EVS disks within the cluster. However, changes made directly on the ECS or EVS console will not be reflected in MRS. To ensure tag consistency, do not modify MRS cluster tags on the ECS or EVS console.
- If your organization has configured tag policies for MRS, add tags to clusters or nodes according to those policies. If a tag violates the tag policies, cluster or node creation may fail. Contact your organization administrator to learn more about tag policies.
Adding Tags to a Cluster
- Adding cluster tags during cluster creation
- Log in to the MRS console.
- Click Buy Cluster. The page for buying a cluster is displayed.
- Click the Custom Config tab.
- Configure the cluster software and hardware by referring to Buying a Custom MRS Cluster.
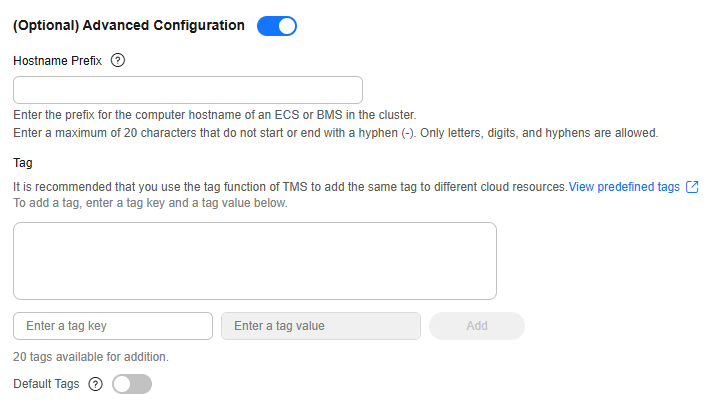
- Enable Advanced Configuration and enter the key and value of the tag to be added. Figure 1 Adding a tag to a cluster
- Adding tags to an existing cluster
- Log in to the MRS console.
- On the Active Clusters page, select a running target cluster and click its name to go to the cluster details page.
- Click the Tags tab.
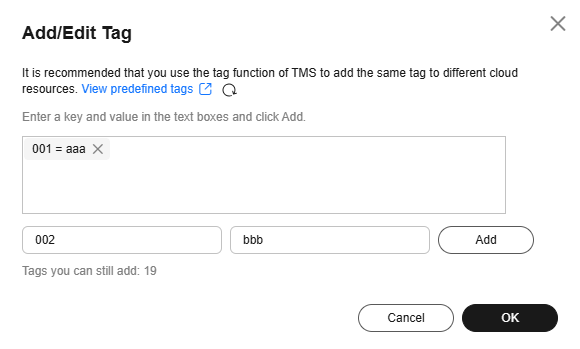
- Click Add/Edit Tag. If this is your first time adding a tag, click Add Tag. In the displayed dialog box, enter the key and value of a tag, and click Add. Figure 2 Adding/Editing a Tag
You can also add a tag to a cluster by enabling the default tag. This adds a default tag to the cluster and each node, consuming two tag quotas.
- Click OK.
Verification:
On the tag management page, check whether the newly added tag appears in the list. If the tag is listed, it has been added successfully.
Adding Tags to a Node
- Adding a default tag to a cluster automatically applies the tag to each node within the cluster. For details, see Adding tags to an existing cluster.
- Adding node tags for auto scaling
If you add a tag when configuring an auto scaling policy, MRS automatically adds the tag to the new nodes and synchronizes the tag to the ECSs and EVS disks.
- Log in to the MRS console.
- On the Active Clusters page, select a running target cluster and click its name to go to the cluster details page.
- On the page that is displayed, click the Auto Scaling tab.
- Click Edit on the right of an existing auto scaling policy. In the displayed dialog box, enter the key and value of the tag you want to add, and click Add.
- Click OK.
When adding node tags through auto scaling, keep the following in mind:
- You need to enable the auto scaling policy and configure scale-out rules. Otherwise, the node tags will not take effect.
- If tag quotas are insufficient, delete the cluster tag or modify an existing tag in the auto scaling policy, and then enable the policy.
- You cannot add tags to auto scaling policies of resource pools.
Verification:
On the node management page, hover over the tag icon for the target node to check whether it includes the tag configured in the auto scaling policy. If the tag is included, it has been added successfully.
Searching for Target Clusters by Tags
- Log in to the MRS console.
- In the upper right corner of the Active Clusters page, click Search by Tag to access the search page.
- Enter the tag of the cluster to be searched.
You can select a tag key or tag value from their drop-down lists. When the tag key or tag value is exactly matched, the system can automatically locate the target cluster. If you enter multiple tags, their intersections are used to search for the cluster.
- Click Search.
The system searches for the target cluster by tag key or value.
Managing Tags
- Log in to the MRS console.
- On the Active Clusters page, click the name of a cluster for which you want to manage tags.
The cluster details page is displayed.
- Click the Tags tab and view, add, and delete tags on the tab page.
- View
On the Tags tab page, you can view details about tags of the cluster, including the number of tags and the key and value of each tag.
- Add
Click Add/Edit Tag. If this is your first time adding a tag, click Add Tag. In the displayed dialog box, enter the key and value of a tag, and click OK.
- Delete
Locate the row that contains the tag you want to delete and click Delete in the Operation column. In the displayed Delete Tag dialog box, enter DELETE, and click Yes.
- View
FAQs
- What should I do if my tag quota is full?
You can add up to 20 tags to each cluster and node. Enabling default tags consumes two tag quotas. When you reach this limit, you cannot add any more tags.
Delete unused cluster tags to free up your tag quota, then add new tags. If you reach your quota limit when adding tags through an auto scaling policy, modify existing policy tags or delete unused cluster tags before adding new ones.
- Why are tag changes on ECS or EVS not synchronized to MRS?
MRS tag synchronization is one-way. Tags modified on the MRS console automatically synchronize to associated ECSs and EVS disks. However, tag changes made on the ECS or EVS console are not synchronized back to MRS clusters.
Modify tags on the Tags page of the MRS console. Once modified, tags automatically synchronize to ECSs and EVS disks to maintain tag consistency. Do not modify MRS cluster tags directly on the ECS or EVS console.
- Why are auto-scaling tags not taking effect?
Node tags configured in auto scaling policies take effect only after you enable the policy and configure scale-out rules. If the policy is disabled or lacks scale-out rules, tags will not be applied to nodes. Additionally, you cannot add tags to auto scaling policies for resource pools.
Ensure that the auto scaling policy is enabled and scale-out rules are configured. If you are using auto scaling policies for resource pools, switch to node auto scaling policies to add tags.
Helpful Links
- For details on purchasing an MRS cluster with custom configurations, see Buying a Custom MRS Cluster.
- For more information about Tag Management Service (TMS), see the Tag Management Service Documentation.
What is your overall rating for this page?
Thank you very much for your feedback. We will continue working to improve the documentation.See the reply and handling status in My Cloud VOC.
For any further questions, feel free to contact us through the chatbot.
Chatbot


