Adding a Node
Scenarios
This topic describes how to install the component controller (isap-agent) and how to edit node information.

The recommended installation path is /opt/cloud. This section also uses this path as an example. You can use other installation paths. Make sure to change the path when you refer to the example here. For example, if the installation path is /tmp, change the installation path in this section to /tmp.
Preparations
- Checking the disk space
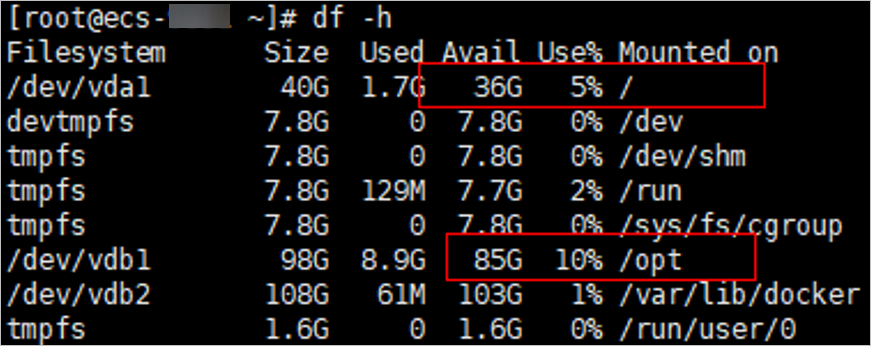
Check the disk space in the /opt directory of the ECS where you will install the component controller and make sure the space is not smaller than 100 GB.
- Remotely log in to the ECS where you want to install the component controller.
- Run the df -h command to check whether more than 100 GB space is reserved in the /opt directory of the disk. At least 2 vCPUs and 4 GB of memory are required.
Figure 1 Checking disks

If the memory is insufficient, stop some applications with high memory usage or expand the memory capacity before the installation.
To ensure that the /opt directory has more than 100 GB free disk space allocated, you can use the disk partitioning script to allocate the disk. For details, see Partitioning a Disk.
Creating a Node
- After you finish Preparations, log in to the management console.
- Click
 in the upper part of the page and choose Security > SecMaster.
 - In the navigation pane on the left, choose Workspaces > Management. In the workspace list, click the name of the target workspace.
- In the navigation pane on the left, choose .
- On the Nodes tab, click Create. The Create Node page is displayed on the right.
- On the Create Node page, configure a channel.
- In the Network Channel Settings area, select the VPC and subnet the target ECS belongs to.
- In the network channel list, click Config in the Operation column of each channel. In the displayed confirmation dialog box, click Confirm.
- Click Next in the lower right corner of the page to go to the Script Installation Verification page.
- Select the ECS OS, follow the step, and click
 to copy the command for installing the component controller.
 - Install the component controller. You can install the component controller in either of the following ways: ECS agency (recommended) or IAM account and password.
Method 1: Using an ECS agency to install the component controller
- Create an isap-agent agency and grant permissions to the agency on IAM.
- Log in to the IAM console as an administrator and choose Agencies in the navigation pane on the left.
- On the Agencies page, click Create Agency in the upper right corner. On the displayed page, configure the following parameters:
- Agency Name: Enter isap-agent.
- Agency Type: Select Cloud service.
- Cloud Service: Select Elastic Cloud Server (ECS) and Bare Metal Server (BMS) from the drop-down list.
- Validity Period: Select Unlimited.
- Description: Provide a description if needed.
- Click Done. In the displayed dialog box, click Authorize.
- On the displayed page, click Create Policy in the upper right corner. On the displayed page, configure the following parameters:
- Policy Name: isap-agent-strategy is recommended.
- Policy View: Select JSON.
- Policy Content. Copy and paste the following content into the box to replace the existing content:
{ "Version": "1.1", "Statement": [ { "Effect": "Allow", "Action": [ "secmaster:workspace:get", "secmaster:node:create", "secmaster:node:monitor", "secmaster:node:taskQueueDetail" , "secmaster:node:updateTaskNodeStatus" ] } ] } - Description: You are advised to enter a brief description for action authorization for the isap-agent agency.
- Click Next in the lower right corner of the page. In the displayed dialog box, click OK.
- On the policy list page, select the created policy isap-agent-strategy, click Next, set the minimum authorization scope (All resources), and click OK in the lower right corner of the page.
- The Authorization successful message is displayed. Click Finish below. The isap-agent agency has been created and authorized.
- Configure the ECS agency.
- Log in to the ECS console, choose Elastic Cloud Server in the navigation pane on the left, find the ECS used to install the component controller (isap-agent), and click the ECS name to go to the details page.
- On the Summary tab of the ECS details page, click
 next to Agency, select the isap-agent agency created in 9.a, and click
  . Complete the ECS agency.
- Remotely log in to the ECS where you want to install the component controller.
- You can log in to the ECS management console and click Remote Login in the ECS list.
- If your server has an EIP bound, you can also use a remote management tool, such as Xftp, SecureFX, WinSCP, or PuTTY, to log in to the server and install the component controller on the server as user root.
- Run the command copied in 8 as user root to install the controller on the ECS.
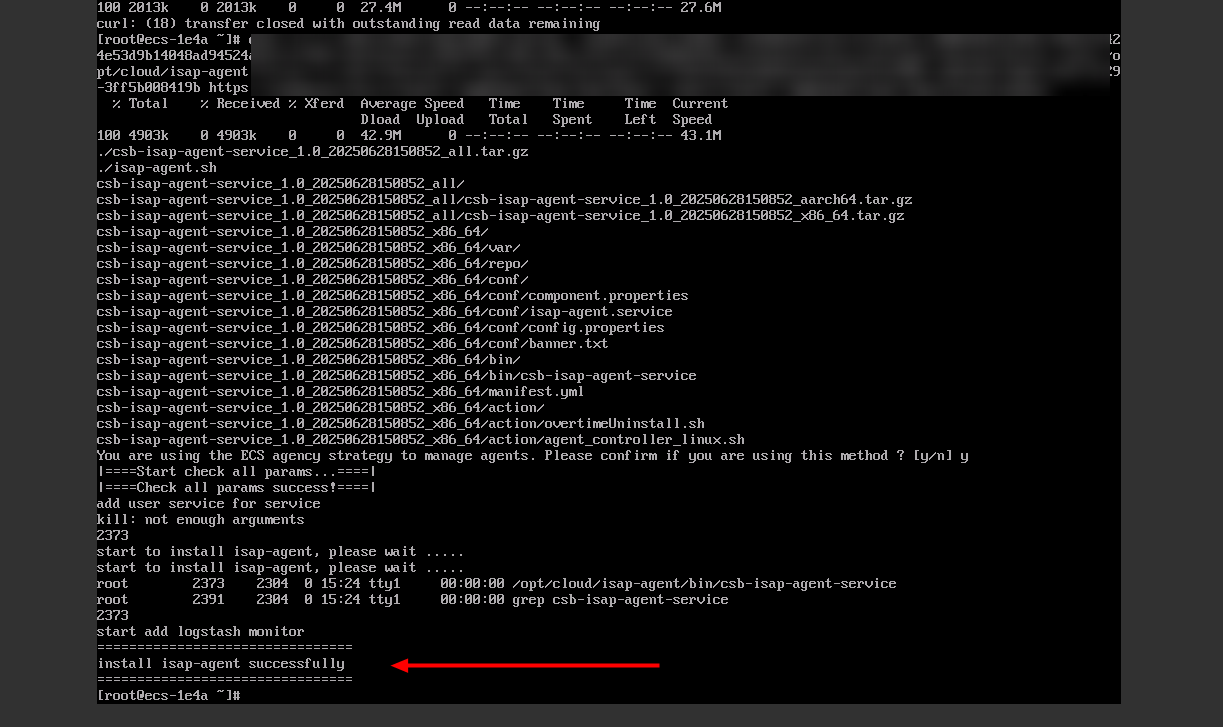
- If you want to use the ECS agency, enter y as prompted.
Figure 2 Installing the agent using an ECS agency

- If install isap-agent successfully is displayed, the component controller has been installed.
Figure 3 Installed

If the installation fails, rectify the fault by referring to Why Did the Component Controller Fail to Be Installed?. If the system displays a message indicating that the memory is insufficient, rectify the fault by referring to Partitioning a Disk.
Method 2: Using an IAM account and password to install the component controller- Remotely log in to the ECS where you want to install the component controller.
- You can log in to the ECS management console and click Remote Login in the ECS list.
- If your server has an EIP bound, you can also use a remote management tool, such as Xftp, SecureFX, WinSCP, or PuTTY, to log in to the server and install the component controller on the server as user root.
- Run the command copied in 8 as user root to install the controller on the ECS.
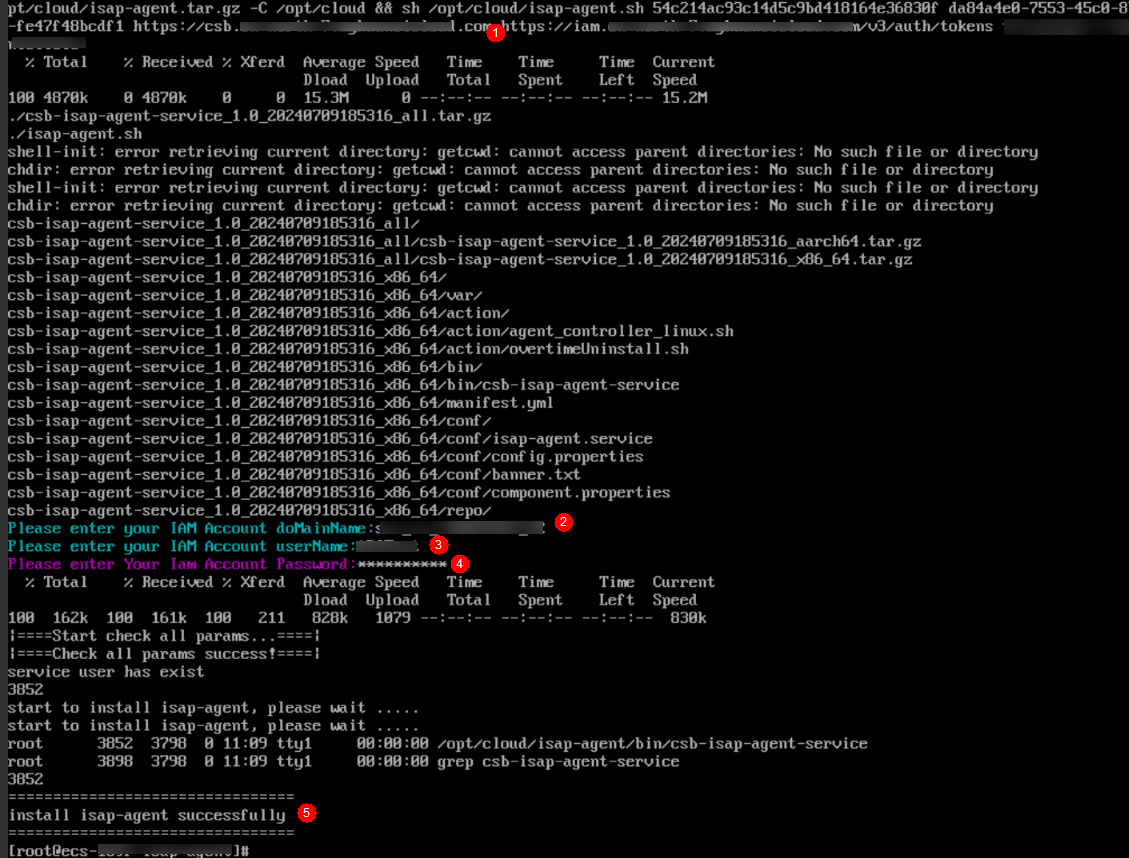
- Enter the IAM username and password as prompted.
- If install isap-agent successfully is displayed, the component controller is installed.
Figure 4 Installed

If the installation fails, rectify the fault by referring to Why Did the Component Controller Fail to Be Installed?. If the system displays a message indicating that the memory is insufficient, rectify the fault by referring to Partitioning a Disk.
- Create an isap-agent agency and grant permissions to the agency on IAM.
- After confirming that installation has been completed, return to the page for adding nodes and click Confirm in the lower right corner of the page.
You can view new nodes on the Nodes tab.
Editing a Node
After a node is added, you can only modify the supplementary information about the node.
- Log in to the management console.
- Click
 in the upper part of the page and choose Security > SecMaster.
 - In the navigation pane on the left, choose Workspaces > Management. In the workspace list, click the name of the target workspace.
- In the navigation pane on the left, choose .
- On the Nodes tab, locate the row that contains the target node and click Edit in the Operation column.
- On the Edit Node panel, edit the node information.
Table 1 Parameters of node information Parameter
Description
Data Center
User-defined data center name
Network Plane
Select the network plane of the node.
Tag
Set the tag for the node.
Description
Description of a user-defined node.
Maintained By
Select a node owner.
- Click Confirm.
Related Operations
You can also view node information or deregister a node. For details, see Managing Nodes and Components.
Feedback
Was this page helpful?
Provide feedbackThank you very much for your feedback. We will continue working to improve the documentation.See the reply and handling status in My Cloud VOC.
For any further questions, feel free to contact us through the chatbot.
Chatbot


