Help Center/
Scalable File Service/
Best Practices/
Using OBS+SFS Turbo for Storage Acceleration in AI Scenarios/
Implementation Procedure/
Basic Configurations/
Configuring Network Passthrough Between ModelArts and SFS Turbo
Updated on 2025-10-16 GMT+08:00
Configuring Network Passthrough Between ModelArts and SFS Turbo
Creating an Agency to Authorize ModelArts to Use SFS Turbo
- Log in to the IAM console as the IAM administrator.
- In the navigation pane on the left, choose Permissions > Policies/Roles.
- Configure a custom policy for calling SFS Turbo APIs.
- Click Create Custom Policy in the upper right corner.
- Enter a policy name as required, for example, enter Authorize ModelArts to operate SFS Turbo-1.
- Select Visual editor or JSON for Policy View. If you select Visual Editor, go to 3.d. If you select JSON, go to 3.e.
- Set the policy content.
- Select Allow.
- Select Scalable File Service.
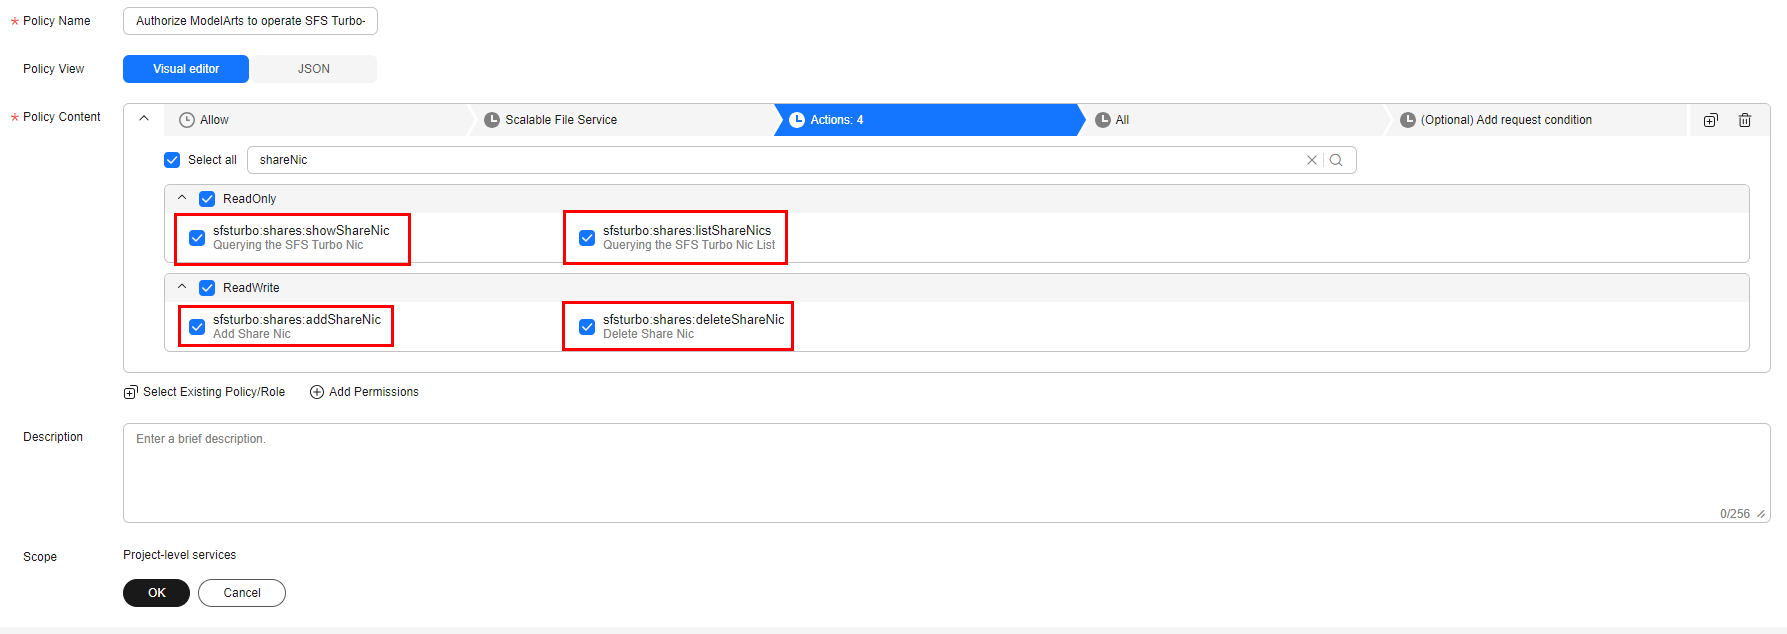
- Select Actions. Select sfsturbo:shares:showShareNic and sfsturbo:shares:listShareNics under ReadOnly, and select sfsturbo:shares:addShareNic and sfsturbo:shares:deleteShareNic under ReadWrite.
- Select All for Resources.
Figure 1 Creating an agency to authorize ModelArts to use SFS Turbo
- In the Policy Content area, enter the following content:
{ "Version": "1.1", "Statement": [ { "Effect": "Allow", "Action": [ "sfsturbo:shares:addShareNic", "sfsturbo:shares:listShareNics", "sfsturbo:shares:deleteShareNic", "sfsturbo:shares:showShareNic" ] } ] } - Click OK.
- Configure a custom policy for calling VPC APIs.
- Click Create Custom Policy in the upper right corner.
- Enter a policy name as required, for example, enter Authorize ModelArts to operate SFS Turbo-2.
- Select Visual editor or JSON for Policy View. If you select Visual Editor, go to 4.d. If you select JSON, go to 4.e.
- Set the policy content.
- Select Allow.
- Select Virtual Private Cloud.
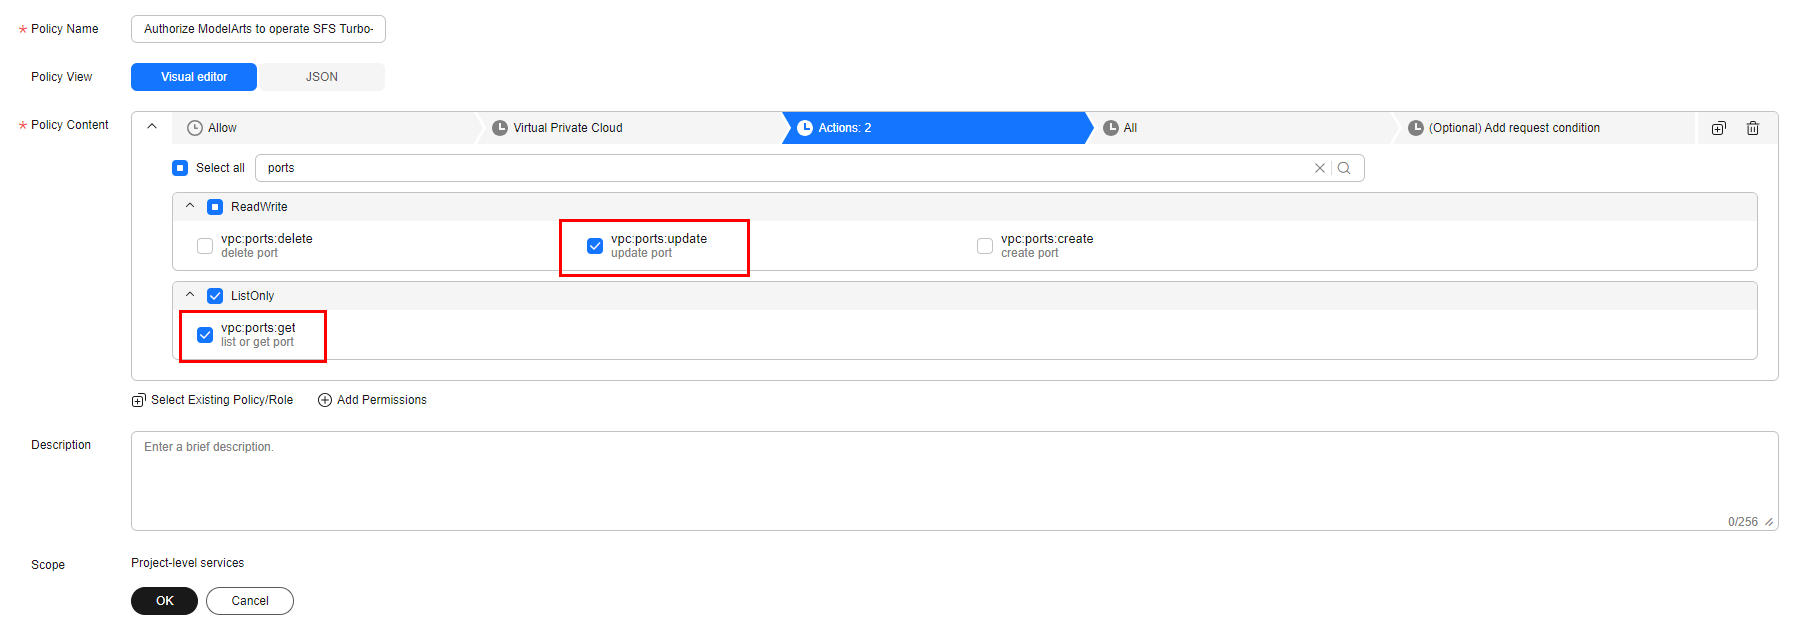
- Select Actions. Select vpc:ports:update under ReadWrite, and select vpc:ports:get under ListOnly.
- Select All for Resources.
Figure 2 Creating an agency to authorize ModelArts to use VPC
- In the Policy Content area, enter the following content:
{ "Version": "1.1", "Statement": [ { "Effect": "Allow", "Action": [ "vpc:ports:update", "vpc:ports:get" ] } ] } - Click OK.
- On the IAM console, choose Agencies in the left navigation pane and click Create Agency in the upper right corner.
- On the Create Agency page, enter an agency name, for example, modelarts_agency.
- Select Cloud service for Agency Type and ModelArts for Cloud Service. Set Validity Period as required and click Next.
- Select the custom policy created from steps 1 to 4, grant permissions to the agency, and click Next.
- Select All resources for Scope.
- Click OK.
Associating the ModelArts Network with SFS Turbo
After associating the ModelArts network with SFS Turbo, you can directly mount the SFS Turbo file system to the notebook development and training environment on ModelArts and access data in the file system.
- Log in to the ModelArts console, create a network and connect it to the VPC and subnet created in Creating Resources. For details, see Configuring the Standard Dedicated Resource Pool to Access the Internet.
- Locate the resource pool network created in 1, click More, and choose Associate with SFS Turbo.
- On the displayed page, select the SFS Turbo HPC file system created in Creating Resources.
- Click OK.

- Do not disassociate the ModelArts resource pool from the SFS Turbo file system. Or, the ModelArts resource pool cannot access data in the SFS Turbo file system.
- An SFS Turbo file system can only be associated with one network.
Parent topic: Basic Configurations
Feedback
Was this page helpful?
Provide feedbackThank you very much for your feedback. We will continue working to improve the documentation.See the reply and handling status in My Cloud VOC.
The system is busy. Please try again later.
For any further questions, feel free to contact us through the chatbot.
Chatbot


