
Migration Operations
Configuration Migration
You can use the Nacos export function to export the configuration file, and then use the CSE Nacos import function to import the configuration file.
- Export the configuration file of the self-built Nacos by choosing Export > Export selected configs on its configuration management page.
- Import the configuration file obtained in 1 to the CSE Nacos engine by referring to Importing Configurations.
Application Migration
- Add the registry center cluster information.
- Access the Nacos Sync service by referring to 3.f.
- In the navigation pane on the left, choose Cluster Configuration to add a self-built Nacos cluster. If multiple namespaces are used, add them for multiple times.

- The namespace is the ID of the namespace where the self-built application to be migrated is located. The user password is the default administrator password. If the password has not been changed using the authentication function, the default password is nacos. The cluster IP address is the IP address and port number of the Nacos you deployed.
- The cluster name can be customized but cannot be changed once being confirmed. Otherwise, tasks added based on the cluster will not be restored after Nacos Sync is restarted.
- Add a CSE Nacos cluster by referring to 1.b. If multiple namespaces are used, add them for multiple times.
The namespace is the ID of the namespace to be migrated to CSE Nacos. The user password is the default administrator password. If the password has not been changed using the authentication function, the default password is nacos. The cluster IP address is the private IP address and port number of CSE Nacos. For details about how to obtain the IP address, see Viewing Nacos Engine Information. The port number is 8848.
- After the clusters are added, you can query the added clusters in the cluster configuration list.
- Add a synchronization task.
- Access the Nacos Sync service by referring to 3.f and add a synchronization task to synchronize data from your self-built Nacos cluster to the CSE Nacos cluster. The synchronization granularity is service. The source cluster is your self-built Nacos cluster, and the destination cluster is the CSE Nacos cluster. After the synchronization task is added, you can view the added synchronization task in the synchronization service list.
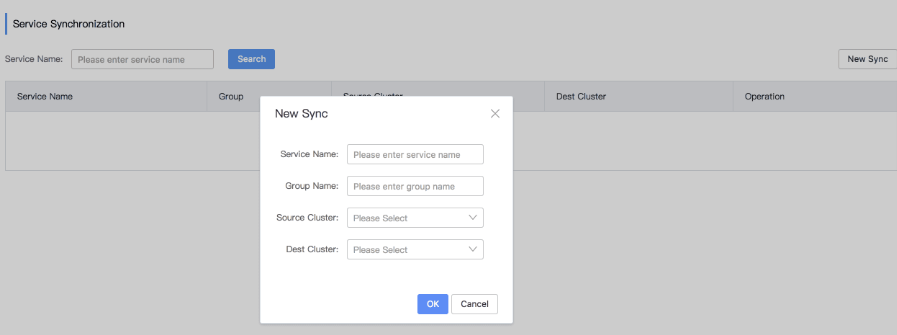
The service name and group name of the target cluster must be the same as those of the source cluster. Otherwise, the synchronization fails. You need to create different tasks for different services.
- Check whether data synchronization is complete and whether data is successfully synchronized to the CSE Nacos cluster. If the service in the synchronization task is displayed in the CSE Nacos cluster, the synchronization is successful. For details, see Viewing the Service List.
- Migrate and synchronize all applications to be migrated, and upgrade the Nacos connection configuration of the client application.
- Access the Nacos Sync service by referring to 3.f and add a synchronization task to synchronize data from your self-built Nacos cluster to the CSE Nacos cluster. The synchronization granularity is service. The source cluster is your self-built Nacos cluster, and the destination cluster is the CSE Nacos cluster. After the synchronization task is added, you can view the added synchronization task in the synchronization service list.
Registration Center Replacement
- The services in the self-built Nacos provide instances. You need to add a reverse synchronization task from the CSE Nacos to the self-built Nacos to ensure that services are not interrupted.
- Check whether the service instances in the self-built Nacos cluster and the CSE Nacos cluster are consistent and whether their health status is normal.
- Modify the configuration for the client to connect to Nacos by updating the access address of the self-built Nacos cluster in the service to the client access address of the CSE Nacos cluster. For details, see Viewing Nacos Engine Information.
spring.cloud.nacos.discovery.server-addr=127.0.0.1:8848 #Change the value to the CSE Nacos cluster address.
- Deploy the service instances of the self-built Nacos in sequence. Your services are now registered only in the CSE Nacos cluster. Instances are migrated from the self-built Nacos to the CSE Nacos.
The following figure shows the CSE Nacos service instances after Nacos Sync synchronization.

When restarting the server for replacement, you need to add a server task from CSE Nacos to the self-built Nacos to ensure that services are not interrupted.
After the Nacos Sync synchronization task is complete, when upgrading the provider service, create a task for synchronizing data from CSE Nacos to the self-built Nacos, replace the configuration, restart the server, and bring the self-built Nacos and Nacos Sync component offline.
Feedback
Was this page helpful?
Provide feedbackThank you very much for your feedback. We will continue working to improve the documentation.See the reply and handling status in My Cloud VOC.
For any further questions, feel free to contact us through the chatbot.
Chatbot


