Deploying ASP.NET Core Applications to CAE
CAE source code deployment supports Docker running. You can configure a Dockerfile, install the build environment in this file, and define build commands. In this way, more projects programmed in various languages can be deployed in CAE.
This topic uses the ASP.NET Core application as an example.
Prerequisites
An environment has been created. For details, see Creating an Environment and Application Management.
Forking Sample Source Code
Use your account to log in to GitHub and fork the sample source code repository to your personal account.
Source code address: https://github.com/Azure-Samples/dotnetcore-docs-hello-world.
Parsing Dockerfile
Dockerfile file in the sample repository.
# Specify the basic image as mcr.microsoft.com/dotnet/sdk:7.0, which is used as the build environment of the ASP.NET Core project.
FROM mcr.microsoft.com/dotnet/sdk:7.0 AS build
# Specify the working directory.
WORKDIR /source

# Copy the source code from the build host to the basic image and specify the working directory and build command.
COPY . ./dotnetcore-docs-hello-world/
WORKDIR /source/dotnetcore-docs-hello-world
RUN dotnet publish -c release -o /app

# Specify the new basic image as mcr.microsoft.com/dotnet/aspnet:7.0 and copy the build product generated in step 2 to the new basic image.
FROM mcr.microsoft.com/dotnet/aspnet:7.0
WORKDIR /app
COPY --from=build /app ./

# Set the environment variable PORT and declare that the container port is 80.
ENV PORT 80
EXPOSE 80

# Specify the container startup command.
ENTRYPOINT ["dotnet", "dotnetcoresample.dll"]
Setting GitHub Repository Authorization
You can set GitHub repository authorization so that build projects and application components can use the authorization information to access the GitHub source code repository.
- Log in to CAE.
- Choose System Settings.
- Click Edit in the Source Code Repository Authorizations module.
- Click Create Authorization, select the required source code repository by referring to Table 1, and set parameters.
Table 1 Authorization parameters Parameter
Description
Authorization
Authorization name, which cannot be changed after being created.
Repository Type
The following official repositories are supported:
- Select GitHub.
- Select Method.
- OAuth: Complete the authorization creation as prompted.
- Token: Enter the obtained private token.
- Click Confirm. The GitHub code repository is authorized.
Figure 1 Authorizing GitHub code repository

Creating and Configuring Components
- In the navigation pane on the left, choose Components.
- Select the created application and environment from the drop-down lists in the upper part of the page, and click Create Component.
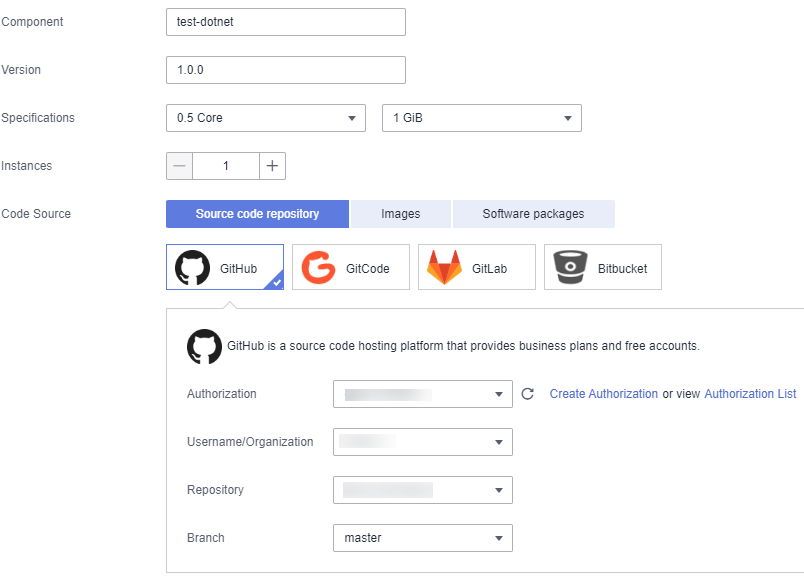
- Configure the component by referring to Table 2.
Table 2 Basic component information Parameter
Description
Component
Enter a component name. In this practice, enter test-dotnet.
Version
Enter a component version.
In this practice, enter 1.0.0.
Specifications
Select instance specifications, for example, 0.5 Core and 1 GiB.
Instances
Set it to 1.
Code Source
Choose Source code repository > GitHub. Select the authorization created in Setting GitHub Repository Authorization and select the sample code repository.
Figure 2 Configuring basic information
- Set Language/Runtime System to Docker and Dockerfile Address to ./Dockerfile.linux.
Figure 3 Configuring the Dockerfile

- Click Configure Component. The Component Configuration page is displayed.
- Go to Access Mode and click Edit.
- In the Access Component from Another Environment area, click Load Balancing > Add Load Balancer.
Configure load balancing by referring to Figure 4.
- Click OK.
- Click Set and Deploy Component in the upper part of the page. In the dialog box that is displayed on the right, click OK. The configuration takes effect after the deployment is complete.
Viewing Application Details
- In the navigation pane on the left, choose Components to return to the components page.
- Click the public network access address in the Access Address column of the test-dotnet component.
- Access the static page of the application.

Feedback
Was this page helpful?
Provide feedbackThank you very much for your feedback. We will continue working to improve the documentation.See the reply and handling status in My Cloud VOC.
For any further questions, feel free to contact us through the chatbot.
Chatbot


