(Optional) Configuring Workload Labels for Grayscale Release
Grayscale release is a service release policy that gradually switches traffic from an early version to a later version by specifying the traffic distribution weight. Services are verified during release and upgrade. If a later version meets the expectation, you can increase the traffic percentage of this version and decrease that of the early version. Repeat this process until a later version accounts for 100% and an early version is down to 0. Then the traffic is successfully switched to the later version.

CCE workloads are configured using the pod label selector for grayscale release. You can quickly roll out and verify new features, and switch servers for traffic processing. For details, see Using Services to Implement Simple Grayscale Release and Blue-Green Deployment.
The following describes how to smoothly switch traffic from V1 to V2 through grayscale release.
- Create a workload, set a pod label with the same value as the app label of the preceding workload. For details, see the preceding workload.
On the workload creation page, go to the Advanced Settings > Labels and Annotations area, and set app=deployment-demo and version=v2. If you create a workload by importing a YAML file, add pod labels in this file.
- For the server group with pod label version=v1, adjust the traffic weight.
- On the APIG console, choose Gateways in the navigation pane.
- Choose API Management > API Policies.
- On the Load Balance Channels tab, click the name of the created channel.
- In the Backend Server Address area, click Modify.
- Change the weight to 100, and click OK.
Weight is the percentage of traffic to be forwarded. All traffic will be forwarded to the pod IP addresses in server group server_group_v1.
- Create a server group with pod label version=v2, then set the traffic weight.
- In the Backend Server Address area, click Create Server Group.
Table 1 Server group configuration Parameter
Description
Server Group Name
Enter server_group_v2.
Weight
Enter 1.
Backend Service Port
Enter 80.
Tag
Select pod label version=v2.
- Click OK.
- In the Backend Server Address area, click Create Server Group.
- Refresh the backend server addresses.
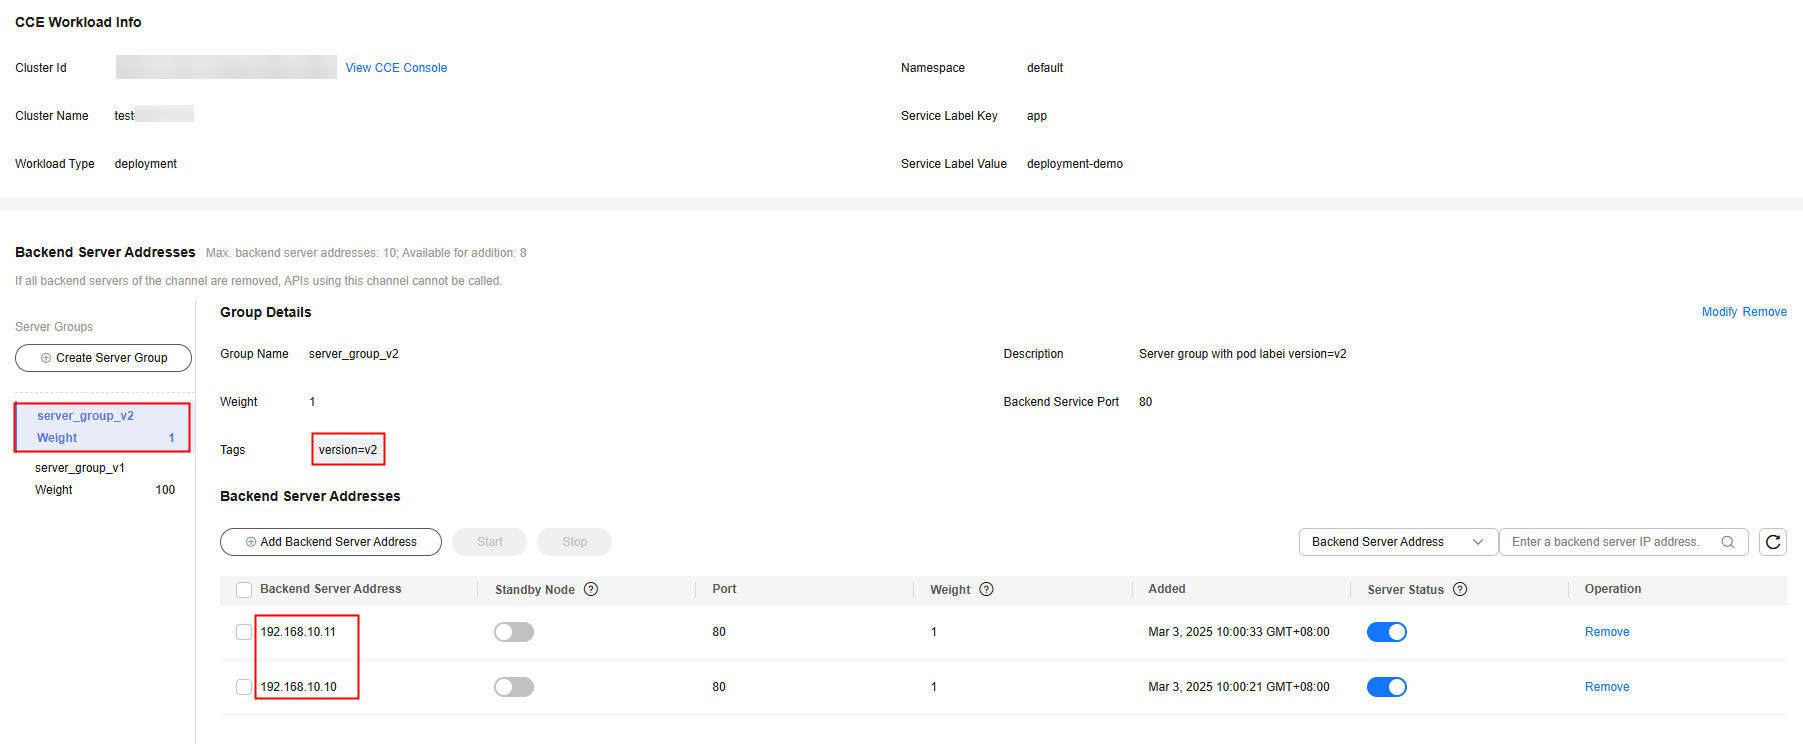
Refresh the page for the backend server addresses. The load balance channel automatically monitors the pod IP addresses of the workload and dynamically adds the addresses as backend server addresses. As shown in the following figure, tags app=deployment-demo and version=v2 automatically match the pod IP addresses (backend server addresses) of the workload.
Figure 2 Pod IP addresses automatically matched
100 of 101 (server group weight of total weight) traffic is distributed to server_group_v1, and the remaining to the later version of server_group_v2.
Figure 3 Click Modify in the upper right of the page.
- Check that the new features released to V2 through grayscale release are running stably.
If the new version meets the expectation, go to 6. Otherwise, the new feature release fails.
- Adjust the weights of server groups for different versions.
Gradually decrease the weight of server_group_v1 and increase that of server_group_v2. Repeat 5 to 6 until the weight of server_group_v1 becomes 0 and that of server_group_v2 reaches 100.

As shown in the preceding figure, all requests are forwarded to server_group_v2. New features are switched from workload deployment-demo of version=v1 to deployment-demo2 of version=v2 through grayscale release. (You can adjust the traffic weight to meet service requirements.)
- Delete the backend server group server_group_v1 of version=v1.
Now all traffic has been switched to the backend server group of version=v2. You can delete the server group of version=v1.
- Go to the load balance channel details page on the APIG console, delete all IP addresses of the server group of version=v1 in the Backend Server Addresses area.
- Click Delete on the right of this area to delete the server group of version=v1.
The backend server group server_group_v2 of version=v2 is kept.
Feedback
Was this page helpful?
Provide feedbackThank you very much for your feedback. We will continue working to improve the documentation.See the reply and handling status in My Cloud VOC.
For any further questions, feel free to contact us through the chatbot.
Chatbot


