|
System Settings |
Kubernetes Version |
Select the Kubernetes component version. |
To ensure proper function dependency, it is important to carefully consider the version of Kubernetes selected for the service mesh. The product baseline document can provide information on function dependency that may be helpful in making this decision. |
|
Container Runtime |
Select the container runtime version. containerd is used by default, helping you quickly set up a container.
|
None |
|
Cluster Endpoint |
API server address exposed by the Kubernetes cluster where global is in. Determine the deployment architecture by referring to "Capacity Planning" in Alauda Cloud Native Success Platform Installation Guide.
- There are two ways to configure cluster HA. You can use Keepalived or a load balancer:
- Keepalived: Enable on-premises VIP (virtual router ID) and set IP/Domain to the applied VIP. Once the cluster is successfully created and using the on-premises VIP, the access address will be <VIP>:6443.
- Load balancer: Disable the on-premises VIP and set IP/Domain to the IP address or domain name of the load balancer (such as the F5, IaaS load balancer, or HAProxy) outside the cluster.
|
Note:
- To enable the on-premises VIP, Keepalived needs the host network to support Virtual Router Redundancy Protocol (VRRP) and all nodes to be in the same subnet as the VIP.
- To ensure HA of the cluster IP address, you can use an on-premises VIP. However, you will need to contact the platform network administrator or O&M personnel beforehand to apply for the VIP and virtual router ID. It is important to note that the virtual router ID must be unique within the same subnet.
|
|
GPU Type |
Select the corresponding GPU as needed. |
Make sure that the node has the GPU driver installed. |
|
Hardware architecture |
Select x86 or Arm. |
It specifies the hardware architecture for the cluster. Once selected, only nodes with the corresponding architecture can be added to the cluster. |
|
Platform Access Address |
Access address of the platform, which is used for communications between the global cluster and the service cluster. By default, it is the same as the cluster IP address. You can configure it by referring to the following:
- If you need both internal and external network access, enter an internal network address. Other access addresses of the platform can be added in the advanced settings on this installation page.
- If you need DR, the address must be a domain name.
- If you need a valid certificate, enter the domain name and configure a self-signed certificate in the Certificate parameter or upload a certificate issued by the certification authority.
|
The platform is deployed using the HTTPS protocol by default. If you want to use the insecure HTTP protocol, you can enable the option in the advanced settings. |
|
Image Repository |
Image Repository |
Repository for storing platform component images.
- Platform Deployment: A built-in image repository is created during deployment of global. All component images on the platform are pulled from this repository.
- External: You need to enter necessary details of an external image repository. In DR environments, you also need to ensure that the repository IP address is accessible to all DR nodes. It is recommended to set up an image repository beforehand to store platform component images. For more information, contact technical support.
|
None |
|
Container Network |
Cluster Network Protocol |
Implementing IPv4/IPv6 dual-stack can effectively address the issue of limited IPv4 network address resources.
Before enabling dual-stack, make sure that all nodes have correctly configured IPv6 network addresses. Once a cluster has been created with dual-stack enabled, it cannot be reverted back to IPv4 single stack.
In the following scenarios, it is recommended that you enable dual-stack:
- Your applications need to provide access services to users with IPv6 terminals.
- You need to analyze and process the access sources that use IPv6 terminals to access services provided by your applications.
- Your application system needs to use IPv6 to access other systems (such as the database system) or application systems.
|
The global platform uses the Kube-OVN overlay network by default. Make sure that the container network and host network belong to different network CIDR blocks to avoid any exceptions during system deployment. |
|
Default Subnet |
Default subnet CIDR block, which is the cluster CIDR block |
|
Service CIDR |
IP address range used by the Kubernetes ClusterIP Services. It must not overlap with the default subnet's network CIDR block. |
|
Join CIDR |
IP address range used for communications between nodes and container groups in Kube-OVN overlay transmission mode. It cannot overlap with the default subnet or service CIDR block. |
|
Node Settings |
Network Interface Card |
Node network interface used by the cluster network add-on. If this parameter is not specified, the system automatically obtains the network interface corresponding to the default route of the node. |
None |
|
Node Name |
Select Use IP or Use Hostname. |
When selecting a hostname as the node name, you need to ensure that the hostname is unique in the cluster. |
|
Global Cluster Platform Node Isolation |
If you need both the global cluster to run platform components and the global cluster to run service applications, you can enable this function to prevent platform components and service applications from preempting resources.
Once you enable this function, you must configure the Application Deployable for any node you add. This configuration ensures that only platform components can be deployed on the node, and that platform components (excluding certain DaemonSets) will not be scheduled to nodes without Application Deployable configured. |
None |
|
Add Node |
- Only one or three master nodes are supported. If there are three master nodes in the cluster, the global cluster is an HA cluster.
- Application Deployable:
- For a controller node:
When you enabled Application Deployable, related functions are forcibly disabled. In this case, service applications cannot be deployed on this node.
When you disabled Application Deployable, related functions are disabled by default, but you can still determine whether to deploy service applications on this node.
- For a compute node:
When you enabled Application Deployable, related functions are forcibly disabled. In this case, service applications cannot be deployed on this node.
When you disabled Application Deployable, related functions are forcibly enabled, so that service applications can be deployed on this node.
- When adding a master node or compute node, if the GPU node is enabled, you need to manually install the GPU driver and container runtime.
- When the Kube-OVN overlay network is used to deploy the platform, if the network interface name of a node is specified, the node uses the configured network interface.
|
- For details about how to select a deployment architecture, see "Capacity Planning" in Alauda Cloud Native Success Platform Installation Guide.
- After you click Add Node, the platform checks the availability of the node. If the verification fails, adjust the configuration following instructions and add the node again.
|
|
Log monitoring settings |
Monitoring Type |
It is recommended to use Prometheus for monitoring. When choosing a node for setting up the monitoring service, it is advisable to select a non-master node.
If VictoriaMetrics is selected, you must configure the number of VictoriaMetrics agent instances, that is, the number of VMAgents. You are advised to add one. A maximum of three can be added. |
To properly configure the monitoring node, you must meet the requirements listed in "Hardware Configuration" in Alauda Cloud Native Success Platform Installation Guide. You can deploy HA monitoring components in scenarios that demand HA.
The monitoring component is typically deployed on a small scale by default. If you need to make changes to the deployment, you can disable the monitoring component in platform management after deployment, redeploy the component, and select nodes to deploy monitoring components of varying scales. |
|
Log Storage Node |
Deploy components like Elasticsearch on the node. It is recommended to choose a non-master node for setting up the log service. The default log service has limited capacity, so if you require a larger log scale, contact the relevant personnel. |
Only one or three log nodes can be selected. If more log nodes are required, see Changing the Number of Nodes Where Elasticsearch Runs. |
|
Other settings |
Other Access Addresses |
You can enter multiple IP addresses or domain names. |
- When entering IP addresses, make sure they can be forwarded to the cluster IP address.
- When entering domain names, make sure they have been resolved to the cluster IP address.
|
|
Pod Number Limit |
Maximum number of pods on each node. The default value is 110.
If all-in-one deployment architecture is used, you can increase the maximum number of pods on a node to 255 manually to ensure that there are enough pod IP addresses. |
None |
|
Product |
Select the name of the product to be deployed. |
None |
|
extension parameters |
It is not recommended to manually configure extension parameters. Doing so may result in the cluster becoming unavailable, and it cannot be modified after creation. If you need to make changes, contact technical support for assistance. |
None |


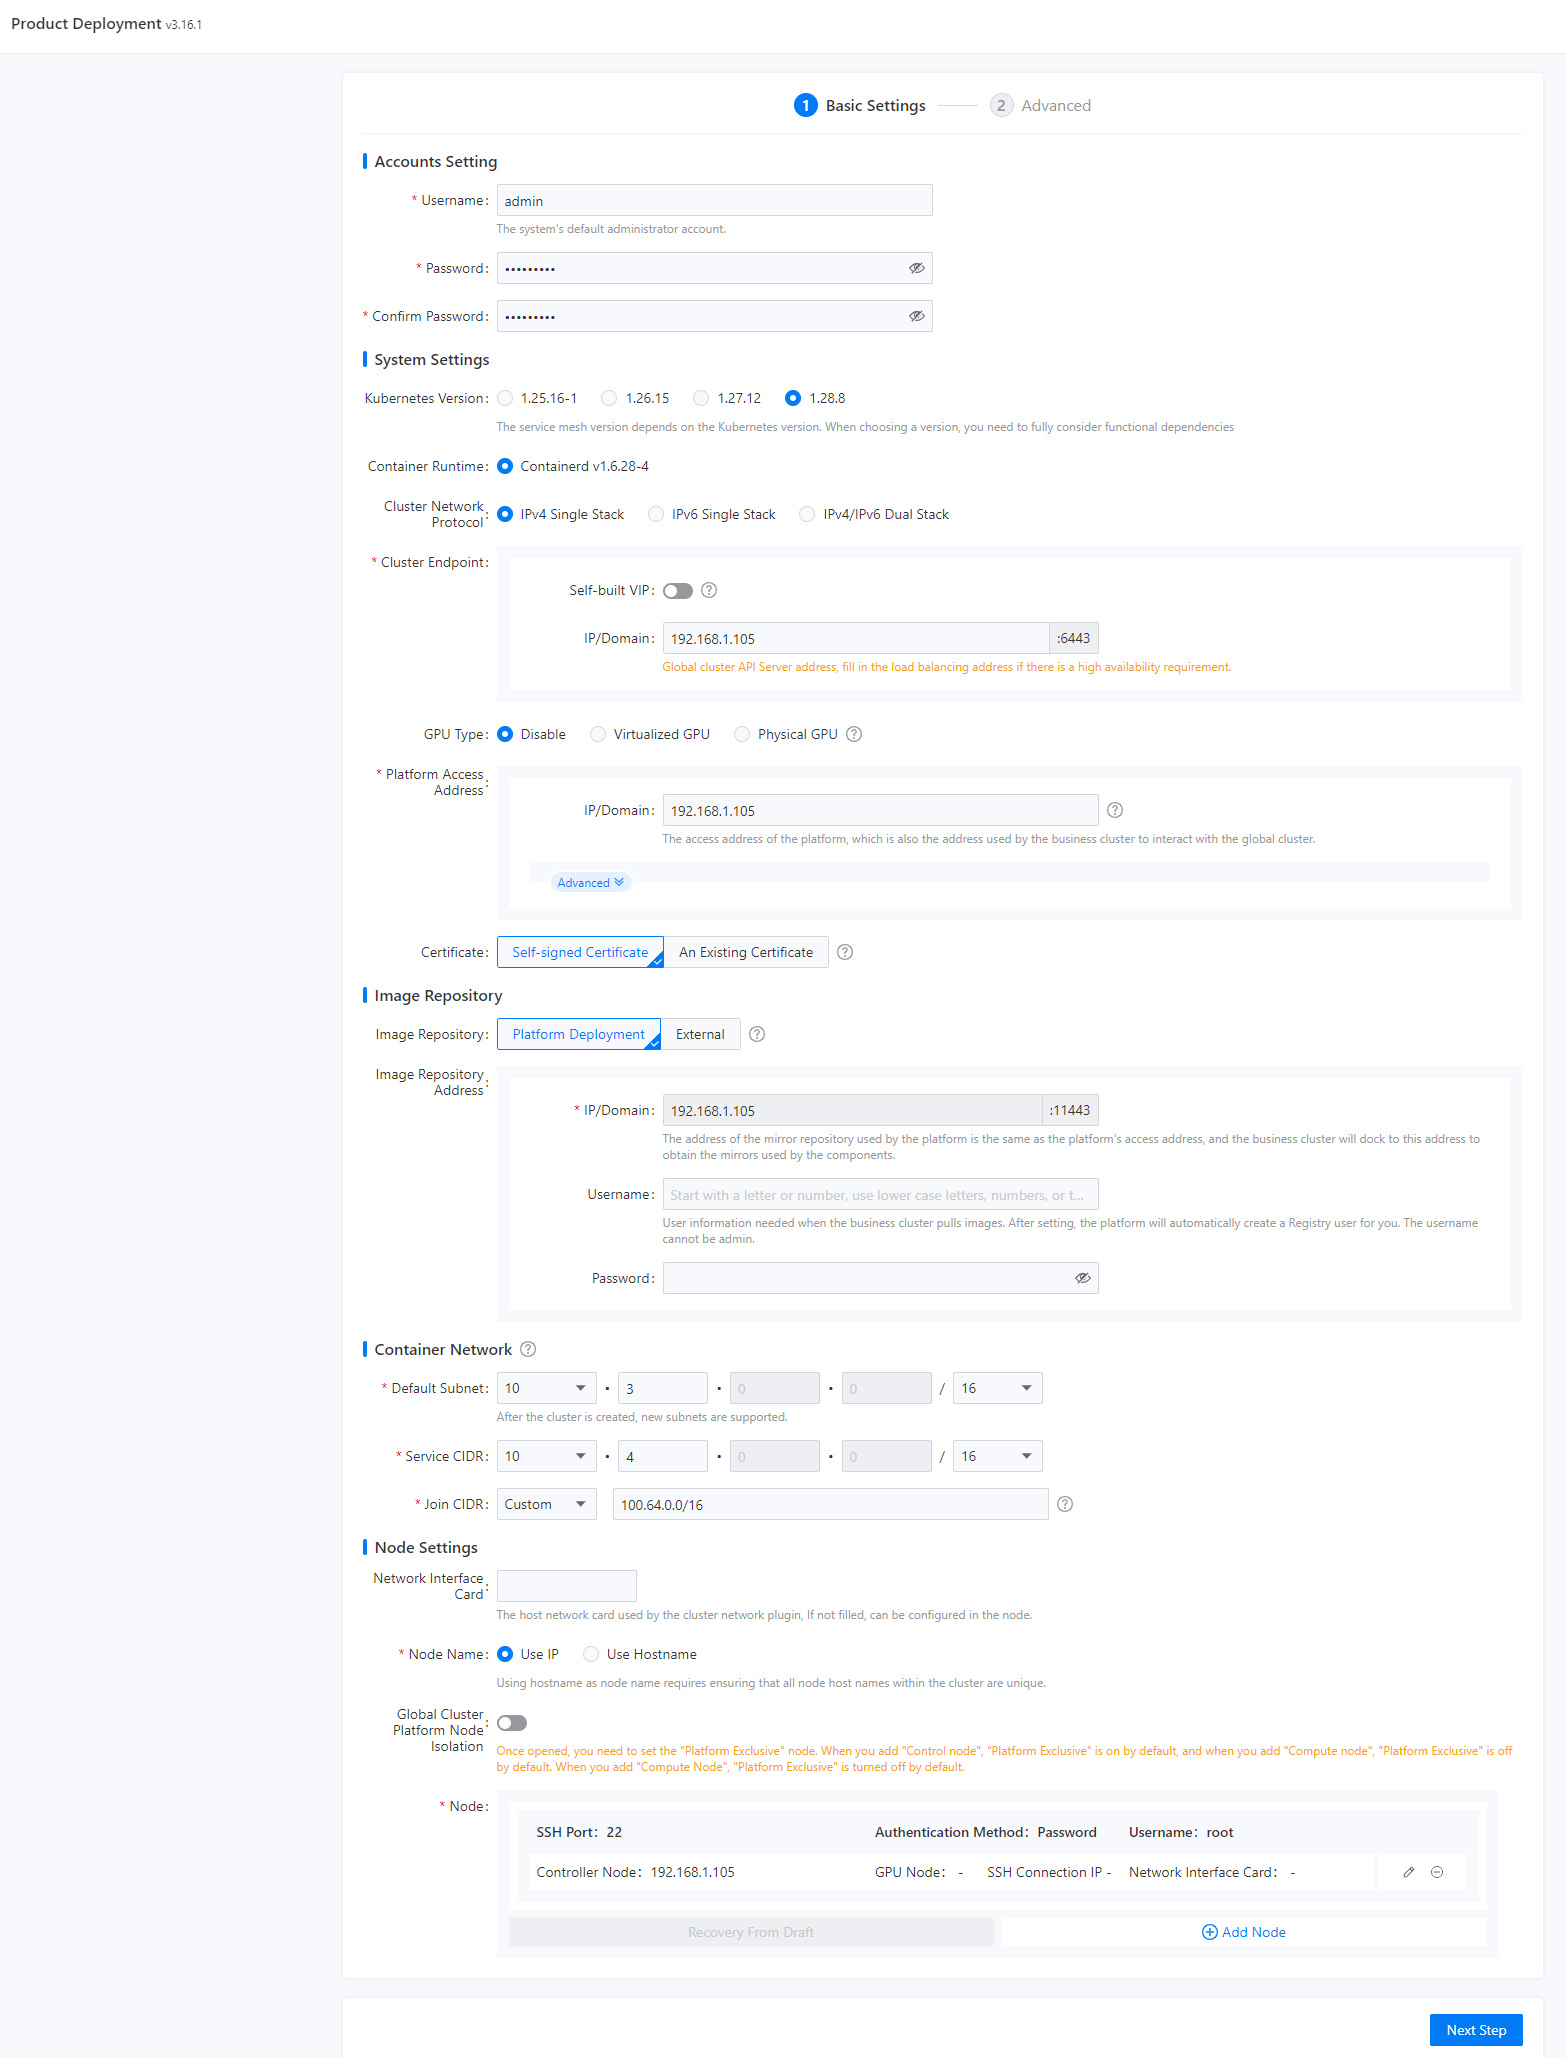 Figure 2 Advanced settings


