Uploading Migration Logs
SMS allows you to upload migration logs to a specified OBS bucket for quick troubleshooting.
Precautions
- Only the Agent 25.1.0 or later can upload migration logs. To view the version of the Agent you installed on a source server, you can click the source server name in the server list on the SMS console. On the displayed page, click the Task Info tab. In the Source Info area, view the Agent version.
- You will be billed for storing logs in OBS.
- If a proxy server is used for the migration, you need to select a bucket in the same region as the proxy server, or the logs cannot be uploaded.
- You can upload logs after the full replication is started. Logs can be uploaded multiple times.
Prerequisites
- Migration logs can be uploaded only after the full replication starts.
- Before uploading migration logs, ensure that an OBS bucket is available. To learn how to create a bucket, see .
Procedure
- Sign in to the SMS console.
- In the navigation pane on the left, choose Servers.
- Locate your server and click Upload in the Log Upload column.
Figure 1 Uploading logs

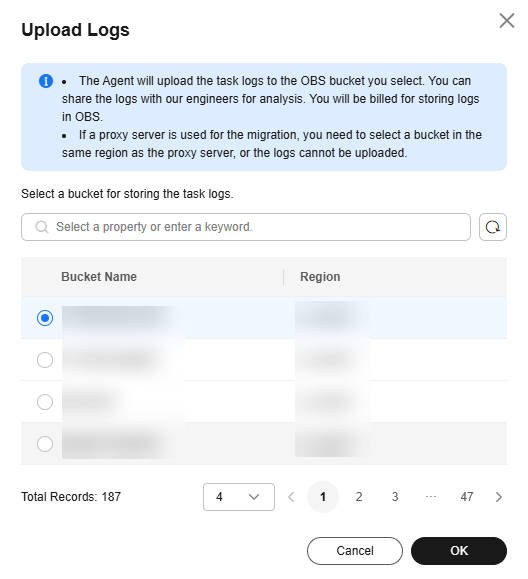
- In the displayed Upload Logs dialog box, select an OBS bucket for storing the uploaded logs and click OK. Then logs will be being uploaded, and Uploading will appear in the Log Upload column.
Figure 2 Selecting an OBS bucket


The log upload status can be Not ready, Ready, Uploading, Upload succeeded, or Upload failed.
- Check whether Upload succeeded appears. If it does, the migration logs have been successfully uploaded. After migration logs are uploaded, move the cursor to Uploaded succeeded. The name of the OBS bucket where the logs are stored and the share URI are displayed.
Figure 3 Logs uploaded

- (Optional) Click
 next to Share URL, and copy and paste the access URL to a browser to view the logs.
Feedback
Was this page helpful?
Provide feedbackThank you very much for your feedback. We will continue working to improve the documentation.


