Repository Image Security Scan Overview
What Is a Repository Image Security Scan?
The images stored in container image repositories (such as Harbor and SWR) can be shared within or between organizations.
Automatic scans on repository images help you identify and fix vulnerabilities, malware, and other security risks, so that insecure images will not be used in the production environment.
Repository Image Security Scan Principles
HSS can scan images in SWR and third-party repositories.
- SWR image security scan
HSS uses an image scan component to obtain the basic image information and image configuration file (such as the manifest file), and to identify image layers. The layers are downloaded to the HSS cluster and decompressed one by one for scan.
- Third-party repository image security scan
To connect a third-party image repository to HSS for scan, provide the repository information and login credentials, upload the image scan component to the repository, and create a scan task in the repository cluster. HSS obtains the basic image information and configuration file (such as the manifest file) based on the information you provided, and identifies image layers. The layers are downloaded to the repository cluster and decompressed one by one for scan.
Repository Image Security Scan Items
The image security scan items are listed in Table 1.
|
Scan Item |
Description |
|---|---|
|
Vulnerabilities |
System and application vulnerabilities in images.
|
|
Malicious Files |
Malicious files in images. |
|
Software Information |
Software information in an image. |
|
File Information |
File information in an image. |
|
Baseline Check |
|
|
Sensitive Information |
Files that contain sensitive information in images.
|
|
Software Compliance |
Whether software and patch packages contain components that may cause security, compliance, or privacy issues. Examples:
|
|
Base Images |
Check the basic image information used by the service image, including the basic image name, version, and image layer path. A base image is the starting point for building other images. It is a minimal image that contains core OS files, runtimes, or basic tools. All service images are built by adding new layers to the base image. Common base images include Ubuntu, Alpine Linux, CentOS, Debian, and Fedora. |
|
Unsafe Image Building Instructions |
Check the risks in image building instructions. For example, the following instructions in Dockerfiles are regarded unsafe:
|
Scenarios
- Scan images across clouds.
In multi-cloud scenarios, security tools or solutions may vary depending on cloud platforms, making it difficult to enhance security in a unified manner. Our scans can check repository images both inside and outside the cloud. You can perform scans and apply unified security policies across clouds, reducing O&M costs.
- Prevent unsafe images from entering the production environment.
Before images are deployed in the production environment, scan for and fix vulnerabilities and malicious files to ensure image security upon deployment.
Constraints
- To scan repository images, enable pay-per-use container image scans. This feature does not depend on any HSS edition. For details, see Enabling Pay-per-use Container Image Scan.
- Only Linux images can be scanned.
- Prerequisites for scanning a third-party image repository:
- The repository cluster (cluster where the repository is deployed) has been connected to HSS and is in the Running state. For details, see Installing the Agent on Containers.
You can connect to the following third-party cloud cluster service providers: Alibaba Cloud, Tencent Cloud, AWS, Microsoft Azure, user-built clouds, and user-built IDCs.
- The third-party image repository has been connected to HSS. For details, see Connecting to a Third-party Image Repository.
Harbor and JFrog image repositories are supported.
- The repository cluster (cluster where the repository is deployed) has been connected to HSS and is in the Running state. For details, see Installing the Agent on Containers.
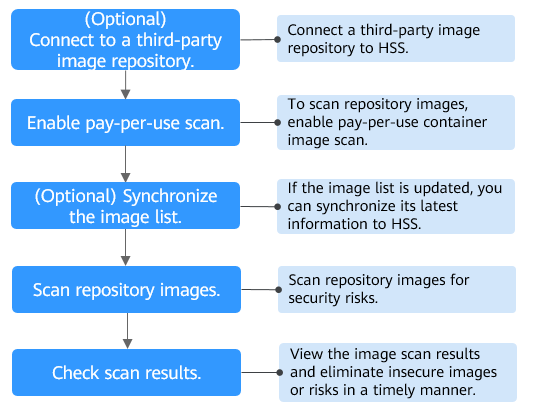
Repository Image Security Scan Process

|
Operation |
Description |
|---|---|
|
You can connect Harbor and JFrog repositories to HSS to scan for and handle their image risks. |
|
|
Enable pay-per-use scan for repository images. |
|
|
(Optional) Synchronizing Repository Images |
If the image list of your repository is updated, you can synchronize the latest image list to HSS. |
|
Perform a manual scan or configure a scheduled scan to identify risks in repository images. |
|
|
View the repository image security scan results. Check and eliminate security risks to prevent insecure images from entering the production environment. |
Feedback
Was this page helpful?
Provide feedbackThank you very much for your feedback. We will continue working to improve the documentation.


