Backing Up and Restoring Database Audit Logs
Database audit logs can be backed up to OBS buckets to achieve high availability for disaster recovery. You can back up or restore database audit logs as required.
Prerequisites
- The database audit instance is in the Running state.
- For details about how to enable database audit, see Enable Database Audit.
Precautions
- Audit logs are backed up to OBS. Buckets are automatically created for you and billed per use.
OBS Fine-grained Authorization
DBSS backup and restoration require OBS permissions. Users without IAM authorization permissions must be manually authorized by a user having the Security Administrator permission.
- Log in to the management console.
- Select a region, click
 in the upper left corner, and choose Management & Governance > Identity and Access Management.
 - In the navigation pane, choose Permissions > Authorization. Click Create Custom Policy.
- Configure policy parameters. Set Policy Name to DBSS OBS Agency Access. Set Policy View to JSON. The policy content is as follows:
{
    "Version": "1.1",
    "Statement": [
        {
            "Effect": "Allow",
            "Action": [
                "obs:object:PutObjectVersionAcl",
                "obs:object:PutObjectAcl",
                "obs:object:GetObjectVersion",
                "obs:object:GetObject",
                "obs:object:GetObjectVersionAcl",
                "obs:bucket:HeadBucket",
                "obs:object:GetObjectAcl",
                "obs:bucket:CreateBucket",
                "obs:bucket:ListBucket",
                "obs:object:PutObject"
            ],
            "Resource": [
                "OBS:*:*:object:*",
                "OBS:*:*:bucket:OBS_Bucket_Name_1",
                "OBS:*:*:bucket:OBS_bucket_2" //You can add multiple buckets.
            ]
        }
    ]
}
See Figure 1. Click OK.
- In the navigation pane, choose Agencies and then click Create Agency in the upper right corner.
- Configure agency parameters. Set Agency Name to dbss_depend_obs_trust. Set Agency Type to Cloud service. Set Cloud Service to DBSS. See Figure 2.
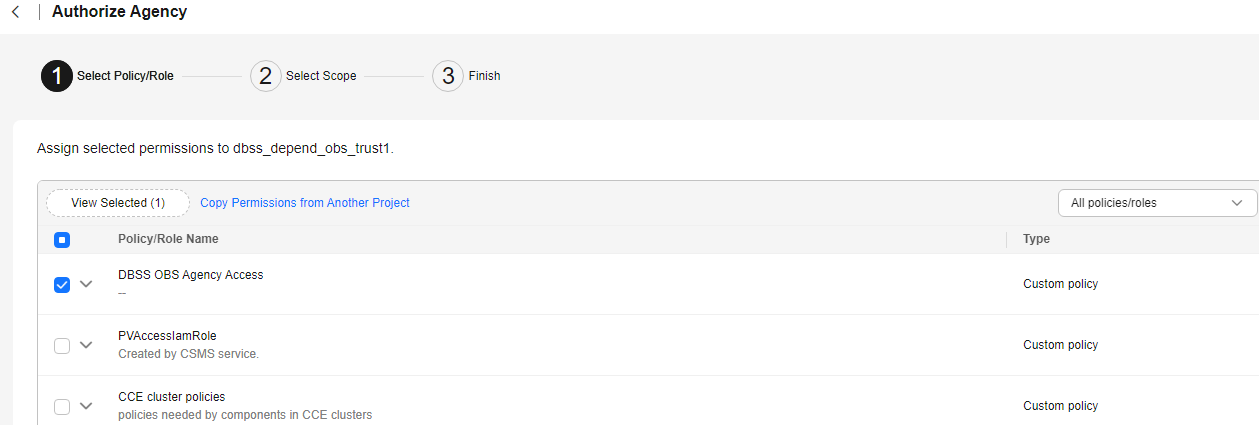
- Click Next. Select the custom policy created in 4, and add the permission DBSS OBS Agency Access to the agency dbss_depend_obs_trust, as shown in Figure 3. Click Next in the lower right corner.
- Set Scope to All resources and click OK. If the message in Figure 4 is displayed, the authorization is successful. Click Finish. The authorization will take effect in about 15 minutes.
Automatically Backing Up Database Audit Logs
- Log in to the management console.
- Click
 and choose . The Dashboard page is displayed.
 - In the navigation tree on the left, choose Settings.
- In the Instance drop-down list, select the required instance and click the Backup and Restoration tab.
- Click Modify Automated Backup Settings. In the displayed dialog box, set the auto backup parameters. Table 1 describes the parameters.
Figure 5 Configure Automatic Backup dialog box

Table 1 Parameters Parameter
Description
Example Value
Automatic Backup
Status of automatic backup
 : enabled
 : disabled

Backup Period
Automatic backup period. Its options are as follows:
- Daily
- Hourly
Daily
Started
Start time of the backup. Click
 to configure.
2020/01/14 20:27:08
Bucket Name
Name of the OBS bucket used for backup. Its options are as follows:
- Create Default Bucket
- Select Bucket
NOTE:- If you click Create Default Bucket, you will be prompted to authorize OBS for exporting audit log backups.
- Audit logs can be exported only to the bucket created by DBSS.
20f18-7a5a-4042
Export Directory
Directory for storing backup files in the OBS bucket.
test
Authorize Automated Backup
Authorize automatic backup before setting an automatic backup task. If you select this option, DBSS can read and write the OBS bucket for audit log backup and export.
CAUTION:Automated backup takes effect about 15 minutes after authorization is completed.
Selected
- Click OK.

After the automatic backup function is configured, new data in the database will be backed up one hour later. Then you can view the backup information.
Restoring Database Audit Logs
After backing up database audit logs, you can restore the audit logs as required.

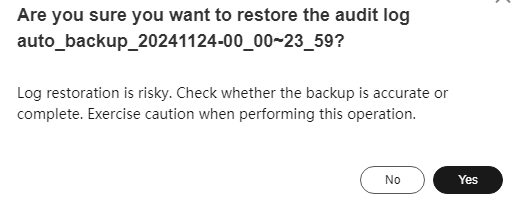
Restoring logs is risky. Therefore before restoring logs, ensure that the backup log data is correct or complete.
- Log in to the management console.
- Click
 and choose . The Dashboard page is displayed.
 - In the navigation tree on the left, choose Settings.
- In the Instance drop-down list, select the required instance and click the Backup and Restoration tab.
- In the Operation column of the backup log to be restored, click Restore Log.
Figure 6 Restoring logs

- In the displayed dialog box, click OK.
Figure 7 Confirming the restoration of audit logs

Exporting Risk Data
You can export the logs that record high-risk operations to OBS. An OBS bucket will be automatically created to store these logs and will charge per use.
- Log in to the management console.
- Click
 and choose . The Dashboard page is displayed.
 - In the navigation tree on the left, choose Settings.
- In the Instance drop-down list, select the required instance and click the Risk Export tab.
- Click
 in the row of a database to export risk data.
Figure 8 Enabling risk export
- An OBS bucket will be automatically created to store risk logs.
- Bucket Name:Click Create Default Bucket or Select Bucket.
- File Export Directory: Create a directory for storing risk files in the OBS bucket.
- Risk export authorization: Authorize risk export before setting the risk export bucket. After the risk export authorization is selected, DBSS can obtain the read and write permissions of the OBS bucket for exporting risk logs.

The risk export takes effect about 15 minutes after the authorization is successful.
Figure 9 Automatically creating an OBS bucket
Feedback
Was this page helpful?
Provide feedbackThank you very much for your feedback. We will continue working to improve the documentation.


