Creating a Firewall (VPC Mode)
A VPC border firewall can collect statistics on the traffic between VPCs, helping you detect abnormal traffic. This section describes how to create a VPC border firewall.
Constraints
- Only the professional edition supports VPC border firewalls.
Creating a Firewall (VPC Mode)
- Log in to the CFW console.
- Click
 in the upper left corner of the management console and select a region or project.
 - (Optional) Switch to another firewall instance. Select a firewall from the drop-down list in the upper left corner of the page.
- In the navigation pane, choose Assets > Inter-VPC Border Firewalls.
- Click Create Inter-VPC Firewall.
- Set Route type to VPC, and click Next.
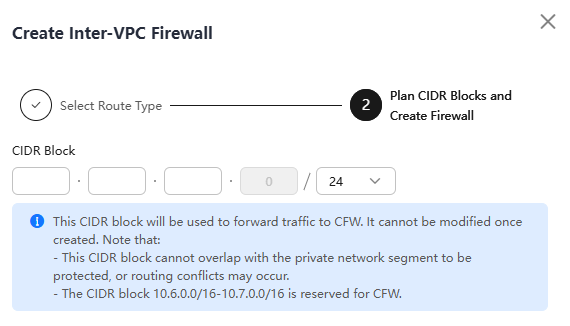
- Configure a CIDR block. An inspection VPC will be automatically created by default.
Figure 1 Network planning

Pay attention to the following restrictions during network planning:
- After a firewall is created, its CIDR block cannot be modified.
- The CIDR block must meet the following requirements:
- Only private network address segments (10.0.0.0/8, 172.16.0.0/12, and 192.168.0.0/16) are supported. Otherwise, route conflicts may occur in public network access scenarios, such as SNAT.
- The CIDR block 10.6.0.0/16-10.7.0.0/16 is reserved for CFW and cannot be used.
- This CIDR block cannot overlap with the private CIDR block to be protected, or routing conflicts and protection failures may occur.
- Click OK.
Follow-up Operations
After the firewall is created, associate the VPC with the firewall by referring to Associating a Protected VPC with the Firewall.
Feedback
Was this page helpful?
Provide feedbackThank you very much for your feedback. We will continue working to improve the documentation.


