
JavaScript
Scenarios
To use JavaScript to call an API through App authentication, obtain the JavaScript SDK, create a new project, and then call the API by referring to the API calling example.
This section uses IntelliJ IDEA 2018.3.5 as an example to describe how to set up a Node.js development environment.
Preparing the Environment
- You have obtained the domain name, request URL, and request method of the API to be called, and the AppKey and AppSecret of the App for calling the API. For more information, see Preparation.
- You have installed the Node.js programming language. If not, download the Node.js installation package from the official Node.js website and install it.
After Node.js is installed, run the npm command to install the moment and moment-timezone modules.
npm install moment --save
npm install moment-timezone --save
- You have installed IntelliJ IDEA. If not, download IntelliJ IDEA from the official IntelliJ IDEA website and install it.
- You have installed the Node.js plug-in on IntelliJ IDEA. If not, install the Python plug-in according to Figure 1.

Obtaining the SDK
- Log in to the DataArts Studio console.
- Click DataArts DataService.
- In the navigation pane, choose DataArts DataService Exclusive > SDKs.
- On the SDKs page, download the SDK package.
- Verify integrity of the SDK package. In Windows, open the CLI and run the following command to generate the SHA-256 value of the downloaded SDK package. In the command, D:\java-sdk.zip is an example local path and name of the SDK package. Replace it with the actual value.
certutil -hashfile D:\java-sdk.zip SHA256
The following is an example command output:
SHA-256 hash value of D:\java-sdk.zip
96fced412700cf9b863cb2d867e6f4edf76480bc679416efab88a9e1912503b9
CertUtil: -hashfile command executed.
Compare the SHA-256 value of the downloaded SDK package with that provided in the following table. If they are the same, no tampering or packet loss occurred during the package download.
Table 1 SDK packages and the corresponding SHA-256 values Language
SHA-256 Value of the SDK Package
Java
96fced412700cf9b863cb2d867e6f4edf76480bc679416efab88a9e1912503b9
Go
f448645da65b4f765d9569fc97ca45dc3e8f1ce4f79d70c5c43934318521d767
Python
54b4984d91db641d2b1b0e77064c162850cb2511a587f95e2f8b8340e7afa128
C#
b66caf856ffccb61fe758872aac08876aa33fb0cf5f4790e3bec163593b2cbae
JavaScript
43da0b54d6b04d1f5ed7f278c2918c2a63a1ddb8048e2d1c5db60baafb17663c
PHP
394c068420a3817f32d5d88b6c1632978f573f2a685e4a1d10c2f698e0f6786e
C++
abae5473d47594f88dcd5eaa0902dc12cd6f1e3bd63c0b82d9d1fab8b4351f54
C
a376573fe8aa3a636a6d123926ddc3dca11748b289b8c2c16a5056830a095acb
Android
c19175d736f05b1945dab4675df19311834ede0d9b1978b11b50c86687baf85c
Obtain the ApiGateway-javascript-sdk.zip package. The following table shows the files decompressed from the package.
| Name | Description |
|---|---|
| signer.js | SDK code |
| node_demo.js | Node.js sample code |
| demo.html | Browser sample code |
| demo_require.html | Browser sample code (loaded using require) |
| test.js | Test case |
| js\hmac-sha256.js | Dependencies |
| js\moment.min.js | |
| js\moment-timezone-with-data.min.js | |
| licenses\license-crypto-js | Third-party licenses |
| licenses\license-moment | |
| licenses\license-moment-timezone | |
| licenses\license-node |
Creating a Project
- Start IntelliJ IDEA and choose File > New > Project.
In the New Project dialog box, choose Static Web and click Next.
Figure 2 New Project
- Click ..., select the directory where the SDK is decompressed, and click Finish. Figure 3 Selecting the SDK directory after decompression

- View the directory structure shown in the following figure. Figure 4 Directory structure of the new project
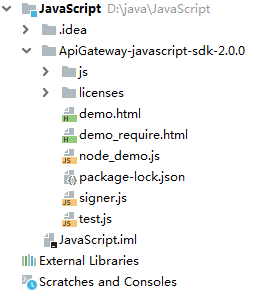
- node_demo.js: Sample code in Node.js. Modify the parameters in the sample code as required. For details about the sample code, see API Calling Example (Node.js).
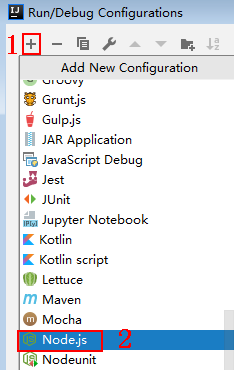
- Click Edit Configurations. Figure 5 Edit Configurations

- Click + and select Node.js. Figure 6 Selecting Node.js
- Set JavaScript file to node_demo.js and click OK. Figure 7 Selecting node_demo.js

API Calling Example (Node.js)
- Import signer.js to your project.
1
2
var signer = require('./signer')
var http = require('http')
- Generate a new signer and enter the AppKey and AppSecret.
1
2
3
4
5
6
7
8
// Coded or plaintext AK and SK pose significant security risks. To ensure security, encrypt your AK and SK, store them in configuration files or environment variables, and decrypt them when needed.
// In this example, the AK and SK stored in the environment variables are used for identity authentication. Before running this example, configure environment variables SDK_AK and SDK_SK in the local environment.
var ak = process.env.SDK_AK;
var sk = process.env.SDK_SK;

var sig = new signer.Signer();
sig.Key = ak;
sig.Secret = sk;
- Generate a request, and specify the method, request URI, and request body.
1
2
var r = new signer.HttpRequest("POST", "{apig-endpoint}/app1?a=1");
r.body = '{"a":1}'
- Add a header to the request. The header contains specific parameters. Add other headers to be signed as necessary.
1r.headers = { "x-stage":"RELEASE", "name":"value"}
- Execute the following function to generate HTTP(s) request parameters, and add the X-Sdk-Date and Authorization headers for signing the request: Then, add the x-Authorization header to the request. The value of the x-Authorization header is the same as that of the Authorization header.
1
2
var opt = sig.Sign(r)
opt.headers["x-Authorization"] = opt.headers["Authorization"]
- Access the API and view the access result. If you access the API using HTTPS, change http.request to https.request.
 1
 2
 3
 4
 5
 6
 7
 8
 9
10
11
var req=http.request(opt, function(res){
        console.log(res.statusCode)
        res.on("data",	function(chunk){
		console.log(chunk.toString())
	})
})
req.on("error",function(err){
	console.log(err.message)
})
req.write(r.body)
req.end()
Feedback
Was this page helpful?
Provide feedbackThank you very much for your feedback. We will continue working to improve the documentation.


