
Mounting an SFS Turbo File System to Windows ECSs
After creating a file system, you need to mount it to cloud servers so that they can share the file system.
This section uses Windows Server 2019 as an example to describe how to mount an SMB SFS Turbo file system to ECSs.

You need to submit a service ticket to apply for using the SMB protocol.
Operations on BMSs are the same as those on ECSs.
To simply mount a file system, see Mounting an SMB File System in Windows.
To mount a file system as an Active Directory (AD) domain user, perform the following steps:
Step 1: Adding an SMB File System to an AD Domain
Step 2: Mounting and Using an SMB File System on a Windows ECS as an AD Domain User
Step 3: Managing ACLs of an SMB File System
Constraints
|
Constraint |
Description |
|---|---|
|
File system functions |
SMB file systems do not support OBS or NAS storage backends. A file system can use either NFS or SMB. It cannot use both protocols. When restoring data from a file system backup, the file system protocol cannot be changed. In other words, a backup of an NFS file system cannot be used to create an SMB file system, and a backup of an SMB file system cannot be used to create an NFS file system. SMB file systems do not support multi-VPC access. |
|
SMB protocol functions |
|
|
SMB protocol version |
SMB 2.0, SMB 2.1, and SMB 3.0 are supported. |
|
SMB client |
On all compute nodes to which a file system is mounted and for all users who use the shared file system, a specific file or directory can have up to 10,000 active file handles. |
Mounting an SMB File System in Windows
- Prepare the environment. Perform this step only once on each Windows ECS where you want to mount the file system. Do not perform it for each mount.
- Enable the Workstation service. Normally, Workstation is enabled by default.
- Choose All Programs > Accessories > Run or press Win+R and then enter services.msc to access the local services.
- Find Workstation and check that its status is Running and startup type is Automatic.
Figure 1 Services (Local) > Workstation
- Enable TCP/IP NetBIOS Helper. Normally, TCP/IP NetBIOS Helper is enabled by default.
- Open Network and Sharing Center and click the network that the ECS is connected to.
- Click Properties. On the displayed page, double-click Internet Protocol Version 4 (TCP/IPv4). Then, click Advanced.
- In the displayed dialog box, choose WINS > Enable NetBIOS over TCP/IP, and click OK.
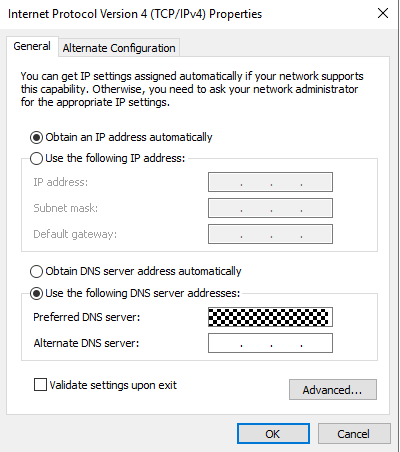
Figure 2 Enable NetBIOS over TCP/IP

- Choose All Programs > Accessories > Run or press Win+R and then enter services.msc to access the local services.
- Find TCP/IP NetBIOS Helper and check that its status is Running and startup type is Automatic.
Figure 3 Services (Local) > TCP/IP NetBIOS Helper

- Enable the Workstation service. Normally, Workstation is enabled by default.
- Mount the SMB file system.
- Open Command Prompt and run the following command to mount the SMB file system:
#Guest authentication
net use X: \\huawei.com\share
#Anonymous authentication
net use X: \\huawei.com\share "" /user:
#AD domain authentication
net use X: \\huawei.com\share /user:example.com\USERNAME PASSWORD
Table 1 Mount parameters Parameter
Description
X
The drive letter on the Windows OS to be used for mount. If letter X has been used or there are multiple mounted NAS file systems, use another letter.
huawei.com
The mount address automatically generated when you create an SMB file system. Replace it with the actual address.
share
The name of the SMB file system, which cannot be changed.
example.com
The domain name of the AD domain server.
USERNAME
The name of the AD domain user.
PASSWORD
The password of the AD domain user.
Guest authentication and anonymous authentication are only used when the file system is not added to a domain. If the file system is added to a domain, unmount the current mount and use AD domain authentication. If the file system is then removed from the domain, unmount the mount and wait for about 30 seconds before mounting it again. Anonymous authentication is recommended then.
- Check that the file system has been mounted.
net use
If information similar to Figure 4 is returned, the file system has been mounted. You can read data from or write data to the SMB file system on the ECS.
- Unmount as needed.
#Unmounting a specific mount
net use X: /del
#Unmounting all mounts
net use * /del
Figure 5 Unmount command
- Open Command Prompt and run the following command to mount the SMB file system:

Adding an SMB File System to an AD Domain
- Set up an AD domain server. A Windows ECS that is in the same VPC as the SMB file system is required. In this example, a server running Windows Server 2019 Standard Edition is used as an example.
- Log in to the Windows ECS.
- In the search box in the lower left corner of the desktop, search for Server Manager to open Server Manager.
- Choose Dashboard > Add roles and features.
Figure 6 Add roles and features

- On the Add Roles and Features Wizard, choose Installation Type > Role-based or feature-based installation and click Next. Then, choose Server Selection > Select a server from the server pool and click Next.
Figure 7 Selecting Role-based or feature-based installation
 Figure 8 Selecting Select a server from the server pool
- Select Active Directory Domain Services, click Next, and then click Install.
Figure 9 Selecting Active Directory Domain Services
 Figure 10 Confirm installation selections
- After the installation is complete, click the task icon in the upper right corner of Server Manager and click Promote this server to a domain controller.
Figure 11 Server Manager > Promote this server to a domain controller

- In the window of Active Directory Domain Services Configuration Wizard, choose Deployment Configuration > Add a new forest and enter the domain name in the Root domain name text box.
Figure 12 Add a new forest

- Choose Domain Controller Options > Domain Name System (DNS) server, configure Type the Directory Services Restore Mode (DSRM) password, and click Next until the Paths tab is displayed. Select the AD domain data and log folders.
Figure 13 Configuring Type the Directory Services Restore Mode (DSRM) password
 Figure 14 Selecting the AD domain data and log folders
- Click Next on the Review Options tab, complete the prerequisites check, and click Install. After the installation is complete, restart the environment where the AD domain server is located. In this example, restart the ECS.
Figure 15 Installing the AD domain services

- Add the file system to the AD domain.
- The process of joining a domain is as follows:
- Log in to the SFS Turbo console.
- In the SFS Turbo file system list, find the file system you want to add to a domain and click its name to go to its details page.
- On the Active Directory Configuration tab, click Join Domain.
Figure 16 Active Directory Configuration

- Enter the Active Directory configuration information.
Figure 17 Entering configuration information

Table 2 Parameters required for joining an AD domain Parameter
Description
Active Directory Domain Name
The name of the AD domain, for example, example.com.
DNS Server IP Address
The IP address of the DNS server that resolves the domain name. You can click + to add an alternative DNS server IP address. A maximum of three IP addresses can be added.
Service Account Username
The administrator account of the AD domain server, for example, administrator.
Service Account Password
The password of the AD domain server administrator account.
System Name
The unique name of the file system in the AD domain server. If a duplicate name is specified, the file system cannot be added to the domain.
Overwrite System Name
Once enabled, if there is a file system with the same name in the domain controller, the file system you specify will overwrite the one in the domain controller.
Organizational Unit
The unit of the AD domain server that the file system is added to. If not specified, the file system is added to the Computers unit, for example, cn=Computers,dc=example,dc=com.
- Wait a few seconds and you can see the Active Directory domain name, DNS server IP address, status, and system name.
Figure 18 Domain joined successfully

- The process of leaving a domain is as follows:
- Locate the domain that the file system has joined and click Leave Domain in the Operation column.
Figure 19 Leave Domain button

- Enter the username and password of the AD domain account, and click OK.
Figure 20 Page for entering the username and password to leave the domain

- Check that the AD domain disappears from the Active Directory Configuration page.
Figure 21 Domain left successfully

- Locate the domain that the file system has joined and click Leave Domain in the Operation column.
- The process of joining a domain is as follows:
Mounting and Using an SMB File System on a Windows ECS as an AD Domain User
This part describes how to mount an SMB file system as an AD domain user in Windows, how to access the SMB file system as an AD domain user, and how to view and edit the ACL of a file or directory.
Prerequisites: The SMB file system has been added to the AD domain by referring to Adding an SMB File System to an AD Domain.
Method 1: Adding a Windows ECS to an AD Domain and Mounting the SMB File System
The following example uses Windows Server 2019 as an example to describe how to add a Windows ECS to an AD domain and mount an SMB file system.
- Configure the DNS server address on the Windows ECS.
- Log in to the Windows ECS.
- In the lower left corner of the desktop, click Start.
- On the Start menu bar, click Control Panel.
- In the Control Panel, choose Network & Internet > Network and Sharing Center.
- Under View your active networks, click Ethernet.
- In the displayed dialog box, click Properties.
- Under This connection uses the following items, select Internet Protocol Version 4 (TCP/IPv4) and click Properties.
- In the displayed dialog box, click Use the following DNS server addresses and enter the IP address of the AD domain server.
Figure 22 Configuring the DNS server IP address

- Open Command Prompt and ping the AD domain name to check the connectivity between the Windows ECS and the AD domain.
Figure 23 Running the ping command

- Add the Windows ECS to the AD domain.
- In the Control Panel, choose System and Security > System.
- In the Computer name, domain, and workgroup settings area, click Change settings.
- In the System Properties dialog box, click Change.
- In the Computer Name/Domain Changes dialog box, enter the name of the AD domain. Then, click OK.
Figure 24 Computer Name/Domain Changes dialog box

- Restart the Windows ECS for the configuration to take effect.
- Mount the SMB file system.
Log in to the Windows ECS as an AD domain user and run the following command to mount the SMB file system:
net use X: \\huawei.com\share /user:example.com\USERNAME PASSWORD
Table 3 Parameters required for mounting an SMB file system Parameter
Description
huawei.com
The mount address automatically generated when you create an SMB file system. Replace it with the actual address.
share
The name of the SMB file system, which cannot be changed.
example.com
The domain name of the AD domain server.
USERNAME
The name of the AD domain user.
PASSWORD
The password of the AD domain user.
Method 2: Connecting a Windows ECS to the AD Domain Server and Mounting the SMB File System
The following example uses Windows Server 2019 as an example to describe how to connect a Windows ECS to an AD domain and mount an SMB file system.
- Configure the DNS server address on the Windows ECS.
- Log in to the Windows ECS.
- In the lower left corner of the desktop, click Start.
- On the Start menu bar, click Control Panel.
- In the Control Panel, choose Network & Internet > Network and Sharing Center.
- Under View your active networks, click Ethernet.
- In the displayed dialog box, click Properties.
- Under This connection uses the following items, select Internet Protocol Version 4 (TCP/IPv4) and click Properties.
- In the displayed dialog box, click Use the following DNS server addresses and enter the IP address of the AD domain server.
Figure 25 Configuring the DNS server IP address
- Open Command Prompt and ping the AD domain name to check the connectivity between the Windows ECS and the AD domain.
Figure 26 Running the ping command

- Mount the SMB file system.
Log in to the Windows ECS as an AD domain user and run the following command to mount the SMB file system:
net use X: \\huawei.com\share /user:example.com\USERNAME PASSWORD
Table 4 Parameters required for mounting an SMB file system Parameter
Description
huawei.com
The mount address automatically generated when you create an SMB file system. Replace it with the actual address.
share
The name of the SMB file system, which cannot be changed.
example.com
The domain name of the AD domain server.
USERNAME
The name of the AD domain user.
PASSWORD
The password of the AD domain user.
Method 3: Mounting an SMB File System Using the GUI
The following steps describe how to mount an SMB file system using the GUI.
- Open File Explorer (Windows Explorer).
- Enter the path of the background server in the address box. For example, enter the following path:
\\huawei.com\share
Table 5 Parameter description Parameter
Description
huawei.com
The mount address automatically generated when you create an SMB file system. Replace it with the actual address.
share
The name of the SMB file system, which cannot be changed.
- (Optional) Press Enter. Windows will prompt you to enter credentials. If identity authentication is required, enter the username and password of the background server.
- Mount the SMB file system. After you complete the preceding steps, the system automatically maps the file system of the background server to Windows File Explorer. When you see the mapped drive in Network locations or This PC, the SMB file system is successfully mounted.

There may be slight differences in each step depending on the OS version and network setup. Ensure that your background server is correctly configured.
Managing ACLs of an SMB File System
After you enabled the ACL function and mount an SMB file system as an AD domain user, you can view or edit the ACL of a file or directory using the following methods:
Method 1: Using the mklink Command Line Tool
You can use the mklink command line tool to create a symbolic link for the mounted SMB file system on a Windows local disk to view or edit the ACLs of files or directories.
- Log in to the Windows ECS.
- Enter Command Prompt in the search box and open Command Prompt.
- Run the following command to create a file system mapping:
mklink /D C:\myshare \\huawei.com\share
Table 6 Parameter description Parameter
Description
C:\myshare
The path of the symbolic link.
\\huawei.com\share
The shared path of the SMB file system.
- After the file system is mapped to a local disk, you can view or edit the ACLs of files or directories on the local disk. For details, see "Method 2: Using Windows File Explorer."
If you are a non-administrator user who does not have permissions to perform this operation. Perform the next step to obtain the permissions.
- Grant a non-administrator user the permissions to use the symbolic link. Skip this step if you are the system administrator.
- Log in to the Windows ECS as the system administrator.
- Open the search bar and run secpol.msc.
Figure 27 Searching for and running secpol.msc

- In the Local Security Policy dialog box, choose Local Policies > User Rights Assignment and add the user to Create symbolic links group policy.
Figure 28 Local Security Policy dialog box
 Figure 29 Add User or Group
Method 2: Using Windows File Explorer
You can create a symbolic link for the SMB file system on a Windows local disk and view or edit the ACLs of files or directories in Windows File Explorer.
- Find the target file or directory and right-click Properties from the shortcut menu.
Figure 30 Choosing Properties

- In the displayed dialog box, click the Security tab and then click Edit.
Figure 31 Selecting Edit

- In the displayed dialog box, click Add and enter information as prompted.
Figure 32 Permissions dialog box
 Figure 33 Entering information
- When using Windows File Explorer to view an SMB file system, if you need to revert a disk path, use the Back button (marked with 1 in the following figure) or the Up button (marked with 2 in the following figure). Do not select a part of a path (marked with 3 in the following figure) to revert.
Figure 34 Reverting a local disk path

- When using Windows File Explorer to access and use an SMB file system, the SMB file system is not added to the AD domain of the user. If you access the file system using the network path \\huawei.com\share instead of the local disk path C:\myshare, you will fail to configure ACLs because the system cannot determine whether the file system is added to the domain due to unavailable function.
Figure 35 Unable to determine whether the computer is added to the domain
 Figure 36 Incorrect function
Modifying C:\myshare permissions using Windows File Explorer will not modify the permissions of the file system root directory. To modify the permissions on the root directory, use the Set-Acl Powershell or icacls command.
- When using Windows File Explorer to view an SMB file system, if you need to revert a disk path, use the Back button (marked with 1 in the following figure) or the Up button (marked with 2 in the following figure). Do not select a part of a path (marked with 3 in the following figure) to revert.
Method 3: Using the icacls Command
Icacls is a Windows command-line utility that you can use to check or view the ACLs on files or directories.
Do not modify the ACL of the root directory. Otherwise, the file system may fail to be accessed.
If the ACL of the root directory is maliciously deleted, run the following commands to restore the ACL. X:\ is the drive letter used for mount. If the ACL cannot be edited or root directory cannot be accessed because the everyone permissions are deleted, you need to restore the everyone permissions of the root directory as a super user or AD domain administrator.
icacls X:\ /grant BUILTIN\Administrators:(OI)(CI)(F)
icacls X:\ /grant "CREATOR OWNER":(OI)(CI)(IO)(F)
icacls X:\ /grant  "NT AUTHORITY\SYSTEM":(OI)(CI)(F)
icacls X:\ /grant    Everyone:(F)
Examples of editing an ACL are as follows:
#Obtaining the control permission list of the X: directory (the read permission of the directory is required)
icacls X:
#Granting the full control permissions to the user
icacls X: /grant <Username>: (F)
#Granting the full control permissions to the administrator
icacls X: /grant administrator:(F)
#Deleting all permissions of the user
icacls X: /remove <Username>
#Deleting all permissions of everyone
icacls X: /remove everyone
- Log in to the Windows ECS.
- Enter Command Prompt in the search box and open Command Prompt.
- Configure the ACL permissions of the file.
Figure 37 Configuring the ACL permissions of the file

- Remove the ACL permissions of a user.
Figure 38 Removing the ACL permissions of a user

Method 4: Using PowerShell
- Log in to the Windows ECS.
- In the search box, enter Windows PowerShell to open Windows PowerShell.
- Check the file ACL permissions.
#Get properties
$value = Get-Acl -Path "X:"
$value.Access
Figure 39 Checking ACLs using PowerShell
- Configure the ACL permissions of the file.
#Set properties
$identity = "Administrator"
$fileSystemRights = "FullControl"
$type = "Allow"
# Create new rule
$fileSystemAccessRuleArgumentList = $identity, $fileSystemRights, $type
$fileSystemAccessRule = New-Object -TypeName System.Security.AccessControl.FileSystemAccessRule -ArgumentList
$fileSystemAccessRuleArgumentList
# Apply new rule
$value.SetAccessRule($fileSystemAccessRule)
$value.Access
#Set ACL
Set-Acl $value -Path "X:"
Figure 40 Configuring ACLs using PowerShell
Configure appropriate permissions for the file system root directory when creating the file system. Or, due to the permissions inheritance, you may need to separately modify the permissions of subdirectories and files after modifying the root directory permissions.
Feedback
Was this page helpful?
Provide feedbackThank you very much for your feedback. We will continue working to improve the documentation.


