Procedure (Configuring an ECS as a VPC Endpoint Service)
- Create a Direct Connect connection.
- Create a connection.
- Go to the Connections page.
- In the upper left corner of the page, click
 and select a region and project.
 - In the upper right corner, click Create Connection.
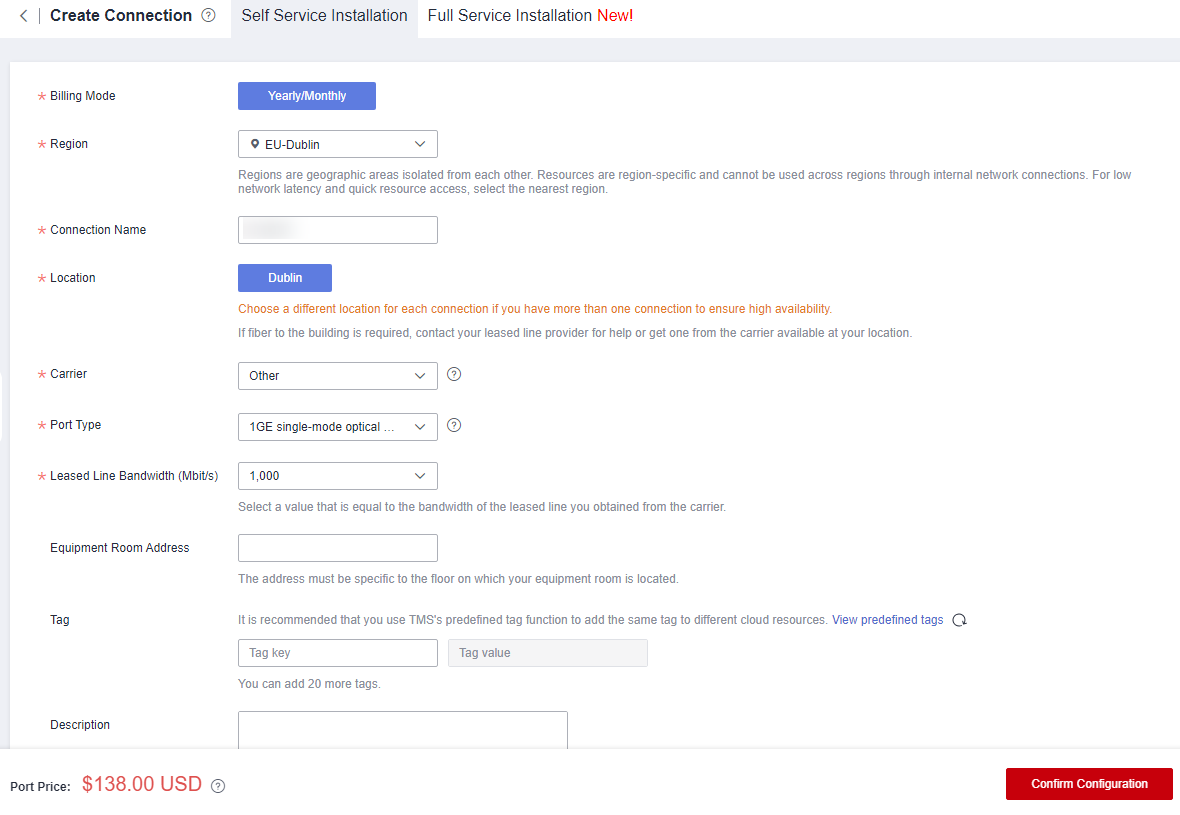
- On the Create Connection page, enter the equipment room details and select the Direct Connect location and port based on Table 1.
Figure 1 Creating a connection

Table 1 Parameters for creating a connection Parameter
Example Value
Description
Billing Mode
Yearly/Monthly
Specifies how you will be billed for the connection. Currently, only Yearly/Monthly is supported.
Region
EU-Dublin
Specifies the region where the connection resides. You can also change the region in the upper left corner of the console.
Connection Name
dc-123
Specifies the name of the connection.
Location
Dublin
Specifies the Direct Connect location where your leased line can be connected to.
Carrier
Other
Specifies the carrier that provides the leased line.
Port Type
1GE single-mode optical port
Specifies the type of the port: 1GE single-mode optical port, 10GE single-mode optical port, 40GE single-mode optical port, or 100GE single-mode optical port.
Leased Line Bandwidth (Mbit/s)
100
Specifies the bandwidth of the line you need to lease from the carrier.
Equipment Room Address
Room xx, xx building, xx road, xx district, xx city
Specifies the address of your equipment room. The address must be specific to the floor your equipment room is on.
Tag
example_key1
example_value1
Adds tags to help you identify your connection. You can change them after the connection is created.
Description
-
Provides supplementary information about the connection.
Required Duration
3 months
Specifies how long the connection will be used for.
Auto-renew
3 months
Specifies whether to automatically renew the subscription to ensure service continuity.
For example, if you select this option and the required duration is three months, the system automatically renews the subscription for another three months.
Enterprise Project
default
Specifies the enterprise project by which connections are centrally managed. Select an existing enterprise project.
- Click Confirm Configuration.
- Confirm the configuration and click Pay Now.
- Confirm the order, select a payment method, and click Confirm.
- After you have paid for the order, a connection ID is allocated to you automatically, and the connection information is displayed on the management console. You will be contacted to confirm the construction plan and relevant information (including your company name, constructor, expected construction time, and construction workers).
- After having confirmed the construction plan, you can arrange the carrier to deploy the dedicated line and connect it to your equipment room based on your construction plan.
- In normal cases, Huawei onsite engineers will connect the dedicated line to the Huawei Cloud gateway port within two working days.
- Verify that the connection is in the Normal state, which means that the connection is ready, and the billing starts.
- Create a virtual gateway.
- In the navigation pane on the left, choose Direct Connect > Virtual Gateways.
- Click Create Virtual Gateway.
- Configure the virtual gateway parameters.
- Click OK.
- Create a virtual interface.
- In the navigation pane on the left, choose Direct Connect > Virtual Interfaces.
- Click Create Virtual Interface.
- Configure the virtual interface parameters.
- Click Create Now.
- Create a connection.
- Create a VPC endpoint service.
- Hover on
 to display Service List and choose Networking > VPC Endpoint.
 - On the displayed page, click Create VPC Endpoint Service.
- Configure the parameters.
- Click Create Now.

In this practice, Connection Approval is enabled when you create a VPC endpoint service. You need to accept the connection from your purchased VPC endpoint.
- Hover on
- Buy a VPC endpoint.
- On the displayed page, click Buy VPC Endpoint.
- Configure the parameters.
- Click Next.
- Confirm the order details and click Submit.
- Approve the connection.
Connection Approval is enabled in 2. If the VPC endpoint status is Pending acceptance, perform the following operations to approve the connection to the VPC endpoint service:
- Locate the VPC endpoint service and click its name.
- On the displayed page, select the Connection Management tab.
- In the Operation column, click Accept.
- (Optional) Verify the connectivity.
Feedback
Was this page helpful?
Provide feedbackThank you very much for your feedback. We will continue working to improve the documentation.


