Adding a Custom IPython Kernel in a Notebook Instance
Scenarios
If the default engine environment in notebook does not meet your needs, you can create a conda environment to set up your own environment as required. This section uses python3.6.5 and tensorflow1.2.0 as an example to describe how to set up an IPython kernel.
Procedure
- Create a conda environment.
Run the command below on the notebook terminal. In the command, my-env indicates a customizable virtual environment name. For details about conda parameters, see the conda official website.
conda create --quiet --yes -n my-env python=3.6.5
After the creation, run the conda info --envs command to view existing virtual environments, where you can see the my-env virtual environment.
sh-4.4$conda info --envs
# conda environments:
#
base                  *  /home/ma-user/anaconda3
TensorFlow-2.1           /home/ma-user/anaconda3/envs/TensorFlow-2.1
my-env                   /home/ma-user/anaconda3/envs/my-env
python-3.7.10            /home/ma-user/anaconda3/envs/python-3.7.10                  /opt/conda/envs/my-env
- Access the conda environment.
source /home/ma-user/anaconda3/bin/activate /home/ma-user/anaconda3/envs/my-env
- Install the following dependency packages in my env:
pip install jupyter
pip install jupyter_core==5.3.0
pip install jupyter_client==8.2.0
pip install ipython==8.10.0
pip install ipykernel==6.23.1
- Add the virtual environment as an IPython kernel.
The value of --name can be customized.
python3 -m ipykernel install --user --name "my-py3-tensorflow-env"
After the command is executed, the following information is displayed:
(my-env) sh-4.4$python3 -m ipykernel install --user --name "my-py3-tensorflow-env"
Installed kernelspec my-py3-tensorflow-env in /home/ma-user/.local/share/jupyter/kernels/my-py3-tensorflow-env
- Customize the environment variables of the virtual environment kernel.
Run the cat /home/ma-user/.local/share/jupyter/kernels/my-py3-tensorflow-env/kernel.json command to view the default configuration.
{
 "argv": [
  "/home/ma-user/anaconda3/envs/my-env/bin/python3",
  "-m",
  "ipykernel_launcher",
  "-f",
  "{connection_file}"
 ],
 "display_name": "my-py3-tensorflow-env",
 "language": "python"
}
Add content in the env field as needed. For reference, see the following configuration. PATH indicates the path to the Python package of the virtual environment.
{ "argv": [ "/home/ma-user/anaconda3/envs/my-env/bin/python3", "-m", "ipykernel_launcher", "-f", "{connection_file}" ], "display_name": "my-py3-tensorflow-env", "language": "python", "env": { "PATH": "/home/ma-user/anaconda3/envs/my-env/bin:/opt/conda/bin:/usr/local/sbin:/usr/local/bin:/usr/sbin:/usr/bin:/sbin:/bin:/home/ma-user/modelarts/ma-cli/bin", "http_proxy": "http://proxy-notebook.modelarts-dev-proxy.com:8083", "https_proxy": "http://proxy-notebook.modelarts-dev-proxy.com:8083", "ftp_proxy": "http://proxy-notebook.modelarts-dev-proxy.com:8083", "HTTP_PROXY": "http://proxy-notebook.modelarts-dev-proxy.com:8083", "HTTPS_PROXY": "http://proxy-notebook.modelarts-dev-proxy.com:8083", "FTP_PROXY": "http://proxy-notebook.modelarts-dev-proxy.com:8083" } } - Access the IPython kernel of the virtual environment.
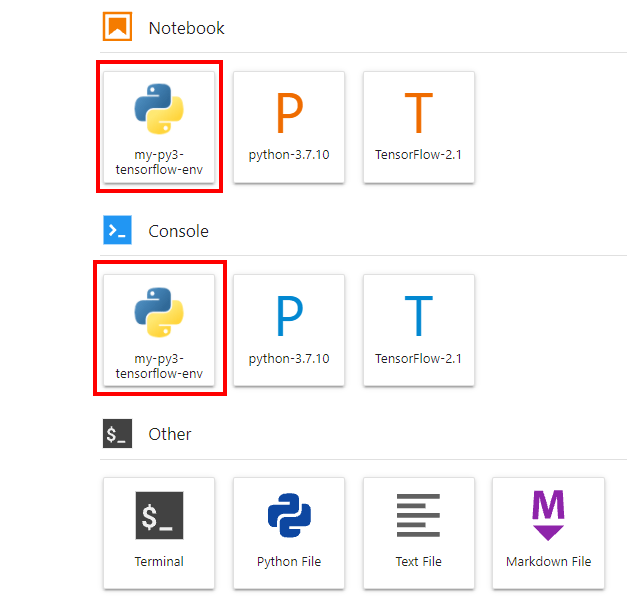
Refresh the JupyterLab page. The custom virtual environment kernel is displayed.

Click my-py3-tensorflow-env to verify that the current environment is used.

- Clear the environment.
Delete the IPython kernel of the virtual environment.
jupyter kernelspec uninstall my-py3-tensorflow-env
Delete the virtual environment.
conda env remove -n my-env
Feedback
Was this page helpful?
Provide feedbackThank you very much for your feedback. We will continue working to improve the documentation.


