Configuring Read Replicas
Scenarios
In a centralized instance, a surge in read requests can consume excessive compute resources. This heavy load may interfere with transaction log (Xlog) replay on standby nodes, leading to increased replication lag between primary and standby nodes. If the primary node fails, the accumulated Xlogs may delay failover. To mitigate this, you can add read replicas to offload and distribute read workloads.
You can also delete read replicas or adjust their specifications to better match changing read demands.
Technical Details
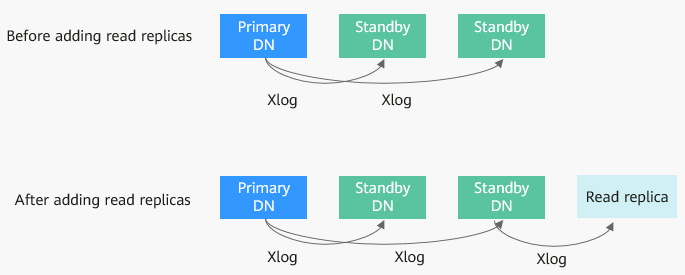
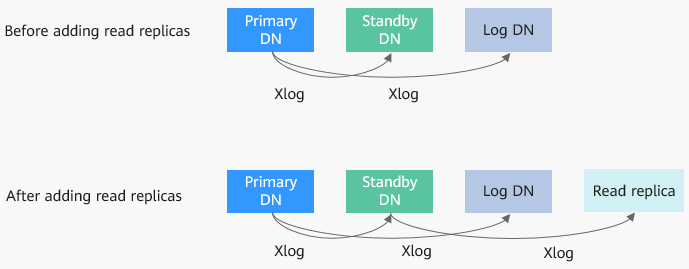
The primary node handles both read and write operations, while standby and log nodes synchronize Xlogs from it. When read traffic increases, high compute resource usage can hinder Xlog replay on standby nodes. Adding read replicas helps offload read requests. They synchronize Xlogs from standby nodes, reducing the primary node's workload and maintaining stable Xlog replay.


Precautions
- Read replica-related operations are supported for centralized (1 primary + 2 standby) instances of V2.0-2.7.1 or later.
- Adding read replicas temporarily stops backups. Once the replicas are ready, the system re-enables backups and runs a full backup automatically.
Adding a Read Replica
- Log in to the management console.
- Click
 in the upper left corner and select a region and project.
 - Click
 in the upper left corner of the page and choose .
 - On the Instances page, click the name of the target instance to go to the Basic Information page.
- In the DB Information area, click Add in the Read Replicas field.
- Select the specifications and parameter template of the read replica, and click Add Read Replica.
- Click Next, confirm the information, and click Submit.
- Check the result of adding a read replica.
On the Instances page, the instance status is Creating read replicas. After the instance status becomes Available, click the instance name. On the Basic Information page, check the number of read replicas.
Deleting a Read Replica
- Log in to the management console.
- Click
 in the upper left corner and select a region and project.
 - Click
 in the upper left corner of the page and choose .
 - On the Instances page, click the name of the target instance to go to the Basic Information page.
- In the DB Information area, click Delete in the Read Replicas field.
- Select the read replica to be deleted and click Next.
- Confirm the information and click Submit.
- Check the result of deleting a read replica.
On the Instances page, the instance status is Deleting a read replica. After the instance status becomes Available, click the instance name. On the Basic Information page, check the number of read replicas.
Changing the Specifications of Read Replicas
- Log in to the management console.
- Click
 in the upper left corner and select a region and project.
 - Click
 in the upper left corner of the page and choose .
 - On the Instances page, click the name of the target instance to go to the Basic Information page.
- In the DB Information area, click Change in the Read Replicas field.
- On the displayed page, select the target read replica and new specifications, and click Next.
- Confirm the specifications and click Submit.
- Check the specification change result.
After the task is submitted, click Go to Instance List. On the Instances page, the instance status is Changing instance specifications. After a few minutes, check the new instance specifications on the Basic Information page.
Feedback
Was this page helpful?
Provide feedbackThank you very much for your feedback. We will continue working to improve the documentation.


