Managing Organization Policies
Organization policies define cloud resource permissions of all member accounts within an organization. For example, you can set an organization policy that allows certain member accounts to purchase the VPC service.
Precautions
- If no policy is attached to an organization, all accounts of the organization and its sub-organizations have all permissions by default.
- Policies attached to an organization will take effect for all accounts of the organization and its sub-organizations.
- Policies will allow or forbid accounts to perform specified operations on relevant cloud services.
- To avoid affecting services, you are advised to apply policies to a testing organization before using them for other organizations.
Creating an Organization Policy
- Go to the Organization Policies page.
- Click the By Policy tab.
- Click Create Policy.

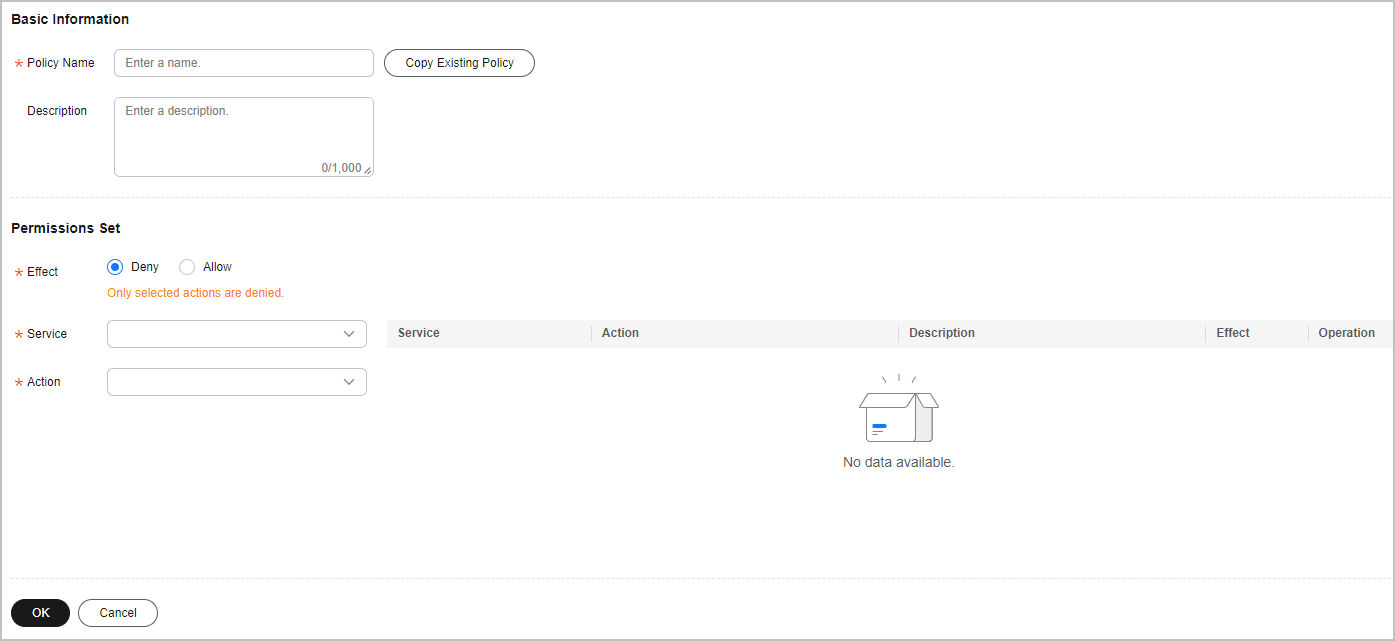
- On the Create Policy page, set policy information.
- Creating a Policy
- Enter the basic information such as the policy name and description.
- Set Effect.

- The options for permission effect include:
- Deny: The specified operations are rejected and other operations are allowed.
- Allow: The specified operations are allowed and other operations are rejected.
- Implementation of organization policies:
- By default, new member accounts associated with your master account have all the permissions required for all cloud services. To control the access of a member account to specific cloud services, you can attach policies to the organization to which the member account belongs. A deny policy refuses the specified operations and permits all the other operations, while an allow policy refuses all operations and permits only the specified operations.
- If a member account is associated with multiple deny policies, all these policies take effect. However, if a member account is associated with multiple allow policies, only the first allow policy authenticated by the system takes effect according to the implementation logic of allow policies. Therefore, to ensure that all allow permissions take effect for a member account, configure all these allow permissions in the same policy and attach the policy to the organization to which the member account belongs.
- The options for permission effect include:
- Set Service and Action.
- Click OK.
- Copying an Existing Policy
- Enter the basic information such as the policy name and description.
- Click Copy Existing Policy.
The Copy Existing Policy dialog box is displayed.
- Select the policy you will copy.
- Click OK. The actions of the selected policy are displayed in the Policy Content text box.
- Change the actions for the new policy.
- Click Check Syntax.
If the syntax of the new policy is correct, the message "Policy content validated successfully." is displayed.
- Click OK.
- Creating a Policy
Adding a Policy to an Organization
- Go to the Organization Policies page.
- Click the By Organization tab.
- In the Organization tree on the left, select the organization to which a policy will be added.
All policies of this organization, including the newly added and inherited policies, are displayed on the right of the page.
- Click Add Policy.
- Select the policies to be added.
- Click OK.

- You can click
 before the policy name to view the content of the selected policy.
 - You can click Cancel Policy in the Operation column to disassociate the policy from the organization.
- You can click
Follow-up Operations
Modifying an Organization Policy
- Go to the Organization Policies page.
- Click the By Policy tab.
- Locate a policy to be modified, and click Edit in the Operation column.
- Modify Policy Name, Description, and Policy Content.
- Click OK.
Deleting an Organization Policy
- Go to the Organization Policies page.
- Click the By Policy tab.
- Locate the policy to be deleted, and click Delete in the Operation column.
- Click Yes.
Feedback
Was this page helpful?
Provide feedbackThank you very much for your feedback. We will continue working to improve the documentation.


