Using SNI Certificates for Access Through Multiple Domain Names
Server Name Indication (SNI) is an extension to TLS. It allows clients to specify which domain name of a listener they are trying to connect in the first request. Once receiving the request, the load balancer searches for the certificate based on the domain name.
SNI Overview
Suppose a listener is associated with a server that hosts multiple HTTPS services, each with its own certificate and domain name.
If the HTTPS listener has only one server certificate, it will always present that same certificate to all clients, regardless of the domain name the clients are trying to access. This may make authentication abnormal.
To address this issue, you can enable SNI when you add an HTTPS listener, allowing the listener to select the right certificate for authentication based on the requested domain name. SNI allows clients to specify which domain name they are trying to connect in the initial SSL handshake. Once receiving the request, the load balancer searches for the certificate based on the domain name. If there is no match, the load balancer uses the default server certificate for authentication.
SNI Certificate
- SNI certificates are server certificates used for multi-domain-name authentication. Each certificate must have an SNI domain name. The SNI domain name specified on the ELB console must be the same as the domain name supported by the certificate for authentication.
- A domain name can be used by both an ECC certificate and an RSA certificate. If this happens, ELB selects the ECC certificate first.
Constraints
- Only HTTPS listeners support SNI. After SNI is enabled, you need to configure at least one SNI certificate for the listener. For details about how to add a certificate, see Adding a Certificate.
- If a certificate has expired, you need to manually replace or delete it by following the instructions in Binding or Replacing a Certificate.
- An HTTPS listener can have up to 30 SNI certificates. All the certificates can have up to 30 domain names.

Listeners of a dedicated load balancer can have up to 50 SNI certificates. You can submit a service ticket to increase the quota.
How SNI Certificates and Domain Names Are Matched
- Domain names in an SNI certificate are matched as follows:
If the domain name of the certificate is *.test.com, a.test.com and b.test.com are supported, but a.b.test.com and c.d.test.com are not supported.
The domain name with the longest suffix is matched. If a certificate contains both *.b.test.com and *.test.com, a.b.test.com preferentially matches *.b.test.com.
- cert-default is the default server certificate bound to the HTTPS listener, and cert-test01 and cert-test02 are SNI certificates.
The domain name of cert-test01 is www.test01.com and that of cert-test02 is www.test02.com.
If the requested domain name matches either of the domain names, the corresponding SNI certificate will be used for authentication. If no domain name is matched, the default server certificate is used for authentication.
Enabling SNI for an HTTPS Listener
- Go to the load balancer list page.
- On the displayed page, locate the load balancer and click its name.
- Click Listeners, locate the listener, and click its name.
- On the Summary tab, click Configure on the right of SNI.
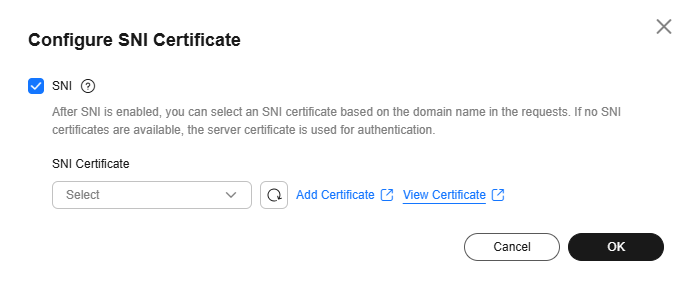
- Enable SNI and select an SNI certificate.
Figure 1 Configuring an SNI certificate

- Click OK.
Helpful Links
Feedback
Was this page helpful?
Provide feedbackThank you very much for your feedback. We will continue working to improve the documentation.


