After alarm notification is enabled, CFW will send notifications to you through the method you specified (such as email or SMS) so that you can monitor the firewall status and quickly detect exceptions.
CFW supports the following alarms:
- Attack alarm: An alarm is triggered when the IPS detects an attack.
- High traffic warning: An alarm is triggered if the traffic reaches the specified percentage of the traffic processing capability you purchased.
- EIP not protected: An alarm is triggered when the current account has EIPs that are not protected.
Setting Alarm Notifications
Perform the following operations to set alarm notifications:
Attack Alarm
- Log in to the CFW console.
- Click
 in the upper left corner of the management console and select a region or project.
- (Optional) Switch to another firewall instance. Select a firewall from the drop-down list in the upper left corner of the page.
- In the navigation pane, choose System Management > Notifications.
Figure 1 Alarm notifications

- In the Operation column of the Attack alarm, click Edit. On the notification item settings page that is displayed, configure notification parameters.

The notification settings take effect immediately after being modified.
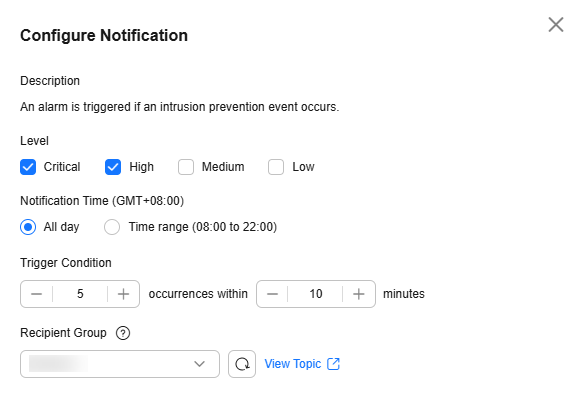
Figure 2 Notification item settings - attack alarm

Table 1 Attack alarm parameters
|
Parameter |
Description |
|
Description |
IPS attack alarm |
|
Level |
Select the risk levels that trigger notifications.
The options are Serious, High, Medium, and Low. Multiple options can be selected.
For example, if you select High and Medium, the firewall will notify you by SMS message or email when detecting an intrusion with a high- or medium-level risk. |
|
Notification Time |
Select a time range for sending notifications.
CFW sends notifications only within the alarm notification period. If an exception is detected outside this period, no notifications will be sent. |
|
Trigger Condition |
Configure the trigger condition.
Alarm notifications are sent if the number of attacks is at least equal to the threshold configured for a certain period. |
|
Recipient Group |
Select a topic from the drop-down list to configure the endpoints for receiving alarm notifications.
If there are no topics, click View Topic and perform the following steps to create a topic:
- Create a topic. For details, see Creating a Topic.
- Add one or more subscriptions to the topic. You will need to provide a phone number, email address, function, platform application endpoint, DMS endpoint, or HTTP/HTTPS endpoint for receiving alarm notifications. For details, see Adding a Subscription.
- Confirm the subscription.
|
- Click OK.
- In the Status column of Attack alarm, click
 to enable it.
High Traffic Warning
- Log in to the CFW console.
- Click
 in the upper left corner of the management console and select a region or project.
- (Optional) Switch to another firewall instance. Select a firewall from the drop-down list in the upper left corner of the page.
- In the navigation pane, choose System Management > Notifications.
Figure 3 Alarm notifications

- In the Operation column of the High Traffic Warning alarm, click Edit. On the notification item settings page that is displayed, configure notification parameters.

The notification settings take effect immediately after being modified.
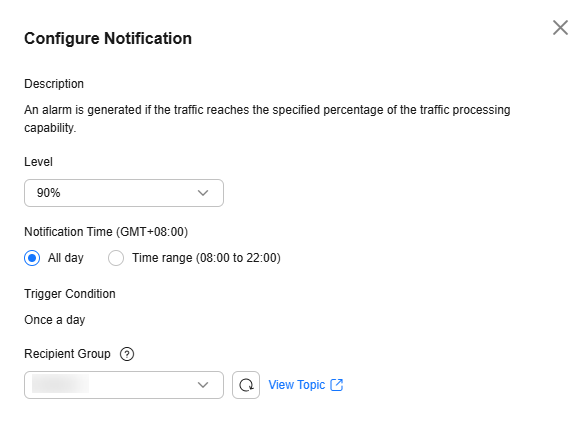
Figure 4 Notification item settings - high traffic warning

Table 2 High traffic warning parameters
|
Parameter |
Description |
|
Description |
An alarm is generated if the traffic reaches the specified percentage of the traffic processing capability you purchased. |
|
Level |
Select a percentage. When the maximum peak inbound or outbound traffic reaches the percentage of the traffic processing capability you purchased, an alarm notification is triggered.
For example, you can select 70%, 80%, or 90%.
If this parameter is set to 80%, an alarm notification is sent when the used traffic reaches 80% of the purchased traffic. |
|
Notification Time |
Select a time range for sending notifications.
CFW sends notifications only within the alarm notification period. If an exception is detected outside this period, no notifications will be sent. |
|
Trigger Condition |
Once a day |
|
Recipient Group |
Select a topic from the drop-down list to configure the endpoints for receiving alarm notifications.
If there are no topics, click View Topic and perform the following steps to create a topic:
- Create a topic. For details, see Creating a Topic.
- Add one or more subscriptions to the topic. You will need to provide a phone number, email address, function, platform application endpoint, DMS endpoint, or HTTP/HTTPS endpoint for receiving alarm notifications. For details, see Adding a Subscription.
- Confirm the subscription.
|
- Click OK.
- In the Status column of High Traffic Warning, click
 to enable it.
EIP Not Protected
- Log in to the CFW console.
- Click
 in the upper left corner of the management console and select a region or project.
- (Optional) Switch to another firewall instance. Select a firewall from the drop-down list in the upper left corner of the page.
- In the navigation pane, choose System Management > Notifications.
Figure 5 Alarm notifications

- In the Operation column of the EIP Not Protected alarm, click Edit. On the notification item settings page that is displayed, configure notification parameters.

The notification settings take effect immediately after being modified.
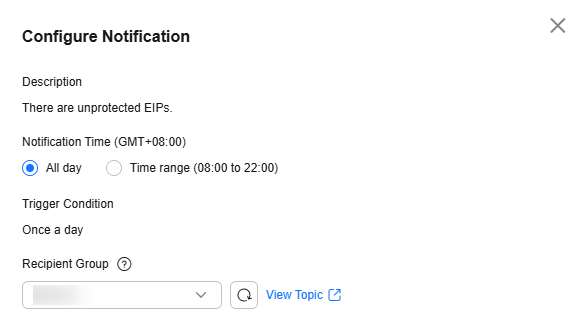
Figure 6 Notification settings - EIP Not Protected

Table 3 Parameters of the alarm EIP Not Protected
|
Parameter |
Description |
|
Description |
This alarm indicates there are unprotected EIPs. |
|
Notification Time |
Select a time range for sending notifications.
CFW sends notifications only within the alarm notification period. If an exception is detected outside this period, no notifications will be sent. |
|
Trigger Condition |
Once a day |
|
Recipient Group |
Select a topic from the drop-down list to configure the endpoints for receiving alarm notifications.
If there are no topics, click View Topic and perform the following steps to create a topic:
- Create a topic. For details, see Creating a Topic.
- Add one or more subscriptions to the topic. You will need to provide a phone number, email address, function, platform application endpoint, DMS endpoint, or HTTP/HTTPS endpoint for receiving alarm notifications. For details, see Adding a Subscription.
- Confirm the subscription.
|
- Click OK.
- In the Status column of EIP Not Protected, click
 to enable it.
References
To add assets to the EIP Not Protected alarm whitelist, click Add to Alarm Whitelist in the Operation column of the alarm. Select EIPs, add them to the whitelist on the right, and click OK. The whitelisted EIPs will no longer trigger this alarm.


