Using Loader to Export Data from HDFS or OBS to a Relational Database
Scenario
This section describes how to use Loader to export data from HDFS or OBS to a relational database.
Prerequisites
- You have obtained the service username and password for creating a Loader job.
- You have had the permission to access the HDFS or OBS directories and data involved in job execution.
- You have obtained the username and password of the relational database.
- No disk space alarm is reported, and the available disk space is sufficient for importing and exporting data.
- If a configured task requires the Yarn queue function, the user must be authorized with related Yarn queue permission.
- The user who configures a task must obtain execution permission on the task and obtain usage permission on the related connection of the task.
- Before the operation, perform the following steps:
- Obtain the JAR package of the relational database driver and save it to the following directory on the active and standby Loader nodes: ${BIGDATA_HOME}/FusionInsight_Porter_xxx/install/FusionInsight-Sqoop-1.99.3/FusionInsight-Sqoop-1.99.3/server/webapps/loader/WEB-INF/ext-lib.
- Run the following command on the active and standby nodes as user root to modify the permission:
cd ${BIGDATA_HOME}/FusionInsight_Porter_xxx/install/FusionInsight-Sqoop-1.99.3/FusionInsight-Sqoop-1.99.3/server/webapps/loader/WEB-INF/ext-lib
chown omm:wheel JAR package name
chmod 600 JAR package name
- Log in to FusionInsight Manager. Choose Cluster > Service > Loader > More > Restart. Enter the password of the administrator to restart the Loader service.
Procedure
Setting Basic Job Information
- Access the Loader web UI.
- Log in to FusionInsight Manager. For details, see Accessing FusionInsight Manager.
- Choose Cluster > Services > Loader.
- Click LoaderServer(Node name, Active). The Loader web UI is displayed.
Figure 1 Loader web UI

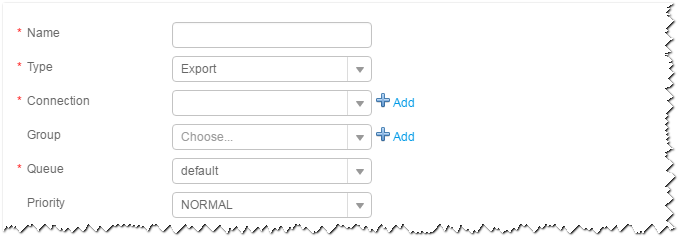
- Click New Job to go to the Basic Information page and set basic job information.
Figure 2 Basic Information

- Set Name to the name of the job.
- Set Type to Export.
- Set Group to the group to which the job belongs. No group is created by default. You need to click Add to create a group and click OK to save the created group.
- Set Queue to the Yarn queue that executes the job. The default value is root.default.
- Set Priority to the priority of the Yarn queue that executes the job. The default value is NORMAL. The options are VERY_LOW, LOW, NORMAL, HIGH, and VERY_HIGH.
- In the Connection area, click Add to create a connection, set Connector to generic-jdbc-connector or dedicated database connector (oracle-connector, oracle-partition-connector or mysql-fastpath-connector), set connection parameters, and click Test to verify whether the connection is available. When "Test Success" is displayed, click OK.

- For connection to relational databases, general database connectors (generic-jdbc-connector) or dedicated database connectors (oracle-connector, oracle-partition-connector, and mysql-fastpath-connector) are available. However, compared with general database connectors, dedicated database connectors perform better in data import and export because they are optimized for specific database types.
- When mysql-fastpath-connector is used, the mysqldump and mysqlimport commands of MySQL must be available on NodeManagers, and the MySQL client version to which the two commands belong must be compatible with the MySQL server version. If the two commands are unavailable or the versions are incompatible, see http://dev.mysql.com/doc/refman/5.7/en/linux-installation-rpm.html. Install the MySQL client applications and tools.
Table 1 generic-jdbc-connector connection parameters Parameter
Description
Example Value
Name
Specifies the name of a relational database connection.
dbName
JDBC Driver Class
Specifies the name of a Java database connectivity (JDBC) driver class.
oracle.jdbc.driver.OracleDriver
JDBC Connection String
Specifies the JDBC connection string.
jdbc:oracle:thin:@//10.16.0.1:1521/oradb
Username
Specifies the username for connecting to the database.
omm
Password
Specifies the password for connecting to the database.
xxxx
JDBC Connection Properties
JDBC connection attribute. Click Add to manually add the attribute.
- Name: connection attribute name
- Value: connection attribute value
- Name: socketTimeout
- Value: 20
Setting Data Source Information
- Click Next. On the displayed From page, set Source type to HDFS.
Table 2 Data source parameters Parameter
Description
Example Value
Input directory
Specifies the input path when data is exported from HDFS or OBS.
NOTE:You can use macros to define path parameters. For details, see Using Macro Definitions in Configuration Items.
/user/test
Path filter
Specifies the wildcard for filtering the directories in the input paths of the source files. Input directory is not used in filtering. If there are multiple filter conditions, use commas (,) to separate them. If the parameter is empty, the directory is not filtered. The regular expression filtering is not supported.
- ? matches a single character.
- * indicates multiple characters.
- Adding ^ before the condition indicates negated filtering, that is, file filtering.
*
File filter
Specifies the wildcard for filtering the file names of the source files. If there are multiple filter conditions, use commas (,) to separate them. The value cannot be left blank. The regular expression filtering is not supported.
- ? matches a single character.
- * indicates multiple characters.
- Adding ^ before the condition indicates negated filtering, that is, file filtering.
*
File Type
Specifies the file import type.
- TEXT_FILE: imports a text file and stores it as a text file.
- SEQUENCE_FILE: imports a text file and stores it as a sequence file.
- BINARY_FILE: imports files of any format by using binary streams but not to process the files.
NOTE:When the file import type to TEXT_FILE or SEQUENCE_FILE, Loader automatically selects a decompression method based on the file name extension to decompress a file.
TEXT_FILE
File split type
Indicates whether to split source files by file name or size. The files obtained after the splitting are used as the input files of each map in the MapReduce task for data export.
- FILE: indicates that the source file is split by file. That is, each map processes one or multiple complete files, the same source file cannot be allocated to different maps, and the source file directory structure is retained after data import.
- SIZE: indicates that the source file is split by size. That is, each map processes input files of a certain size, and a source file can be divided and processed by multiple maps. After data is stored in the output directory, the number of saved files is the same as the number of maps. The file name format is import_part_xxxx, where xxxx is a unique random number generated by the system.
FILE
Extractors
Specifies the number of maps that are started at the same time in a MapReduce job of a data configuration operation. This parameter cannot be set when Extractor size is set. The value must be less than or equal to 3000.
20
Extractor size
Specifies the size of data processed by maps that are started in a MapReduce job of a data configuration operation. The unit is MB. The value must be greater than or equal to 100. The recommended value is 1000. This parameter cannot be set when Extractors is set. When a relational database connector is used, Extractor size is unavailable. You need to set Extractors.
-
Setting Data Transformation
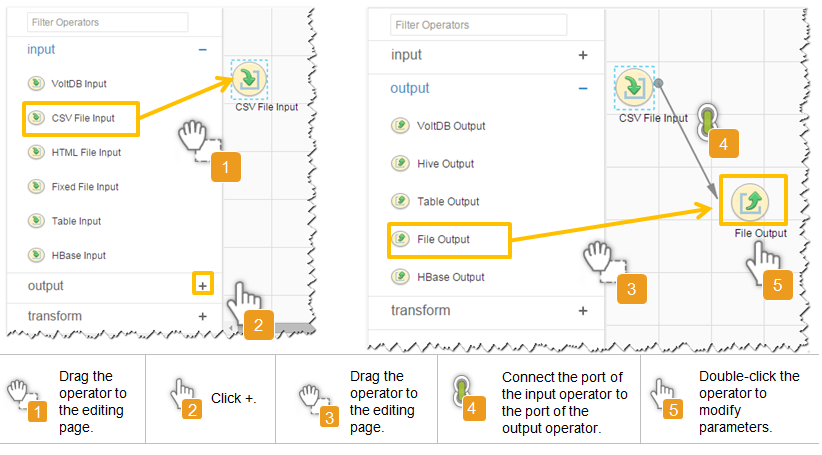
- Click Next. On the displayed Transform page, set the transformation operations in the data transformation process. For details about how to select operators and set parameters, see Loader Operator Help and Table 3.
Table 3 Setting the input and output parameters of the operator Input Type
Export Type
CSV file input
Table output
HTML Input
Table output
Fixed-width file input
Table output
Figure 3 Operator operation procedure
Setting Data Storage Information and Executing the Job
- Click Next. On the displayed To page, set the data storage mode.
Table 4 Parameter description Parameter
Description
Example Value
Schema name
Specifies the database schema name.
dbo
Table Name
Specifies the name of a database table that is used to save the final data of the transmission.
NOTE:Table names can be defined using macros. For details, see Using Macro Definitions in Configuration Items.
test
Temporary table
Specifies the name of a temporary database table that is used to save temporary data during the transmission. The fields in the table must be the same as those in the database specified by Table name.
NOTE:A temporary table is used to prevent dirty data from being generated in the destination table when data is exported to the database. Data is migrated from the temporary table to the destination table only after all data is successfully written to the temporary table. Using temporary tables increases the job execution time.
tmp_test
- Click Save and run to save and run the job.
Checking the Job Execution Result
- Go to the Loader WebUI. When Status is Succeeded, the job is complete.
Figure 4 Viewing a job

Feedback
Was this page helpful?
Provide feedbackThank you very much for your feedback. We will continue working to improve the documentation.


