Using Yonghong BI to Access MRS HetuEngine
Application Scenarios
Yonghong BI is a one-stop big data BI platform that comprehensively covers all stages of the data analysis process, effortlessly completing end-to-end data analysis tasks, including data collection, cleaning, integration, storage, computation, modeling, training, visualization, and collaboration, thereby significantly reducing the costs associated with implementation, integration, and training.
The following describes how to use Yonghong Desktop 9.1 to access HetuEngine in a security cluster.
Solution Architecture
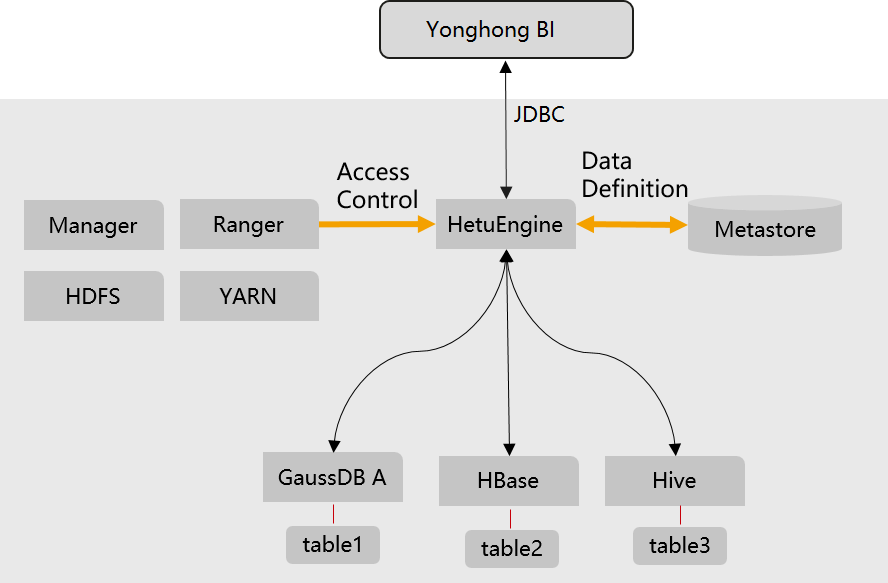
Enterprises usually store massive data, such as from various databases and warehouses, for management and information collection. However, diversified data sources, hybrid dataset structures, and scattered data storage rise the development cost for cross-source query and prolong the cross-source query duration.
HetuEngine simplifies cross-source analysis operations by providing unified standard SQL statements for collaborative analysis.

Constraints
- Yonghong Desktop 9.1 has been installed.
- This topic is available for MRS 3.1.2 and later clusters of the LTS version.
Step 1: Create an MRS Cluster and Compute Instances
- Create an MRS cluster.
Create an MRS cluster that contains the HetuEngine component.
- Create the hetu_user user.
Create a human-machine user, for example, hetu_user, in the cluster. For details, see Creating a HetuEngine User. For clusters with Ranger authentication enabled, you need to grant the Ranger permission to hetu_user based on service requirements. For details, see Adding a Ranger Access Permission Policy for HetuEngine.
- Creating a HetuEngine compute instance.
Create a compute instance and ensure it is running properly. For details, see Creating a HetuEngine Compute Instance.
Step 2: Obtain the JDBC JAR Package
- Log in to FusionInsight Manager.
- Choose Cluster > Services > HetuEngine > Dashboard.
- In the upper right corner of the page, choose More > Download Client and download the Complete Client to the local PC as prompted.
- Decompress the HetuEngine client package FusionInsight_Cluster_Cluster ID_ HetuEngine_Client.tar to obtain the JDBC file and save it to a local directory, for example, D:\test.

How to obtain the JDBC file:
Decompress the package in the FusionInsight_Cluster_Cluster ID_HetuEngine_ClientConfig\HetuEngine\xxx\ directory to obtain the hetu-jdbc-*.jar file.
Note: xxx can be arm or x86.
Step 3: Configure Parameters for Accessing HetuEngine on Yonghong
- Open Yonghong Desktop and choose Create Connection > presto.

- On the data source configuration page, set parameters as shown in the following figure. User and Password are the username and password of the created human-machine user. After the configuration is complete, click Test Connection.
Figure 2 Configuring the data source

- Driver: Choose Custom > Select Custom Driver. Click
 , edit the driver name, click Upload File to upload the obtained JDBC JAR file, and click OK.

- URL: Enter the URL required for using either HSFabric or HSBroker. For details, see Table 1.
- Server Login: Select Username and Password and enter the username and password.
- Driver: Choose Custom > Select Custom Driver. Click
- Click New Data Set. On the page that is displayed, modify the save path and change the file name as shown in the following figure, and click OK.
Figure 3 Modifying the save path and changing the file name

- Select the file name of the created data set under DemoAll. The default file name Untitled-0 is used as an example. Choose Untitled-0 > hive > default > Views and select SQL Data Set under New Data Set in the right pane.

- In the Connection area, select the new data set. All table information is displayed. Select a table, for example, test, and click Refresh Data. All table information is displayed in the Data Details area on the right.

Feedback
Was this page helpful?
Provide feedbackThank you very much for your feedback. We will continue working to improve the documentation.


