Using DBeaver to Access Phoenix
Application Scenarios
DBeaver is an SQL client and database management tool. For relational databases, you can use JDBC APIs to interact with a database through the JDBC driver. For NoSQL databases, you can use the dedicated database driver.
This topic uses DBeaver 6.3.5 as an example to describe how to access an MRS 3.1.0 cluster that requires Kerberos authentication. The HBase service in the cluster does not require Ranger authentication.
Solution Architecture
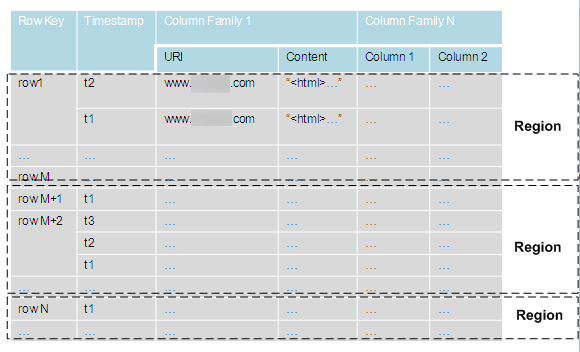
HBase stores data in tables, as shown in Figure 1. HBase divides table data into multiple Regions, and Master allocates the data to RegionServers for management.
Each Region contains data within a RowKey range. An HBase data table contains only one Region at first. As the number of data increases and reaches the upper limit of the Region capacity, the Region is split into two Regions. You can define the RowKey range of a Region when creating a table or define the Region size in the configuration file.
Phoenix is an intermediate structured query language (SQL) layer built on HBase. Phoenix provides a JDBC driver that can be embedded in a client. The Phoenix query engine converts input SQL statements to one or more HBase scans, and compiles and executes the scan tasks to generate a standard JDBC result set.
Constraints
- DBeaver 6.3.5 has been installed. You can download the DBeaver installation package by clicking https://dbeaver.io/files/6.3.5/dbeaver-ce-6.3.5-x86_64-setup.exe.
- JDK 1.8.0_x has been installed.
Step 1: Configure the DBeaver Installation Environment
- Add the bin directory of JDK 1.8.0_x, for example, C:\Program Files\Java\jdk1.8.0_121\bin, to the dbeaver.ini file in the DBeaver installation directory.
Figure 2 Adding the bin directory of JDK

- Download the Phoenix software package from https://archive.apache.org/dist/phoenix/apache-phoenix-5.0.0-HBase-2.0/bin/apache-phoenix-5.0.0-HBase-2.0-bin.tar.gz and decompress it to obtain phoenix-5.0.0-HBase-2.0-client.jar.
- Create and purchase an MRS 3.1.0 cluster that does not require Kerberos authentication and contains the HBase component.
- Install the client that contains HBase and download the hbase-site.xml file from the Client installation directory/HBase/hbase/conf directory on the node where the client is installed. Use the compression software to open the phoenix-5.0.0-HBase-2.0-client.jar file and drag hbase-site.xml to the JAR file.
Step 2: Configure DBeaver Parameters for Accessing Phoenix
- Open DBeaver. In the navigation pane, choose File > New > DBeaver > Database Connection.
Figure 3 Creating a database connection

- Click Next. In the Select your database dialog box, select Apache Phoenix and click Next.
Figure 4 Selecting a database

- Click Edit Driver Settings.
Figure 5 Edit Driver Settings

- Click Add File and select the prepared phoenix-5.0.0-HBase-2.0-client.jar file. If there are multiple driver packages, delete them and retain only added phoenix-5.0.0-HBase-2.0-client.jar.
Figure 6 Deleting original driver packages
 Figure 7 Adding the Phoenix JAR file
- Click Find Class and select org.apache.phoenix.jdbc.PhoenixDriver for Driver class.
Figure 8 Loading a driver class

- Add the ZooKeeper Base Path.
- Log in to FusionInsight Manager and choose Cluster > Services > HBase. On the Dashboard tab page that is displayed, click the link next to HMaster WebUI to access the HBase web UI. Search for ZooKeeper Base Path and obtain its value. As shown in the following figure, the value of ZooKeeper Base Path is /hbase.
Figure 9 Viewing the value of ZooKeeper Base Path

- Add a colon (:) and the ZooKeeper Base Path value, that is, :/hbase to the end of the original URL for URL Template and click OK.
Figure 10 Configuring URL Template

- Log in to FusionInsight Manager and choose Cluster > Services > HBase. On the Dashboard tab page that is displayed, click the link next to HMaster WebUI to access the HBase web UI. Search for ZooKeeper Base Path and obtain its value. As shown in the following figure, the value of ZooKeeper Base Path is /hbase.
- Configure EIPs. If the network between local Windows hosts and the cluster is disconnected, configure an EIP for each HBase node and ZooKeeper node, and add the mapping between the EIPs of all nodes and the host domain names to the hosts file on the local Windows hosts. An example is as follows:


If Windows ECSs are used and they can communicate with the cluster, you do not need to configure EIPs.
- Log in to FusionInsight Manager, choose Cluster > Services > ZooKeeper, and click the Instances tab.
Select a node and enter the EIP of the node in Host. (If a Windows ECS is selected and it can communicate with the cluster properly, enter the service IP address of the ECS.)
Figure 11 Configuring Host
- Click Test Connection. If the information shown in Figure 12 is displayed, the interconnection is successful. Click OK.
- Log in to the node where the HBase client is installed as the client installation user and run the following commands to create the MY_NS namespace:
cd Client installation directory
source bigdata_env
hbase shell
create_namespace "MY_NS"
Step 3: Verify the Connection on DBeaver
- Open DBeaver and choose SQL Editor > New SQL Editor to run related SQL statements.
- Enter the following commands in the editor and choose SQL Editor > Execute SQL Statement to create the TEST table in the DEFAULT namespace:
CREATE TABLE IF NOT EXISTS TEST (id VARCHAR PRIMARY KEY, name VARCHAR);
UPSERT INTO TEST(id,name) VALUES ('1','jamee');
- Enter the following commands in the editor and choose SQL Editor > Execute to create the TEST table in the MY_NS namespace and inset data to the namespace:
CREATE TABLE IF NOT EXISTS MY_NS.TEST (id integer not null primary key, name varchar);
UPSERT INTO MY_NS.TEST VALUES(1,'John');
UPSERT INTO MY_NS.TEST VALUES(2,'Tom');
UPSERT INTO MY_NS.TEST VALUES(3,'Manson');
UPSERT INTO MY_NS.TEST VALUES(4,'Aurora');
- Enter the following commands in the editor and choose SQL Editor > Execute SQL Statement to create the TEST table in the DEFAULT namespace:
- Right-click the connection name, click Refresh, and click
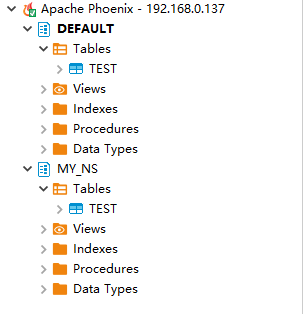
 on the left of the connection name to view the tables created in DEFAULT and MY_NS.
Figure 13 Viewing tables
Feedback
Was this page helpful?
Provide feedbackThank you very much for your feedback. We will continue working to improve the documentation.


