Building with npm and Uploading the Software Package to the Release Repo (Built-in Executors, GUI)
Scenario
In this practice, you use built-in executors provided by CodeArts Build to compile a Node.js project and upload the resulting software package to the release repo. These steps will be carried out through the graphical user interface (GUI).
These steps depend on the following services:
- CodeArts Repo: stores your project code.
- CodeArts Artifact: stores your private dependencies.
Requirements
- You have permissions for CodeArts Artifact.
- You have permissions for CodeArts Repo.
Procedure
|
Step |
Description |
|---|---|
|
#codeci_practice_1003/en-us_topic_0000001947776221_section1885415962013 |
Create a project. |
|
Create a CodeArts Repo repository. |
|
|
Create a build task. |
|
|
Configure build actions and run the build task. |
|
|
View and verify the build results. |
Creating a Project
- Log in to the Huawei Cloud console with your Huawei Cloud account.
- Click
 in the upper left corner and choose from the service list.
 - Click Access Service. The homepage of CodeArts is displayed.
- Click Create Project, and select the Scrum template.
- Set the project name to build-bestpractice and , and leave the other parameters as default.
- Click OK to access the project.
Creating a CodeArts Repo Repository
- In the navigation pane, choose .
- Access CodeArts Repo, click New Repository. On the displayed page, select Template, and click Next.
- On the template selection page, select the Nodejs Webpack Demo template and click Next.
- On the repository creation page, type nodesource in the Repository Name field, leave the other parameters as default, and click OK.
Creating a Build Task
- In the navigation pane, choose .
- Click Create Task. On the displayed Basic Information page, set parameters according to Table 2. Then, click Next.
Table 2 Basic information Parameter
Description
Name
Assign a custom name to the build task, for example, npm_yml_build.
Code Source
Select Repo.
Repository
Select nodesource, the code repository created in Creating a CodeArts Repo Repository.
Default Branch
Keep the default value master.
Description
Enter additional information to describe the build task.
- Select the npm template and click OK. The Build Actions page is displayed.
Configuring Build Actions and Running the Build Task
- Configure action Build with npm.
In the command editor, add # before the npm run build command. Then add the zip -r ./nodeserver.zip ./ command to pack the code into nodeserver.zip, as shown in Figure 1. Leave the other parameters as default.
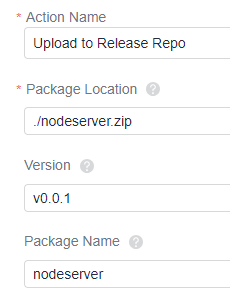
- Configure action Upload to Release Repo according to Figure 2.
- Once you have finished configuring all build actions, click Save and Run to run the build task.
Feedback
Was this page helpful?
Provide feedbackThank you very much for your feedback. We will continue working to improve the documentation.


