
Creating Table Migration Jobs in Batches Using CDM Nodes
Scenario
In a service system, data sources are usually stored in different tables to reduce the size of a single table in complex application scenarios.
In this case, you need to create a data migration job for each table when using CDM to integrate data. This tutorial describes how to use the For Each and CDM nodes provided by the DataArts Factory module to create table migration jobs in batches.
In this tutorial, the source MySQL database has three tables, mail01, mail02, and mail03. The tables have the same structure but different data content. The destination is MRS Hive.
Prerequisites
- You have created a CDM cluster.
- MRS Hive has been enabled.
- Databases and tables have been created in MRS Hive.
Creating a Link
- Log in to the DataArts Studio console, locate the target DataArts Studio instance, and click Access on the instance card.
- Locate a workspace and click DataArts Migration.
- In the Operation column, click Job Management.
- Click the Links tab and then Driver Management. Upload the MySQL database driver by following the instructions in Managing Drivers.
- Click the Links tab and then Create Link. Select MySQL and click Next to configure parameters for the link. After the configuration is complete, click Save to return to the Links page.
Table 1 Parameters for a link to a MySQL database Parameter
Description
Example Value
Name
Link name, which should be defined based on the data source type, so it is easier to remember what the link is for
mysql_link
Database Server
IP address or domain name of the database to connect
Click Select next to the text box and select a MySQL DB instance in the displayed dialog box.
192.168.0.1
Port Number
Port of the database to connect
3306
Database
Name of the database to connect
dbname
Username
Username used for accessing the database This account must have the permissions required to read and write data tables and metadata.
cdm
Password
Password of the user
-
Use Local API
(Optional) Whether to use the local API of the database for acceleration.
When you create a MySQL link, CDM automatically enables the local_infile system variable of the MySQL database to enable the LOAD DATA function, which accelerates data import to the MySQL database. If this parameter is enabled, the date type that does not meet the format requirements will be stored as 0000-00-00. For details, visit the official MySQL website.
If CDM fails to enable this function, contact the database administrator to enable the local_infile system variable. Alternatively, set Use Local API to No to disable API acceleration.
If data is imported to RDS for MySQL, the LOAD DATA function is disabled by default. In such a case, you need to modify the parameter group of the MySQL instance and set local_infile to ON to enable the LOAD DATA function.
NOTE:If local_infile on RDS is uneditable, it is the default parameter group. You need to create a parameter group, modify its values, and apply it to the RDS for MySQL instance. For details, see the Relational Database Service User Guide.
Yes
Use Agent
This parameter does not need to be configured. The agent function will be unavailable soon.
-
Agent
This parameter does not need to be configured. The agent function will be unavailable soon.
-
local_infile Character Set
When using local_infile to import data to MySQL, you can configure the encoding format.
utf8
Driver Version
Select a driver version that adapts to the database type.
-
Fetch Size
(Optional) Displayed when you click Show Advanced Attributes.
Number of rows obtained by each request. Set this parameter based on the data source and the job's data size. If the value is either too large or too small, the job may run for a long time.
1000
Commit Size
(Optional) Displayed when you click Show Advanced Attributes.
Number of records submitted each time. Set this parameter based on the data destination and the job's data size. If the value is either too large or too small, the job may run for a long time.
-
Link Attributes
(Optional) Click Add to add the JDBC connector attributes of multiple specified data sources. For details, see the JDBC connector document of the corresponding database.
The following are some examples:- connectTimeout=360000 and socketTimeout=360000: When a large amount of data needs to be migrated or the entire table is retrieved using query statements, the migration fails due to connection timeout. In this case, you can customize the connection timeout interval (ms) and socket timeout interval (ms) to prevent failures caused by timeout.
- tinyInt1isBit=false or mysql.bool.type.transform=false: By default, tinyInt1isBit is true, indicating that TINYINT(1) is processed as a bit, that is, Types.BOOLEAN, and 1 or 0 is read as true or false. As a result, the migration fails. In this case, you can set tinyInt1isBit to false to avoid migration failures.
- useCursorFetch=false: By default, useCursorFetch is enabled, indicating that the JDBC connector communicates with relational databases using a binary protocol. Some third-party systems may have compatibility issues, causing migration time conversion errors. In this case, you can disable this function. Open-source MySQL databases support the useCursorFetch parameter, and you do not need to set this parameter.
- allowPublicKeyRetrieval=true: By default, public key retrieval is disabled for MySQL databases. If TLS is unavailable and an RSA public key is used for encryption, connection to a MySQL database may fail. In this case, you can enable public key retrieval to avoid connection failures.
sslmode=require
Reference Sign
(Optional) Delimiter between the names of the referenced tables or columns. For details, see the product documentation of the corresponding database.
'
Batch Size
Number of rows written each time. It should be less than Commit Size. When the number of rows written reaches the value of Commit Size, the rows will be committed to the database.
100
- Click the Links tab and then Create Link. Select MRS Hive and click Next to configure parameters for the link. After the configuration is complete, click Save to return to the Links page.
Table 2 MRS Hive link parameters Parameter
Remarks
Example
Metric Name
Link name, which should be defined based on the data source type, so it is easier to remember what the link is for
hive
Manager IP
Floating IP address of MRS Manager. Click Select next to the Manager IP text box to select an MRS cluster. CDM automatically fills in the authentication information.
127.0.0.1
Authentication Method
Authentication method used for accessing MRS- SIMPLE: Select this for non-security mode.
- KERBEROS: Select this for security mode.
KERBEROS
Hive Version
Hive version. Set it to the Hive version on the server.
HIVE_3_X
Username
If Authentication Method is set to KERBEROS, you must provide the username and password used for logging in to MRS Manager. If you need to create a snapshot when exporting a directory from HDFS, the user configured here must have the administrator permission on HDFS.
To create a data connection for an MRS security cluster, do not use user admin. The admin user is the default management page user and cannot be used as the authentication user of the security cluster. You can create an MRS user and set Username and Password to the username and password of the created MRS user when creating an MRS data connection.NOTE:- If the CDM cluster version is 2.9.0 or later and the MRS cluster version is 3.1.0 or later, the created user must have the permissions of the Manager_viewer role to create links on CDM. To perform operations on databases, tables, and data of a component, you also need to add the user group permissions of the component to the user.
- If the CDM cluster version is earlier than 2.9.0 or the MRS cluster version is earlier than 3.1.0, the created user must have the permissions of Manager_administrator, Manager_tenant, or System_administrator to create links on CDM.
cdm
Password
Password for logging in to MRS Manager
-
OBS storage support
The server must support OBS storage. When creating a Hive table, you can store the table in OBS.
Disabled
Run Mode
This parameter is used only when the Hive version is HIVE_3_X. Possible values are:- EMBEDDED: The link instance runs with CDM. This mode delivers better performance.
- STANDALONE: The link instance runs in an independent process. If you want to connect CDM to multiple Hadoop data sources (MRS, Hadoop, or CloudTable), and both KERBEROS and SIMPLE authentication modes are available, you must select STANDALONE for this parameter. NOTE:
The STANDALONE mode is used to solve the version conflict problem. If the connector versions of the source and destination ends of the same link are different, a JAR file conflict occurs. In this case, you need to place the source or destination end in the STANDALONE process to prevent the migration failure caused by the conflict.
EMBEDDED
Use Cluster Config
You can use the cluster configuration to simplify parameter settings for the Hadoop connection.
Disabled
Creating a Sample Job
- In the Operation column, click Job Management.
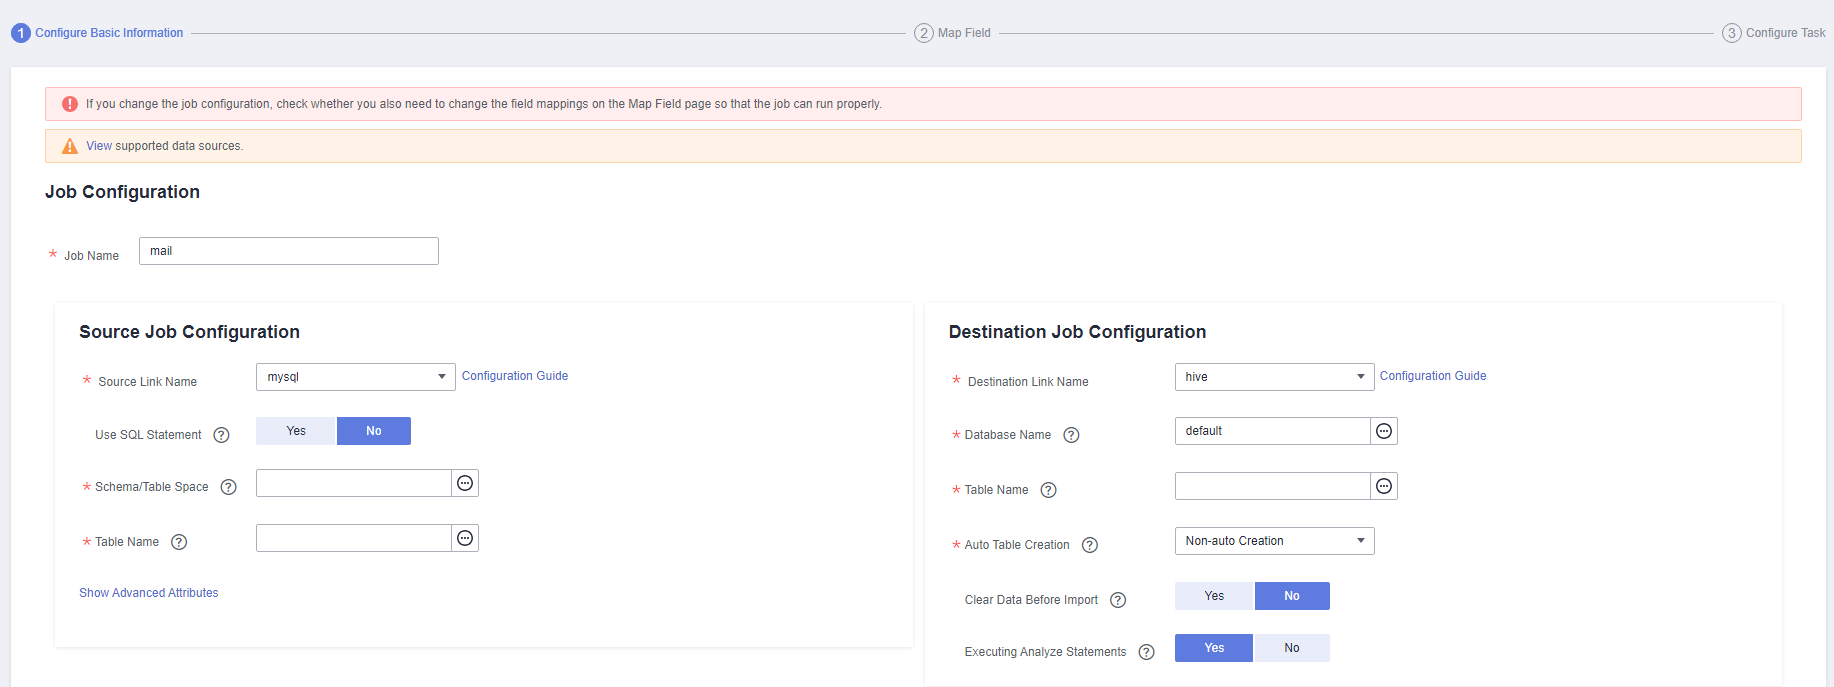
- Click the Table/File Migration tab and then Create Job to create a job for migrating data from the first MySQL subtable mail001 to the MRS Hive table mail. Figure 1 Creating a job
 Figure 2 Configuring basic information
- After the sample job is created, view and copy the job JSON for subsequent configuration of data development jobs. Figure 3 Viewing job JSON
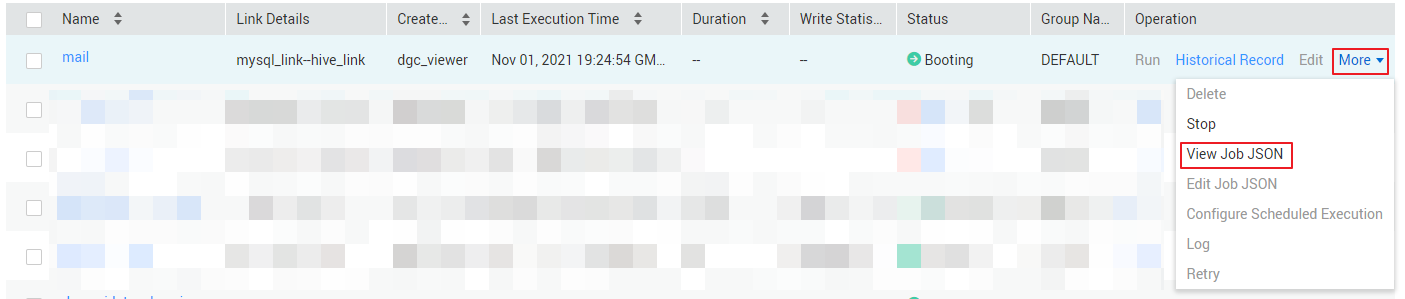 Figure 4 Copying job parameters
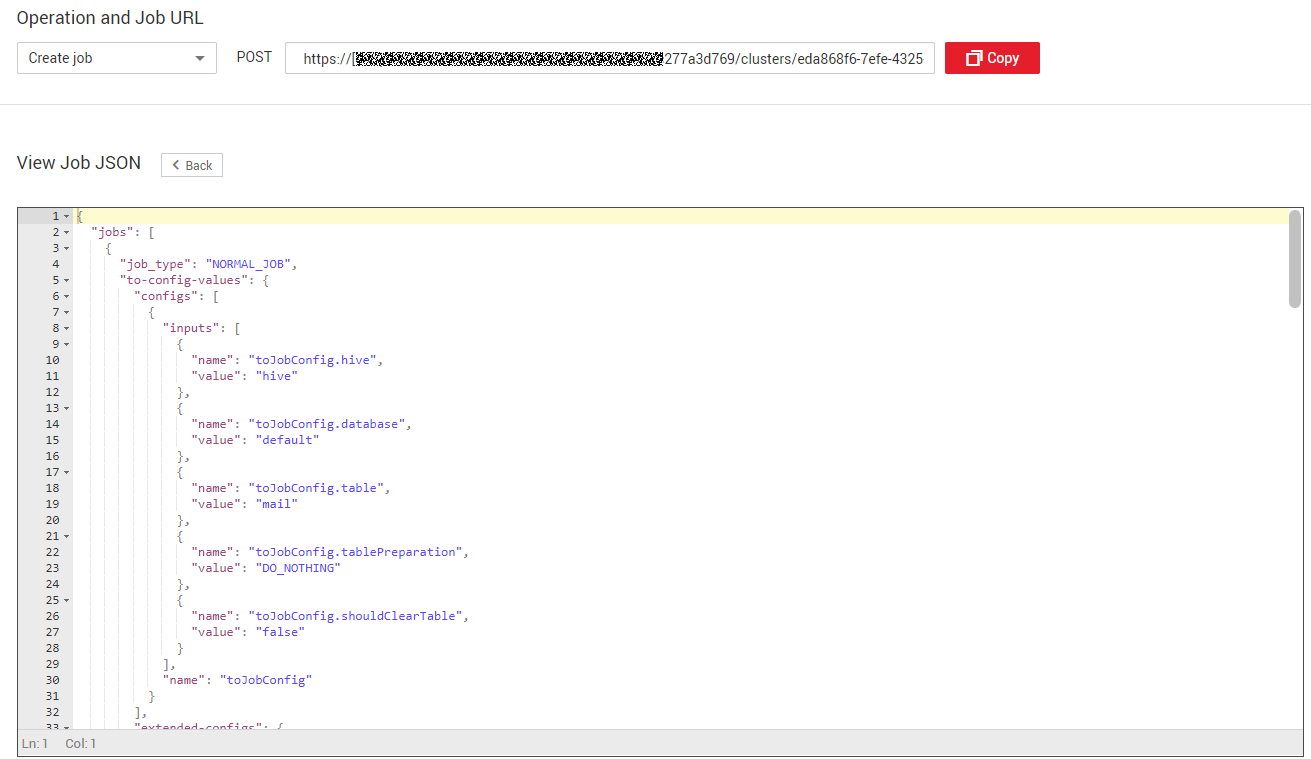
Creating a Data Development Job
- Locate a workspace and click DataArts Factory.
- Create a subjob named table, select the CDM node, select New jobs for Job Type in Properties, and copy and paste the JSON file in Step 2 to the CDM Job Message Body. Figure 5 Configuring the CDM job message body

- Edit the CDM job message body.
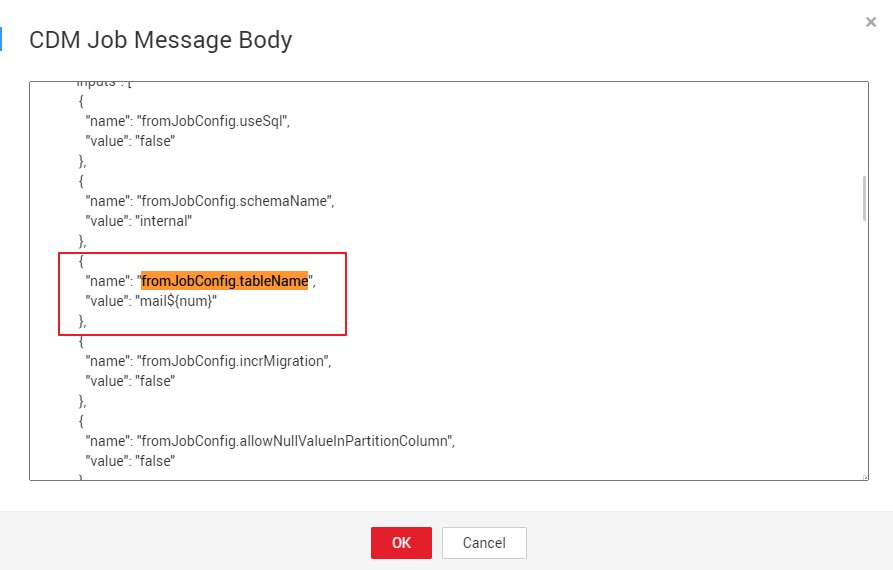
- Since there are three source tables mail001, mail002, and mail003, you need to set fromJobConfig.tableName to mail${num} in the JSON file of the job. The following figure shows the parameters for creating a main job. Figure 6 Editing JSON
- The name of each data migration job must be unique. Therefore, you need to change the value of name in the JSON file to mail${num} to create multiple CDM jobs. The following figure shows the parameters for creating a main job.

To create a sharding job, you can change the source link in the job JSON file to a variable that can be easily replaced.
Figure 7 Editing JSON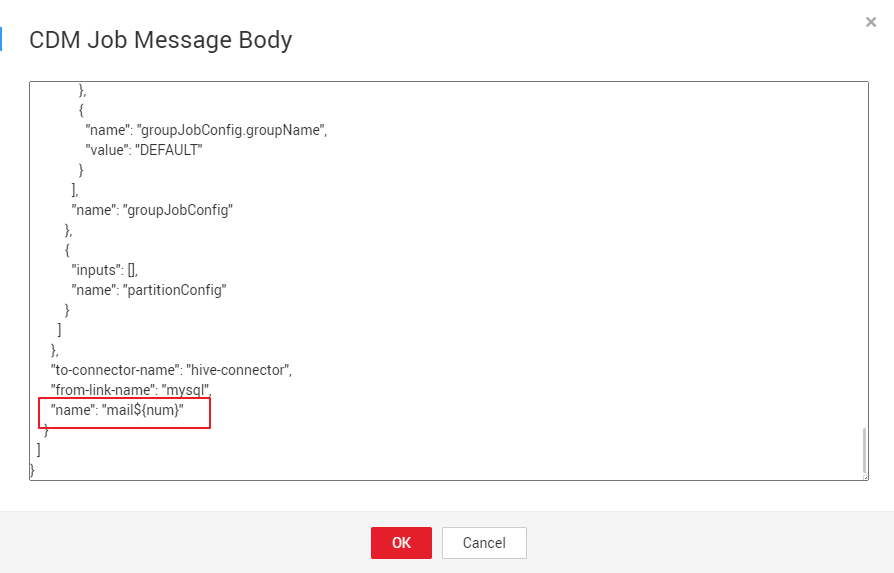
- Since there are three source tables mail001, mail002, and mail003, you need to set fromJobConfig.tableName to mail${num} in the JSON file of the job. The following figure shows the parameters for creating a main job.
- Add the num parameter, which is invoked in the job JSON file. The following figure shows the parameters for creating a main job. Figure 8 Adding job parameter num
Click Save and Submit to save the subjobs.
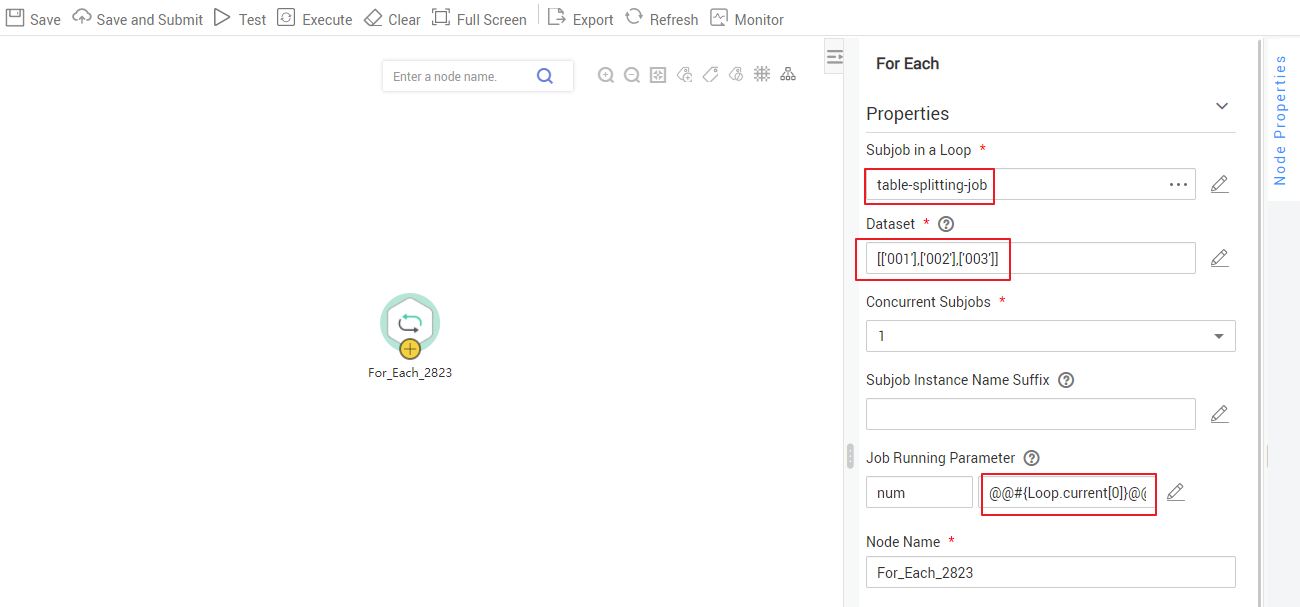
- Create the main job integration_management. Select the For Each node that executes the subjobs in a loop and transfers parameters 001, 002, and 003 to the subjobs to generate different table extraction tasks. The key configurations are as follows:
- Subjob in a Loop: Select table.
- Dataset: Enter [['001'],['002'],['003']].
- Subjob Parameter Name: Enter @@#{Loop.current[0]}@@.
Add @@ to the EL expression of the subjob parameter. If @@ is not added, dataset 001 will be identified as 1. As a result, the source table name does not exist.
The following figure shows the parameters for creating a main job.
Figure 9 Configure key parameters
Click Save and Submit to save the main job.
- After the main job and subjobs are created, test and run the main job to check whether it is successfully created. If the job is successfully executed, the CDM subjobs are successfully created and executed. Figure 10 Viewing the job creation status

Important Notes
- Some attributes, such as fromJobConfig.BatchJob, may not be supported in some CDM versions. If an error is reported during task creation, you need to delete the attribute from the request body. The following figure shows the parameters for creating a main job. Figure 11 Modifying an attribute

- If a CDM node is configured to create a job, the node checks whether a CDM job with the same name is running.
- If the CDM job is not running, update the job with the same name based on the request body.
- If a CDM job with the same name is running, wait until the job is run. During this period, the CDM job may be started by other tasks. As a result, the extracted data may not be the same as expected (for example, the job configuration is not updated, or the macro of the running time is not correctly replaced). Therefore, do not start or create multiple jobs with the same name.
Feedback
Was this page helpful?
Provide feedbackThank you very much for your feedback. We will continue working to improve the documentation.


