
Creating a Backup Using OBS Buckets
Supported Source and Destination Databases
| Source DB | Destination DB |
|---|---|
| On-premises and other cloud's Microsoft SQL Server backup file versions:
| RDS for SQL Server
NOTE:
|
Prerequisites
- You have logged in to the DRS console.
- Your account balance is greater than or equal to $0 USD.
- For details about the supported DB types and versions, see Supported Databases.
- If a subaccount is used to create a DRS task, ensure that an agency has been added. To create an agency, see Agency Management.
Before Backing Up File
Learn the backup migration constraints before starting a migration task.
| Scenario | Preparations |
|---|---|
| OBS bucket |
NOTE:
|
Precautions
This section describes constraints on backup migrations of Microsoft SQL Server databases.
| Type | Restrictions |
|---|---|
| Database permissions | Before creating a backup migration task, ensure that the current account has the OBS and bucket permissions. |
| Backup database names |
|
| New database name |
|
| Local backup files |
|
| Backup file sources |
|
| Precautions |
|
Procedure
This section describes how to create a backup migration task using the backup stored in the OBS bucket on the DRS console.
- On the Backup Migration Management page, click Create Migration Task.
- On the Select Backup page, specify information about the task and backup files. Then, click Next.
Table 4 Task information Parameter
Description
Region
The region where your service is running. You can change the region. To reduce latency and improve access speed, select the region closest to your services.
Task Name
The task name must start with a letter and consist of 4 to 50 characters. It can contain only letters, digits, hyphens (-), and underscores (_).
Description
The description can contain up to 256 characters and cannot contain special characters !=<>&'\"
Figure 1 Backup file information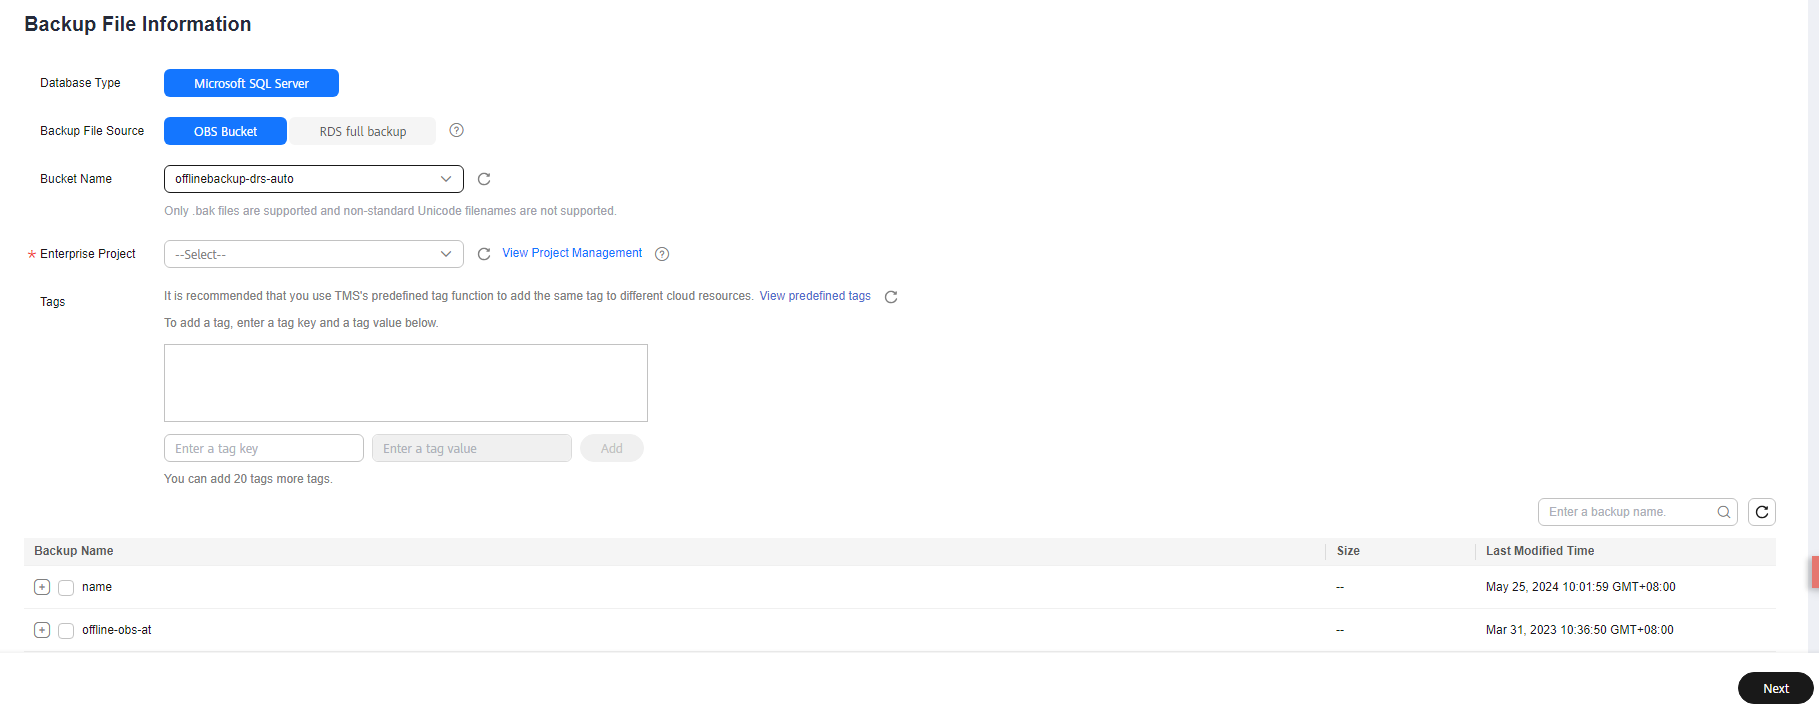
Table 5 Backup file information Parameter
Description
Database Type
Database type of the backup file. Select Microsoft SQL Server.
Backup File Source
Select OBS Bucket.
Bucket Name
Select a bucket and a backup file stored in the directory of the bucket.
NOTE:- The backup file of the Microsoft SQL Server must be named in the .bak format in the OBS bucket directory. Multiple backup files can be selected at the same time.
- A database cannot be split into different files for upload.
- The bucket name, backup file name, or path cannot contain Chinese characters or spaces.
Enterprise Project
An enterprise project you would like to use to centrally manage your cloud resources and members. Select an enterprise project from the drop-down list. The default project is default.
To customize an enterprise project, click Enterprise in the upper right corner of the console. The Enterprise Project Management Service page is displayed. For details, see Creating an Enterprise Project in Enterprise Management User Guide.
Tags
- Tags a task. This configuration is optional. Adding tags helps you better identify and manage your tasks. Each task can have up to 20 tags.
- After a task is created, you can view its tag details on the Tags tab. For details, see Tag Management.
- On the Select Destination page, specify database information and click Next. Figure 2 Microsoft SQL Server database information
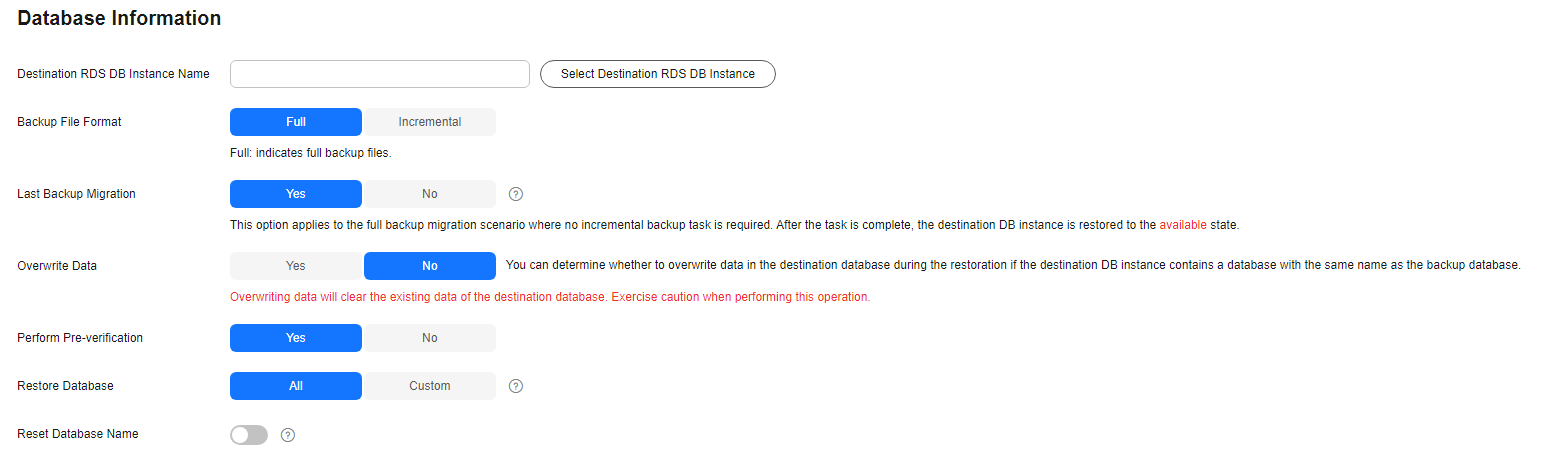
Table 6 Microsoft SQL Server database information Parameter
Description
Destination RDS DB Instance Name
Select a destination RDS DB instance.
Backup File Format
Select Full or Incremental.
- Full: indicates full backup files.
- Incremental: indicates log backup files. NOTE:
- Before performing an incremental restoration, you need to perform a full restoration.
- To migrate databases at a time, you need to stop services first and upload full backups for restoration.
- To ensure service continuity during a migration, perform a full backup and multiple incremental backups, and then upload the backup data to OBS for restoration.
Last Backup
A complete restoration involves restoring several incremental backup files. The destination DB instance cannot be modified while it is being restored. It will not be available until the last backup file is restored. If you select Yes and restore the instance, any incremental restoration will not be performed. You can select the last backup in the following scenarios:
- Perform a one-time full migration.
- The selected backup file is the last one to be restored.
- Select No for the full+incremental backup migration scenario where you continue to restore databases using incremental backup files after a full backup restoration is performed. During this period, the destination DB instance is being restored and in the unavailable state.
Overwrite Data
You can determine whether to overwrite data in the destination database during the restoration if the destination DB instance contains a database with the same name as the backup database. Exercise caution when performing this operation.
NOTE:If you select this option, the destination databases with the same names as the backup databases will be overwritten. Exercise caution when performing this operation.
Perform Pre-verification
Specifies whether to perform pre-verification on the backup migration task. The default value is Yes.
- Yes: To ensure successful migration and identify potential problems in advance, verify the validity, integrity, continuity, and version compatibility of backup files before restoration.
- No: If pre-verification is not performed, the migration speed is faster, but you need to check the validity, integrity, continuity, and version compatibility of backup files on your own.
Restore Database
You can restore all or part of databases. All of databases are restored by default.
- All: Restore all databases from the backup file. You do not need to enter the name of the database to be restored.
- Custom: Restore specified databases from the backup file. You need to enter the names of the databases to be restored. The databases to be restored must be consistent with those for which the full or incremental backups are created.
Reset Database Name
If Restore Database is set to All, you can reset database names. If you enable Reset Database Name, the original database names in the backup file will be reset to new database names.
Constraint:
- The backup file contains only one database.
- The backup file is a full backup file and is the last backup file. Select Full for Backup File and Yes for Last Backup Type.
NOTE:The database name can be reset only when Backup Type is set to Full and Restore Database is set to All.
Backup Database Name
If Restore Database is set to Custom, you need to specify Backup Database Name.
The backup database name must be the same as that in the backup file and consist of 1 to 64 characters. It can contain only letters (case-sensitive), digits, hyphens (-), underscores (_), and periods (.).
DRS also allows you to create an alias for the database to be restored.
- If you choose to restore databases in full backup mode, you can set the alias of the database based on the site requirements. The alias is also stored in the destination database.
- If databases are restored in incremental backup mode, alias is not supported.
NOTE:The backup database can be renamed. Up to 100 backup databases can be created.
- On the Confirm Task page, check configuration details, read and agree to the agreement, and click Next.

If the SQL Server source contains non-clustered index tables, the index information of non-clustered index tables will become invalid after the SQL Server backups are restored to a new database. For the best performance, rebuild the indexes after the backup migration. In addition, the backup files store only database-level information. If the SQL Server source contains some instance-level configurations, such as login, permission, DBlink, and job, migrate these configurations by referring to Best Practices.
- In the task list on the Backup Migration Management page, check whether the task is in the Restoring status. If the migration is successful, the task status becomes Successful.
Feedback
Was this page helpful?
Provide feedbackThank you very much for your feedback. We will continue working to improve the documentation.


