# 业务用户登录页前台开发实施步骤
业务用户在前台登录时,需要先在线下开发一个登录组件,上传到高级页面,并在高级页面中配置组件桥接器中的数据。最后在页面中,输入登录账号密码,通过调用"用户登录服务编排",实现"业务用户"页面登录功能。
本文以"A"应用为例,介绍如何开发登录页面,具体流程如[图1]所示。
图1应用登录页面开发流程

除了自定义登录组件外,您还可以直接使用高级页面预置的登录组件,快速实现登录功能的配置。更多关于登录组件的介绍,请参见[设置华为云Astro轻应用高级页面登录组件属性](https://support.huaweicloud.com/usermanual-astrozero/astrozero_05_9001.html)。
#### 步骤一:开发自定义组件
本示例中,提供了一个已开发好的自定义登录组件userLogin,单击[userLogin.zip](https://obs-for-bj4-gongyouyun-update.obs.cn-north-4.myhuaweicloud.com/obs/deploy/userLoginVue3.zip)可直接下载使用。如果想要了解自定义登录组件的开发方法,可参考本步骤执行。
1. 在华为云Astro轻应用服务控制台的主页中,单击"进入首页",进入应用开发页面。
2. 单击,选择"环境管理 \> 环境配置",进入环境配置。
3. 在主菜单中,选择"维护"。
4. 在左侧导航栏中,选择"全局元素 \> 页面资产管理 \> 组件模板"。
5. 在组件模板列表中,单击"widgetVue3Template",进入模板详情页。
6. 单击"下载",设置组件的名称为"userLogin",单击"保存",将模板下载到本地。
图2保存模板

7. 查看解压后的组件目录。
图3解压后目录

- userLogin.js:存放vue业务逻辑的代码。
- userLogin.ftl:存放html代码。
- userLogin.css:存放样式代码。
- userLogin.editor.js、packageinfo.json:配置文件。
8. 在解压后的文件夹中,创建一个imgs文件夹,并放入一个登录页面的背景图片。
假设放入的背景图片名称为"imagebg.jpg"。
9. 在本地编辑器中打开文件夹,把userLogin.editor.js文件中的propertiesConfig代码改为如下代码,用于配置桥接器。
```
propertiesConfig: [
{
headerTitle: 'Parameters',
accordion: true,
accordionState: 'open',
config: [
{
type: 'text',
name: 'loginAPI',
label: 'login API',
value: '',
},
],
},
{
config: [
{
type: 'connectorV2',
name: 'FlowConnector',
label: 'Flow Connector',
model: 'ViewModel',
},
{
type: 'connectorV2',
name: 'common.GetConnector',
label: 'View API Get Connector',
model: 'ViewModel',
},
{
type: 'connectorV2',
name: 'common.PostConnector',
label: 'View API Post Connector',
model: 'ViewModel',
},
{
type: 'connectorV2',
name: 'common.PutConnector',
label: 'View API Put Connector',
model: 'ViewModel',
},
{
type: 'connectorV2',
name: 'common.DeleteConnector',
label: 'View API Delete Connector',
model: 'ViewModel',
},
],
},
],
```
10. 把packageinfo.json文件中加入如下**加粗内容** 。
```
{
"widgetApi": [
{
"name": "userLogin"
}
],
"widgetDescription": "",
"authorName": "",
"localFileBasePath": "",
"requires": [
{
"name": "global_Vue3",
"version": "3.3.4"
},
{
"name": "global_ElementPlus",
"version": "2.6.0"
},
{
"name": "global_Vue3I18n",
"version": "9.10.1"
},
{
"name": "global_Vue3Router",
"version": "4.3.0"
}
]
}
```
11. 将userLogin.ftl文件中的内容,替换为如下代码。
```
```
12. 将userLogin.js文件内容,替换为如下代码。
```
userLogin = StudioWidgetWrapper.extend({
init: function () {
var thisObj = this
thisObj._super.apply(thisObj, arguments)
thisObj.render()
thisObj.initBusi()
if (typeof Studio != 'undefined' && Studio) {
Studio.registerEvents(thisObj, 'goHomepage', 'go Homepage', [])
}
},
render: function () {
var thisObj = this
let tenantId;
if (Studio.inReader) {
tenantId = STUDIO_DATA.catalogProperties["tenant-id"].value
} else {
tenantId = magno.pageService.getCatalogProperties()["tenant-id"].value
}
HttpUtils.setCookie("tenant-id", tenantId)
HttpUtils.setCookie("locale","zh_CN");
var elem = thisObj.getContainer()
if (elem) {
var containerDiv = $('.scfClientRenderedContainer', elem)
if (containerDiv.length) {
$(containerDiv).empty()
} else {
containerDiv = document.createElement('div')
containerDiv.className = 'scfClientRenderedContainer'
$(elem).append(containerDiv)
}
}
thisObj.sksBindItemEvent()
$(window).resize(function () {
thisObj.sksRefreshEvents()
})
},
initBusi: function () {
var thisObj = this
var widgetProperties = thisObj.getProperties()
var BasePath = thisObj.getWidgetBasePath() // 本地路径
var elem = thisObj.getContainer()
const app = Vue.createApp({
data(){
return {
BasePath: BasePath,
imgCode: '',
account: '',
password: '',
inputImgCode: '',
errorDesc: '',
needRead: false,
backgroundClass: 'backgroundClass',
needVerify: false,
accountName: '',
isMobile: false,
}
},
created() {
this.getVerifyCode()
this.checkIsLogin()
this.isMobile = /Android|webOS|iPhone|iPad|BlackBerry/i.test(
navigator.userAgent
)
},
watch: {
account(newVal, oldVal) {
if (newVal !== oldVal) {
this.password = ''
}
},
},
methods: {
checkIsLogin() {
const userInfo = JSON.parse(
window.sessionStorage.getItem('userInfo')
)
if (userInfo !== null && userInfo.username) {
setTimeout(() => {
thisObj.triggerEvent('goHomepage', {})
}, 1000)
}
},
shouldShowImgCode() {
connService(
thisObj,
`${ds_baseUrl}/identities/isNeedCaptcha`,
{
username: this.account,
},
'common.PostConnector'
)
.then((res) => {
const { data = [], resp = {} } = res
if (resp.code !== '0') {
this.$message.error(resp.message)
}
if (data && data.length) {
this.needVerify = data[0].needVerify
if (!this.needVerify) {
this.confirmLogin()
}
}
})
.catch((e) => {
this.$message.error(e.response.resMsg)
})
},
// 登录按钮
validateBeforeSubmit() {
if (!this.password) {
this.errorDesc = '请输入密码。'
this.needVerify = true
return false
}
if (!this.account) {
this.errorDesc = '请输入用户名。'
this.needVerify = true
return false
}
if (!this.inputImgCode && this.needVerify) {
this.errorDesc = '验证码错误。'
return false
}
if (this.needVerify && this.inputImgCode) {
this.confirmLogin()
return
}
this.confirmLogin()
},
// 调登录接口
confirmLogin() {
var request = {
username: this.account,
password: this.password,
captcha: this.inputImgCode,
}
//
this.callFlowConn1(
widgetProperties.loginAPI,
request,
this.callLogin,
this.loginFail,
'post'
)
},
// 登录接口成功函数
callLogin(response) {
if (response) {
this.errorDesc = ''
let userInfo = {
username: response.data[0].username,
userId: response.data[0].userId,
profile: response.data[0].profile,
}
HttpUtils.setCookie('isLogged', true)
window.sessionStorage.setItem(
'userInfo',
JSON.stringify(userInfo)
)
thisObj.triggerEvent('goHomepage', {})
}
},
// 登录失败resMsg
loginFail(data){
this.errorDesc = data.response.resMsg
this.getVerifyCode()
this.needVerify = true
},
// 获取验证码
getVerifyCode() {
this.imgCode =
'/u-route/baas/sys/v1.0/verificationcode?type=login&t=' +
Date.parse(new Date())
},
// 封装flow调用后台
callFlowConn1: function (service, param, callbackFunc,callbackfail, method) {
var thisView = this
let mMethod
switch (method) {
case 'get':
mMethod = 'common.GetConnector'
break
case 'post':
mMethod = 'common.PostConnector'
break
case 'put':
mMethod = 'common.PutConnector'
break
default:
mMethod = 'common.FlowConnector'
break
}
var connector = thisObj.getConnectorInstanceByName(mMethod)
if (connector) {
connector.setInputParams({
service: service,
needSchema: 'data',
async: false,
})
connector
.query(param) // 调用接口,以param为入参
.done(function (response) {
if (response.resp && response.resp.code) {
callbackFunc.call(thisView, response)
}
})
.fail(function (response) {
// 代表接口执行失败
callbackfail.call(thisView, response)
})
}
},
},
})
app.use(ElementPlus);
thisObj.vm = app.mount($("#userLogin", elem)[0]);
},
})
```
13. 将userLogin.css文件内容,替换为如下代码。
需要注意的是,"background"的取值需要和[8]中创建的文件夹和图片名称保持一致。
```
.page-login {
/* 使用webkit内核的浏览器 */
/* Firefox版本4-18 */
/* Firefox版本19+ */
}
.page-login * {
box-sizing: border-box;
}
.page-login .flex {
display: flex;
}
.page-login .login_tip {
font-size: 12px;
color: #167aeb;
}
.page-login .bg-box {
position: relative;
display: flex;
justify-content: center;
width: 100%;
height: 100%;
background: url('imgs/imagebg.jpg') no-repeat 50%;
background-size: cover;
}
.page-login .bg-box > img {
width: 100%;
}
@media (min-width: 767px) {
.page-login .bg-box .login-box {
position: absolute;
right: 18%;
top: 26%;
padding: 30px 30px 20px 30px;
width: 380px;
background: #fff;
border-radius: 10px;
box-shadow: 0 8px 16px 0 rgba(0, 0, 0, 0.1);
}
.page-login .bg-box .login-box .login-title {
font-size: 24px;
color: #333;
text-align: center;
}
.page-login .bg-box .login-box .login-form {
padding-top: 20px;
}
.page-login .bg-box .login-box .login-form .error-line {
display: flex;
align-items: center;
background: #ffebeb;
color: #e4393c;
border: 1px solid #faccc6;
padding: 3px 10px 3px 10px;
height: auto;
text-align: left;
font-size: 12px;
}
.page-login .bg-box .login-box .login-form .error-line .error-text {
padding-left: 5px;
}
.page-login .bg-box .login-box .login-form .error-line .error-text .change_tab {
color: #167aeb;
cursor: pointer;
}
.page-login .bg-box .login-box .login-form .login-item {
display: flex;
align-items: center;
margin-top: 20px;
}
.page-login .bg-box .login-box .login-form .login-item .el-input__inner {
height: 36px;
}
.page-login .bg-box .login-box .login-form .login-item > input {
flex: 1;
padding: 5px 10px;
height: 36px;
border-radius: 3px;
border: 1px solid #ddd;
}
.page-login .bg-box .login-box .login-form .login-item .verify-code {
height: 36px;
margin-left: 5px;
}
.page-login .bg-box .login-box .login-form .login-item .verify-code img {
height: 100%;
}
.page-login .bg-box .login-box .login-form .login-item .el-checkbox {
margin-right: 10px;
}
.page-login .bg-box .login-box .login-form .login-item .read-text {
font-size: 12px;
color: #333;
}
.page-login .bg-box .login-box .login-form .login-item .read-text .clickable {
color: #167aeb;
cursor: pointer;
}
.page-login .bg-box .login-box .login-form .login-item .read-text .clickable:hover {
text-decoration: underline;
}
.page-login .bg-box .login-box .login-form .mg-top10 {
margin-top: 10px;
}
.page-login .bg-box .login-box .login-button {
margin-top: 20px;
height: 40px;
line-height: 40px;
border-radius: 3px;
background: #3d88ff;
text-align: center;
color: #fff;
font-size: 14px;
cursor: pointer;
}
.page-login .bg-box .login-box .login-button:hover {
opacity: 0.8;
}
.page-login .bg-box .login-box .divide-line {
margin-top: 20px;
height: 1px;
background: #eee;
opacity: 0.8;
}
.page-login .bg-box .login-box .login-bottom {
margin-top: 20px;
justify-content: center;
align-items: center;
}
.page-login .bg-box .login-box .login-bottom .bottom-text {
font-size: 12px;
color: #999;
}
.page-login .bg-box .login-box .login-bottom .type-item {
margin-left: 10px;
width: 30px;
height: 23px;
cursor: pointer;
}
.page-login .bg-box .login-box .login-bottom .type-item img {
width: 100%;
}
}
@media (max-width: 767px) {
.page-login .bg-box .login-box {
position: absolute;
right: auto;
top: 26%;
padding: 30px 30px 20px 30px;
width: 380px;
background: #fff;
border-radius: 10px;
box-shadow: 0 8px 16px 0 rgba(0, 0, 0, 0.1);
}
.page-login .bg-box .login-box .login-title {
font-size: 24px;
color: #333;
text-align: center;
}
.page-login .bg-box .login-box .login-form {
padding-top: 20px;
}
.page-login .bg-box .login-box .login-form .error-line {
display: flex;
align-items: center;
background: #ffebeb;
color: #e4393c;
border: 1px solid #faccc6;
padding: 3px 10px 3px 10px;
height: auto;
text-align: left;
font-size: 12px;
}
.page-login .bg-box .login-box .login-form .error-line .error-text {
padding-left: 5px;
}
.page-login .bg-box .login-box .login-form .error-line .error-text .change_tab {
color: #167aeb;
cursor: pointer;
}
.page-login .bg-box .login-box .login-form .login-item {
display: flex;
align-items: center;
margin-top: 20px;
}
.page-login .bg-box .login-box .login-form .login-item .el-input__inner {
height: 36px;
}
.page-login .bg-box .login-box .login-form .login-item > input {
flex: 1;
padding: 5px 10px;
height: 36px;
border-radius: 3px;
border: 1px solid #ddd;
}
.page-login .bg-box .login-box .login-form .login-item .verify-code {
height: 36px;
margin-left: 5px;
}
.page-login .bg-box .login-box .login-form .login-item .verify-code img {
height: 100%;
}
.page-login .bg-box .login-box .login-form .login-item .el-checkbox {
margin-right: 10px;
}
.page-login .bg-box .login-box .login-form .login-item .read-text {
font-size: 12px;
color: #333;
}
.page-login .bg-box .login-box .login-form .login-item .read-text .clickable {
color: #167aeb;
cursor: pointer;
}
.page-login .bg-box .login-box .login-form .login-item .read-text .clickable:hover {
text-decoration: underline;
}
.page-login .bg-box .login-box .login-form .mg-top10 {
margin-top: 10px;
}
.page-login .bg-box .login-box .login-button {
margin-top: 20px;
height: 40px;
line-height: 40px;
border-radius: 3px;
background: #3d88ff;
text-align: center;
color: #fff;
font-size: 14px;
cursor: pointer;
}
.page-login .bg-box .login-box .login-button:hover {
opacity: 0.8;
}
.page-login .bg-box .login-box .divide-line {
margin-top: 20px;
height: 1px;
background: #eee;
opacity: 0.8;
}
.page-login .bg-box .login-box .login-bottom {
margin-top: 20px;
justify-content: center;
align-items: center;
}
.page-login .bg-box .login-box .login-bottom .bottom-text {
font-size: 12px;
color: #999;
}
.page-login .bg-box .login-box .login-bottom .type-item {
margin-left: 10px;
width: 30px;
height: 23px;
cursor: pointer;
}
.page-login .bg-box .login-box .login-bottom .type-item img {
width: 100%;
}
}
.page-login ::-webkit-input-placeholder {
font-size: 12px;
color: #aaa;
}
.page-login :-moz-placeholder {
font-size: 12px;
color: #aaa;
}
.page-login ::-moz-placeholder {
font-size: 12px;
color: #aaa;
}
.page-login :-ms-input-placeholder {
font-size: 12px;
color: #aaa;
}
.page-login .logining-text {
margin-top: 120px;
text-align: center;
font-size: 30px;
color: #333;
}
```
14. 将修改后的配置文件和自定义开发的文件,压缩成一个zip包,包名为userLogin.zip。
#### 步骤二:上传自定义登录组件
自定义组件开发完成后,需要上传到华为云Astro轻应用组件库中,供高级页面使用。
1. 在华为云Astro轻应用环境配置页面,单击主菜单中的"维护"。
2. 在左侧导航栏中,选择"全局元素 \> 页面资产管理 \> 组件"。
3. 单击"提交新组件",进入提交新组件页面。
4. 单击"上传",上传自定义组件包"userLogin.zip"。
图4上传自定义组件
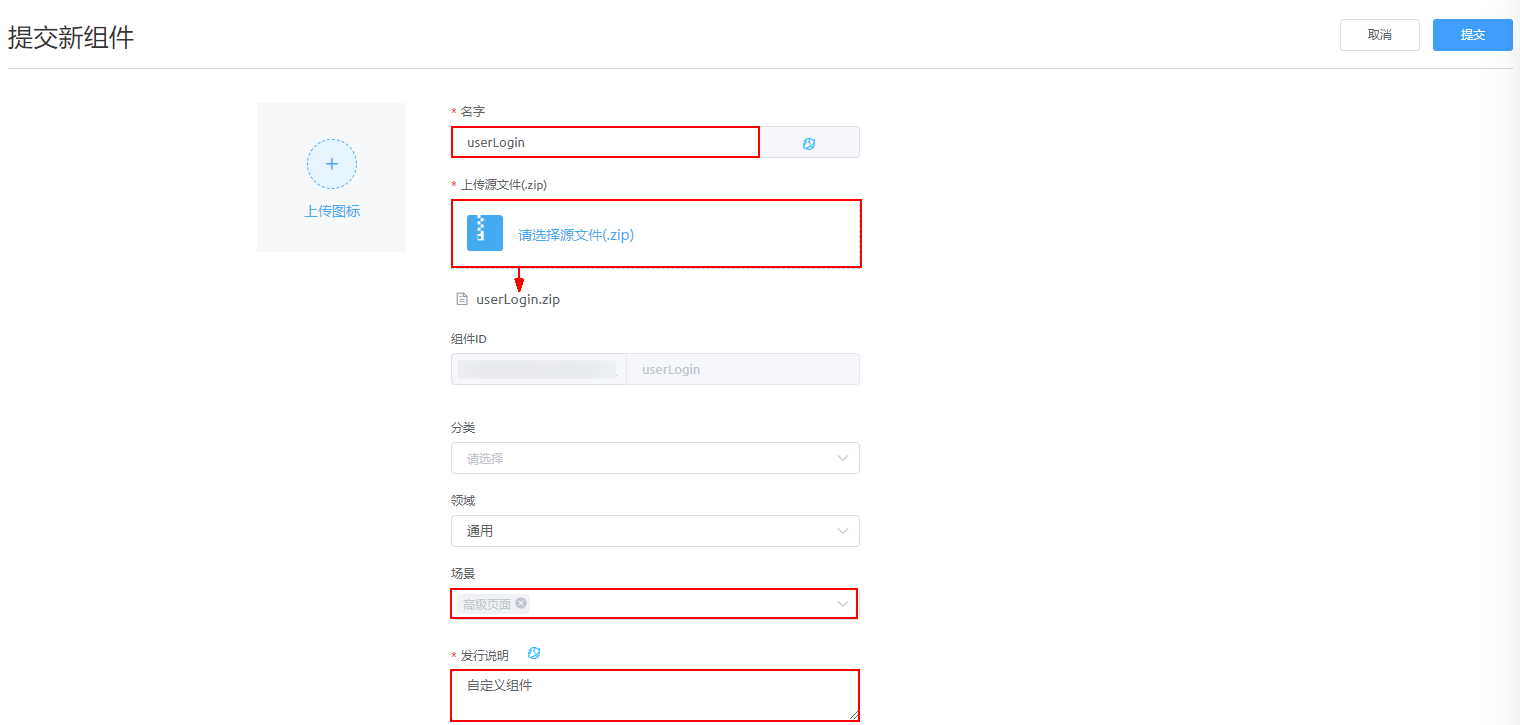
表1上传组件参数说明
| 参数 | 说明 | 示例 |
|:---|:---|:---|
| 名字 | 新提交组件的名称,系统会根据组件包名称自动填充。 | userLogin |
| 上传源文件 | 组件的源文件包。 | 选择[步骤一:开发自定义组件]中的自定义组件登录包 |
| 场景 | 选择组件包的应用场景,可同时勾选多项,勾选后,在相应类型页面开发中,才可使用该组件。 | 高级页面 |
| 发行说明 | 组件的描述信息,需要配置不同语种下的描述信息。 此处配置的信息,将会在组件详情页的"概况"页签中进行展示。 | 自定义组件 |
5. 参数设置完成后,单击"提交",完成组件的上传。
#### 步骤三:创建高级页面
"业务用户登录"页面是一个高级页面,主要是通过引用上传的自定义登录组件,再配置相关参数,来实现登录功能。
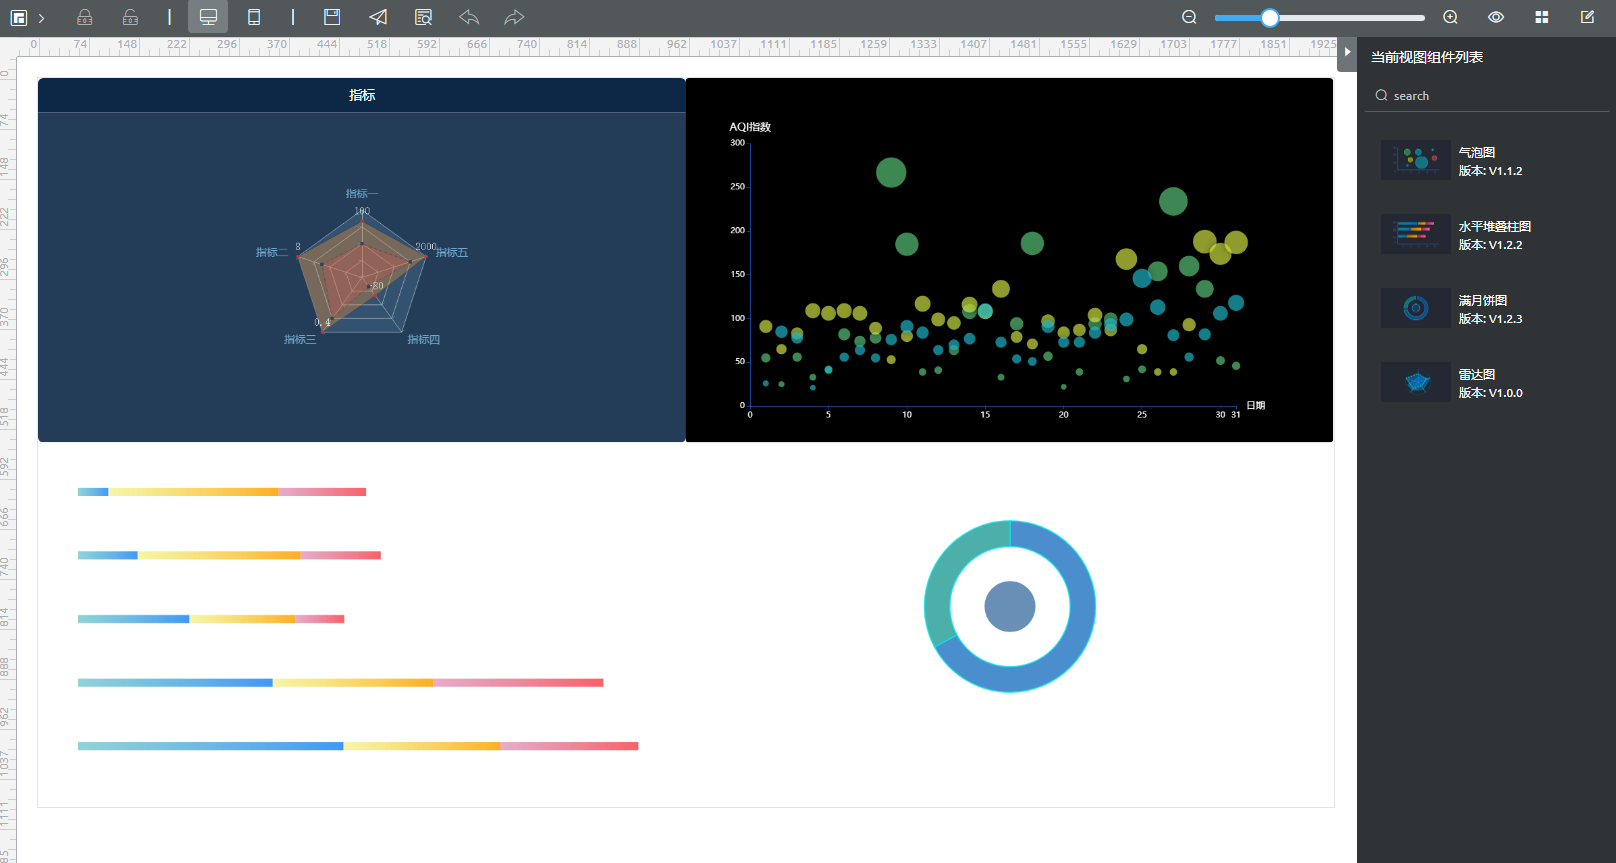
在组装业务用户登录页面时,需要配置从登录页面登录成功后跳转的页面,所以需要提前创建一个高级页面。在本示例中,假设已创建了一个Home页面。Home页面中没有实际数据,在Home页面中拖拽了几个图表组件,然后保存发布成样例页面。在实际开发过程中,可以根据业务需要,选择跳转到需要的页面,或者执行自定义的业务逻辑。
图5Home页面
1. 在华为云Astro轻应用服务控制台的主页中,单击"进入首页",进入应用开发页面。
2. 在"主页 \> 全部应用"中,单击应用"A"后的编辑,进入应用"A"的设计器。
3. 在左侧导航栏中,选择"界面"。
4. 单击高级页面后的"+",设置标签和名称为"Login",并选择"绝对布局",单击"添加"。
图6添加高级页面

#### 步骤四:拖拽组件开发登录页面
1. 在[步骤三:创建高级页面]中创建的高级页面中,单击左上角的,选择"全部",在"自定义"页签,拖拽"userLogin"组件到页面编辑区。
图7拖拽组件到编辑区

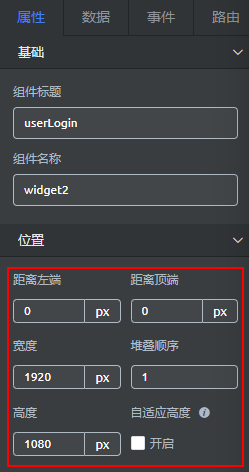
2. 设置自定义组件"userLogin"的位置属性。
1. 将"userLogin"组件拖拽到页面编辑区后,会在右侧显示该组件的属性配置面板。
2. 在"位置"中,设置"距离左端"、"距离顶端"为"0","宽度"为"1920","高度"为"1080"。
图8设置组件位置
3. 组件位置、样式等属性修改完成后,单击页面上方的,保存页面修改。
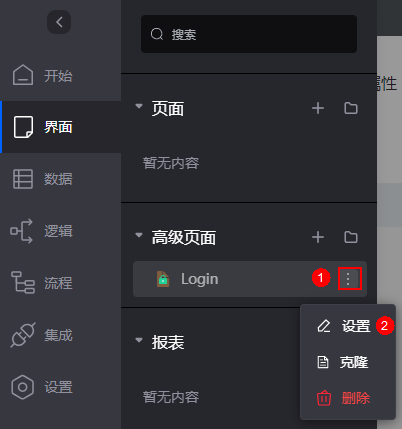
4. 在"界面 \> 高级页面"中,将鼠标放在"Login"上,单击,选择"设置"。
图9选择设置
5. 在页面设置中,选中拉伸属性,单击"保存"。
图10设置页面拉伸

3. 设置自定义组件的桥接器。
1. 选中"userLogin"组件,在"属性 \> Parameters"中,设置"login API"为"/*命名空间* __A/1.0.0/Flow_login"。
图11添加登录服务URL

"login API"为登录接口的URL后半段,"命名空间"请根据实际情况配置,"A"为应用名,登录接口是在[业务用户登录页后端逻辑开发实施步骤](https://support.huaweicloud.com/bestpractice-astrozero/astrozero_bestpractice_0049.html)中创建的。
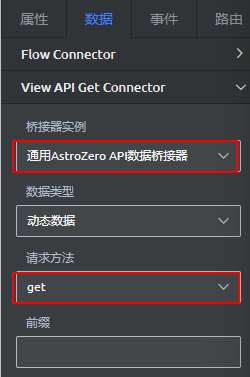
2. 在"数据"页签,单击"View API Get Connector",设置"桥接器实例"为"通用AstroZero API数据桥接器","数据类型"为"动态数据","请求方法"为"get",如下图所示。
图12设置桥接器
3. 参考上一步,分别设置下图中框选的桥接器实例。
图13设置其他桥接器
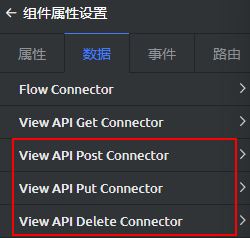
表2桥接器实例配置
| **数据名** | **桥接器实例** | **数据类型** | **Request Method** |
|:---|:---|:---|:---|
| View API Post Connector | 通用AstroZero API数据桥接器 | 动态数据 | Post |
| View API Put Connector | 通用AstroZero API数据桥接器 | 动态数据 | Put |
| View API Delete Connector | 通用AstroZero API数据桥接器 | 动态数据 | Delete |
4. 设置自定义组件"userLogin"的"事件",使自定义组件与其他页面关联。
图14需要配置的事件
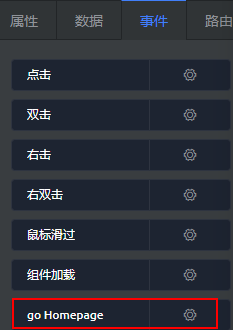
1. 单击"go Homepage"后的齿轮图标,进入事件编辑页面。
2. 单击"新建动作",选择"默认 \> 页面跳转",进入跳转编辑页面。
3. 选择需要跳转的页面,单击"确定"。
这里选择的高级页面是之前创建并发布的"Home",在实际开发过程中,可以根据业务需要,选择跳转到需要的页面,或者执行自定义的业务逻辑。
图15编辑页面跳转

5. 在上述步骤完成后,单击Login页面上方的,保存页面,再单击,发布页面。
6. 页面发布成功后,单击,即可预览发布的登录页面。
当前登录页中,输入业务用户账号及密码,单击"登录"的登录逻辑是通过"自定义登录"组件,调用用户登录服务编排完成的。
图16预览的登录页面

7. 在预览的登录页面中,输入配置了权限的业务用户的账号密码,单击登录后,如果页面跳转到"Home"页面,则业务用户登录成功。